

Collaborate on Fedi-hosting - looking for others to team up with
Amazon Simple Email Service free tier upcoming change notification
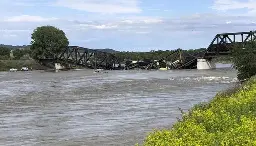
Freight train carrying hazardous materials plunge into Yellowstone River as bridge collapses
111 years after sinking, Titanic claims 5 more lives: OceanGate’s tourist sub ‘Titan’ implodes, debris found near the wreck of old ship
Nice initiative.