Do It Yourself
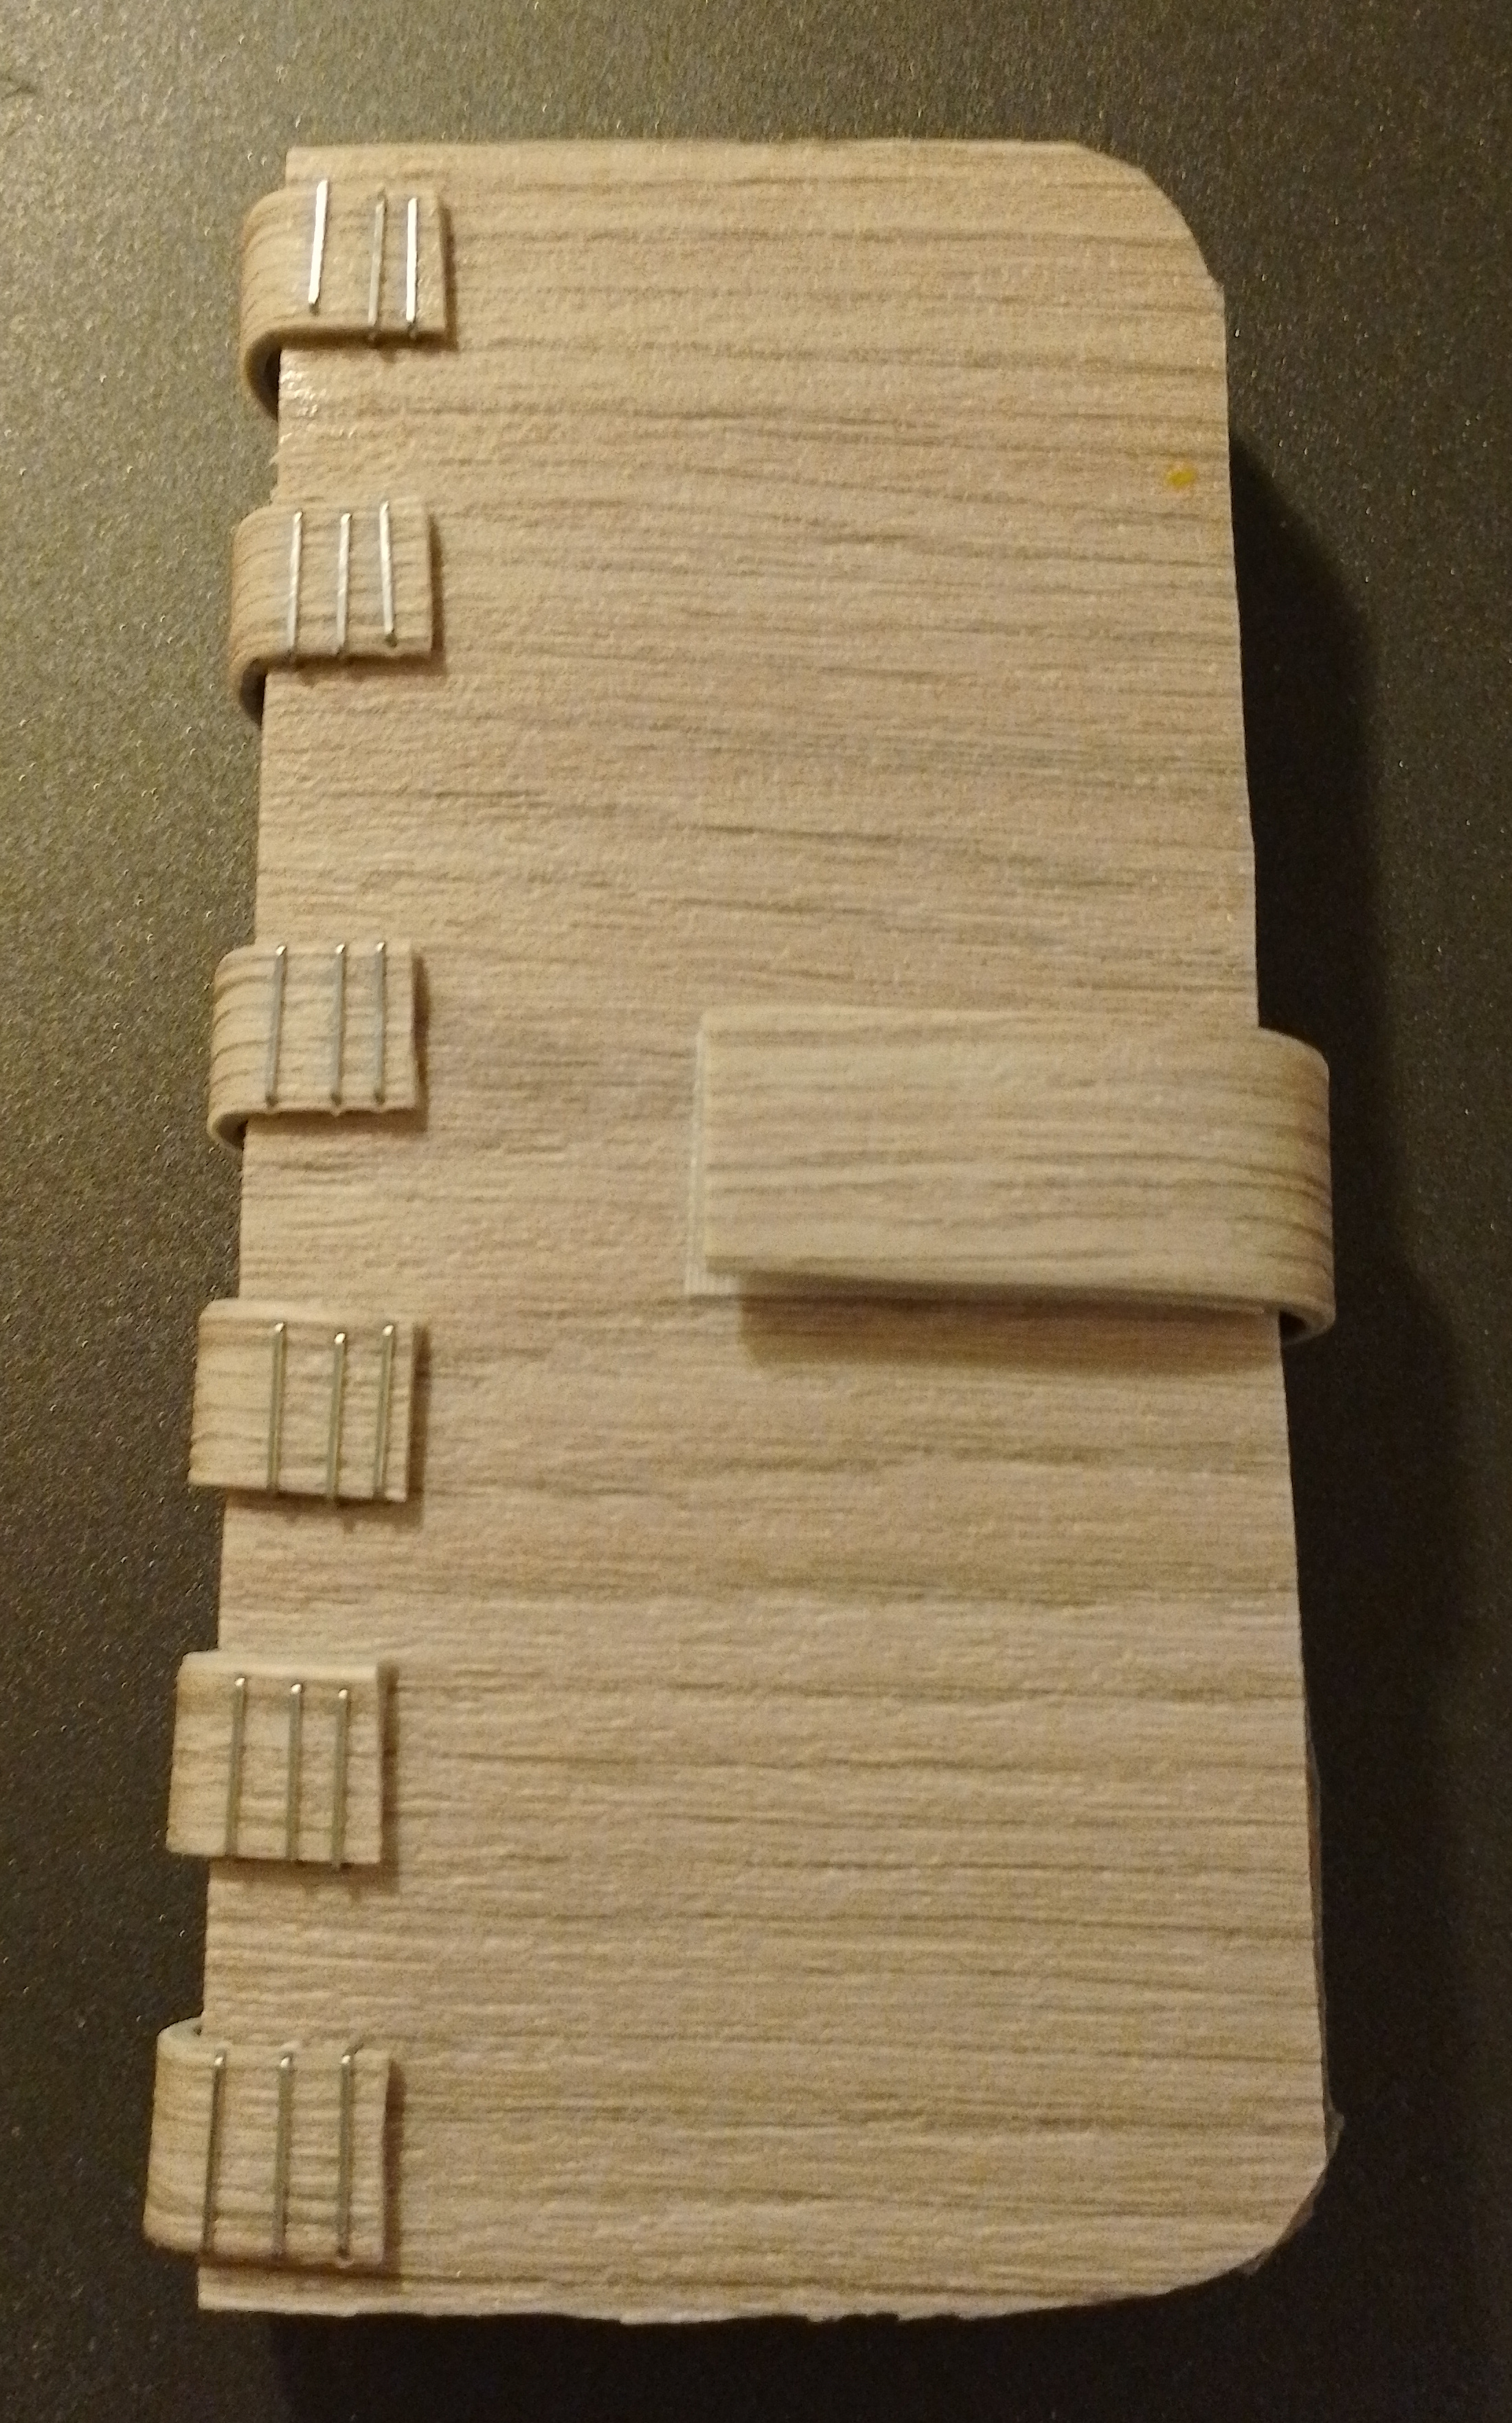
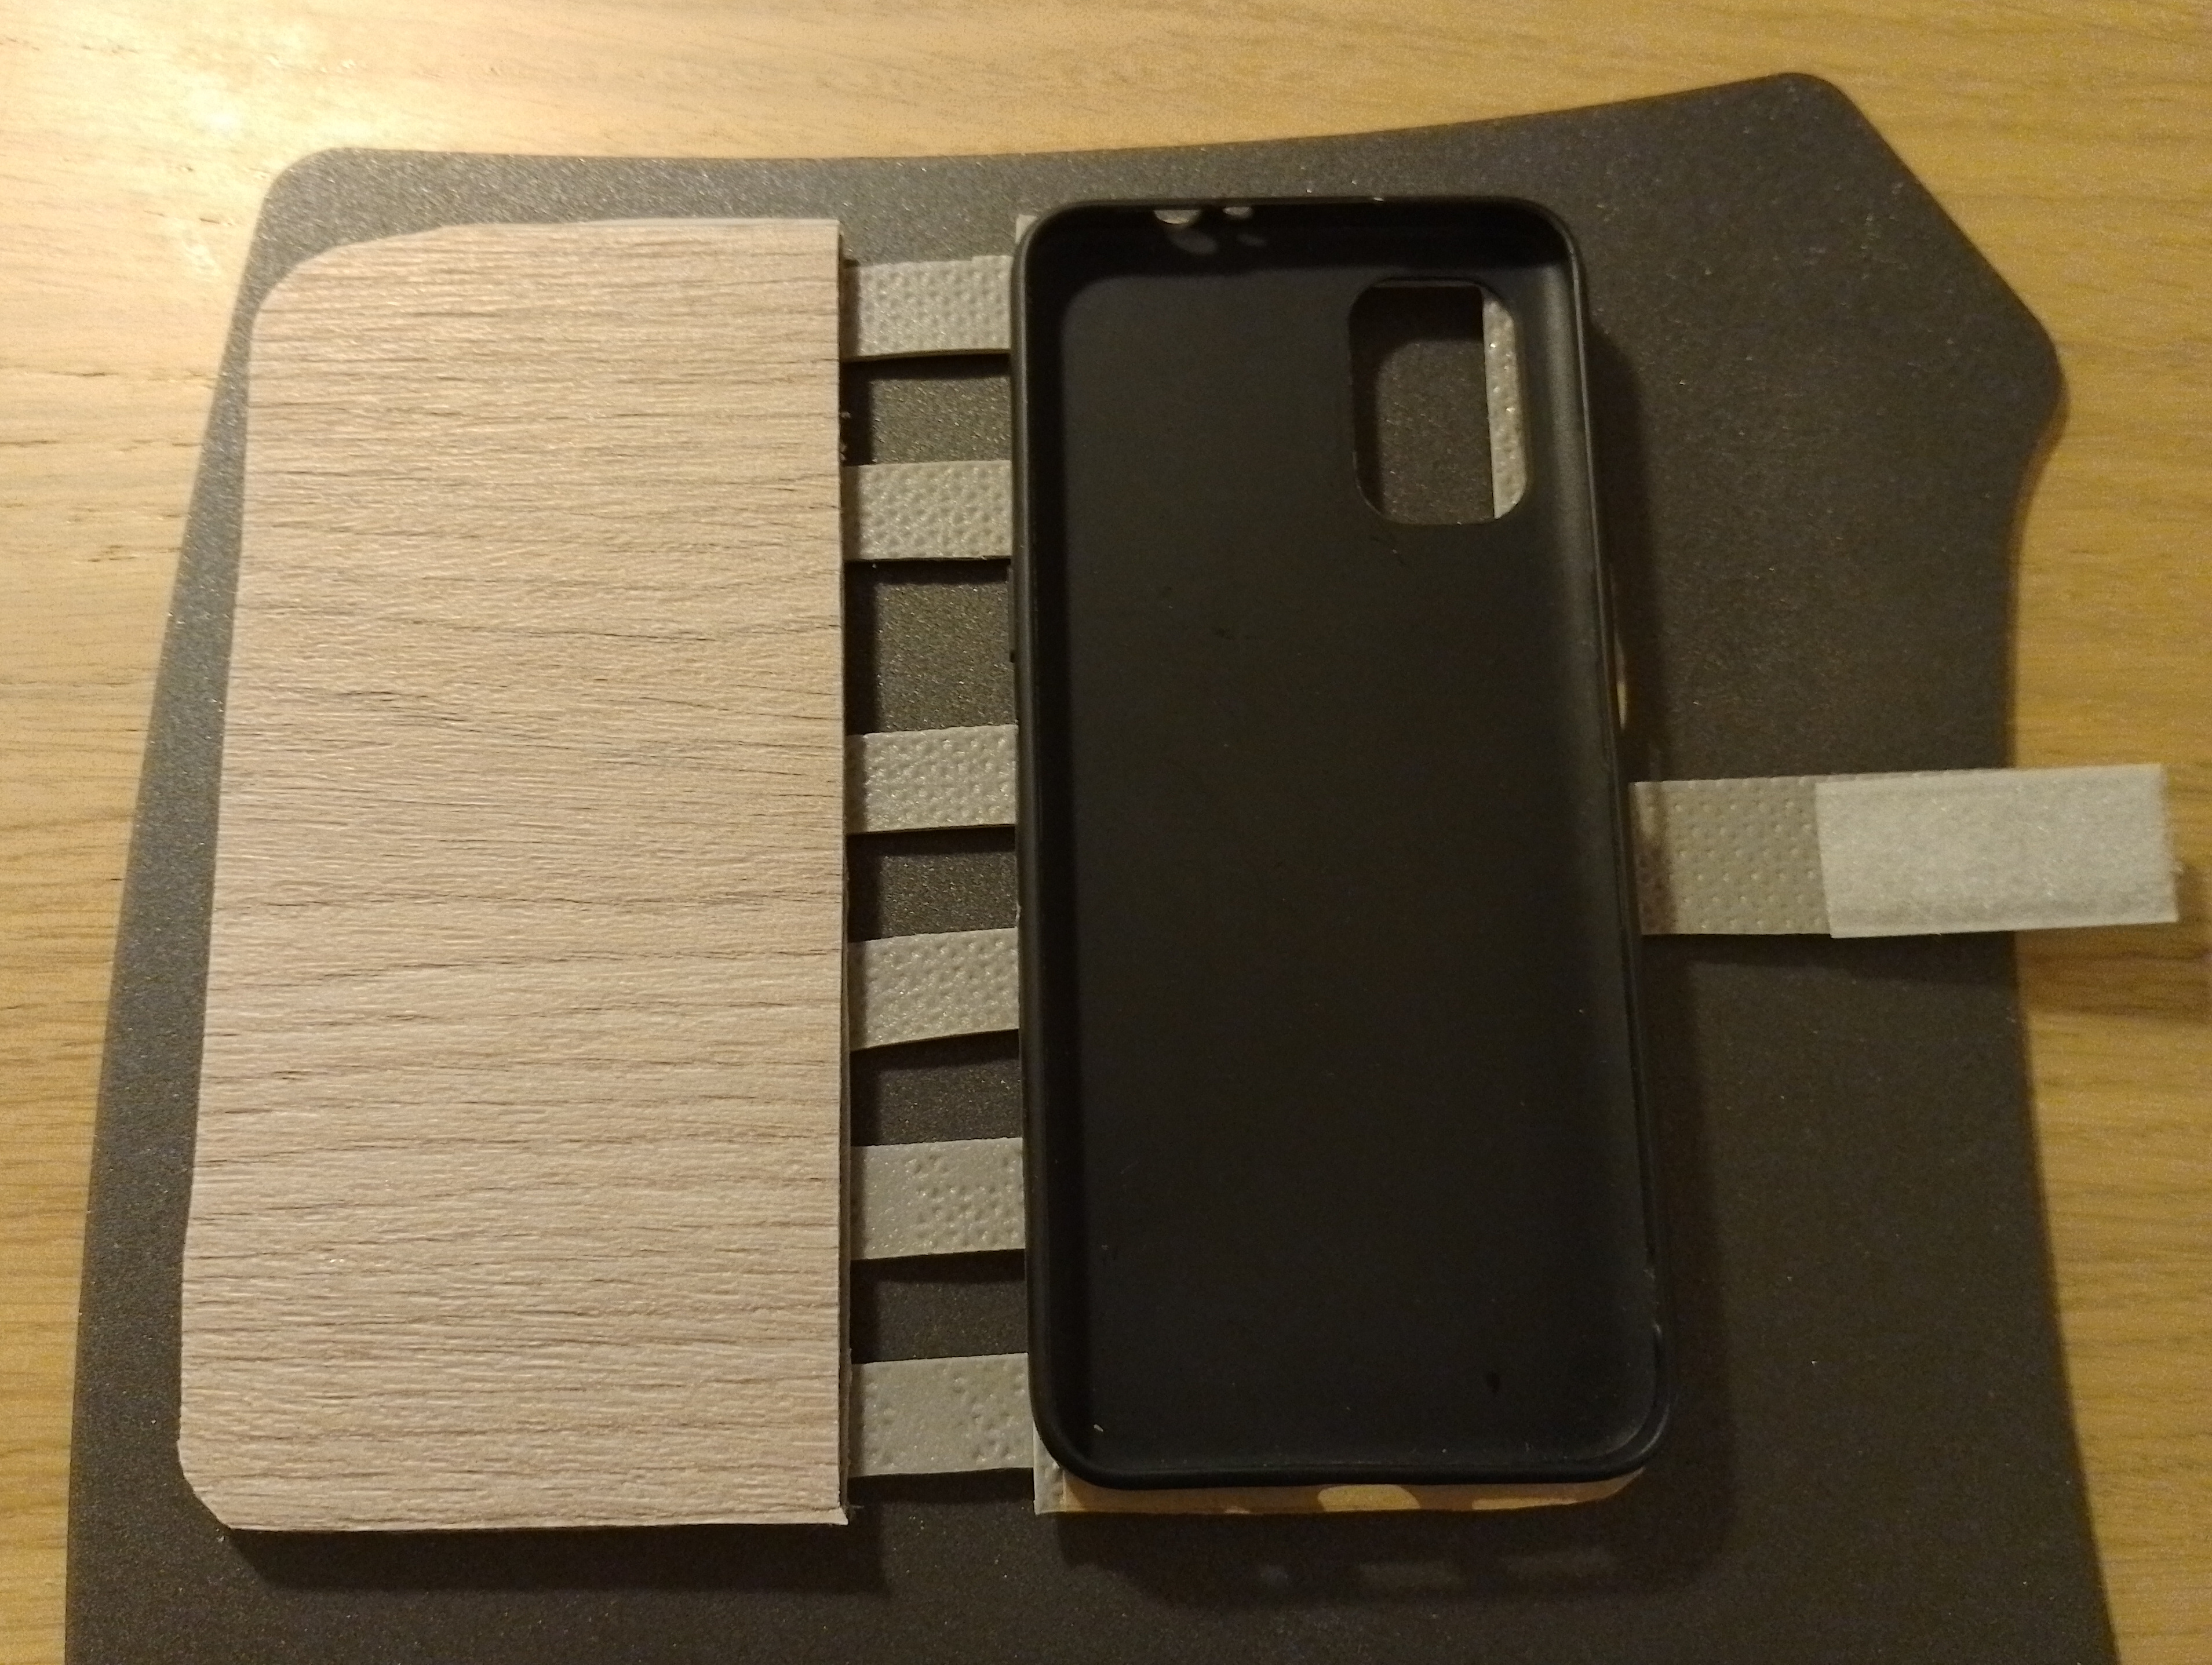
- I tried to make a phone case.
cross-posted from: https://lemmings.world/post/11714128
> ! > > ! > > I tried to make a phone "wallet" case. I used the inside of my old one (what you press your phone into), cardboard from a an old box and some leftover vinyl flooring. I originally wanted to glue everything but ended up stapling some bits. these pics where hastily made and don't do the thing justice. > Let's see how well this holds up (I seldom have it in my pocket so that helps).
- Fun replacement for an overhead light in a bedroom?
I have an overhead light in my bedroom that I absolutely despise. It's way too bright and it's right behind my phone/book/whatever when I'm lying in bed. We have other lights around the room, and so I'd like to replace it with someone else. I don't really want a ceiling fan there, but that's the only thing I can think of. Does anyone have suggestions of something fun to put in the center of a bedroom ceiling?
- Need to replace bathroom tub fixtures
cross-posted from: https://slrpnk.net/post/11339091
> My bathroom tub fixtures have seen better days. Pretty sure they're original to the house (~60 years). We have fairly hard water, and the prior owners were not the best at maintenance so no clue how long these slow leaks have been going on. But the shower handle is stuck hard on the valve, and the bath spigot is crumbling away and similarly fused in place. Hot and cold come off easily. > > Does anyone have any tips for freeing the one handle and spigot? I've tried light tapping with a mallet on the back of the handle to no avail. The spigot seems bound pretty tightly, to the point where I'm concerned about damaging the pipe if I apply too much torque. > > As for the leaks, I haven't decided if I'm going to just replace the valves, or try fiddling with/replacing the packing nuts. This is my first time messing with plumbing, but either way seems straightforward enough after watching a few videos. > > Any tips/tricks/suggestions appreciated, thanks!
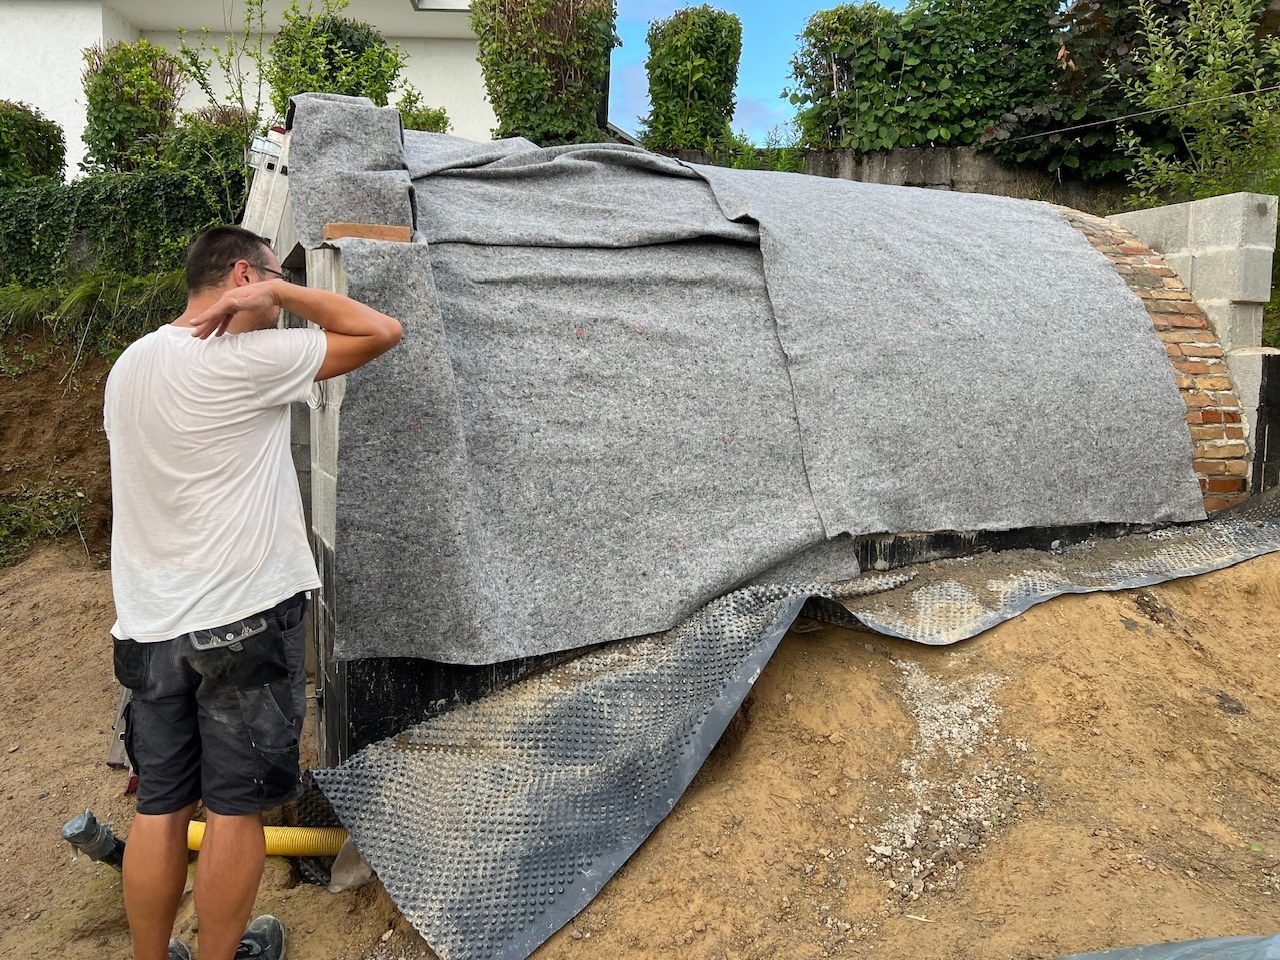
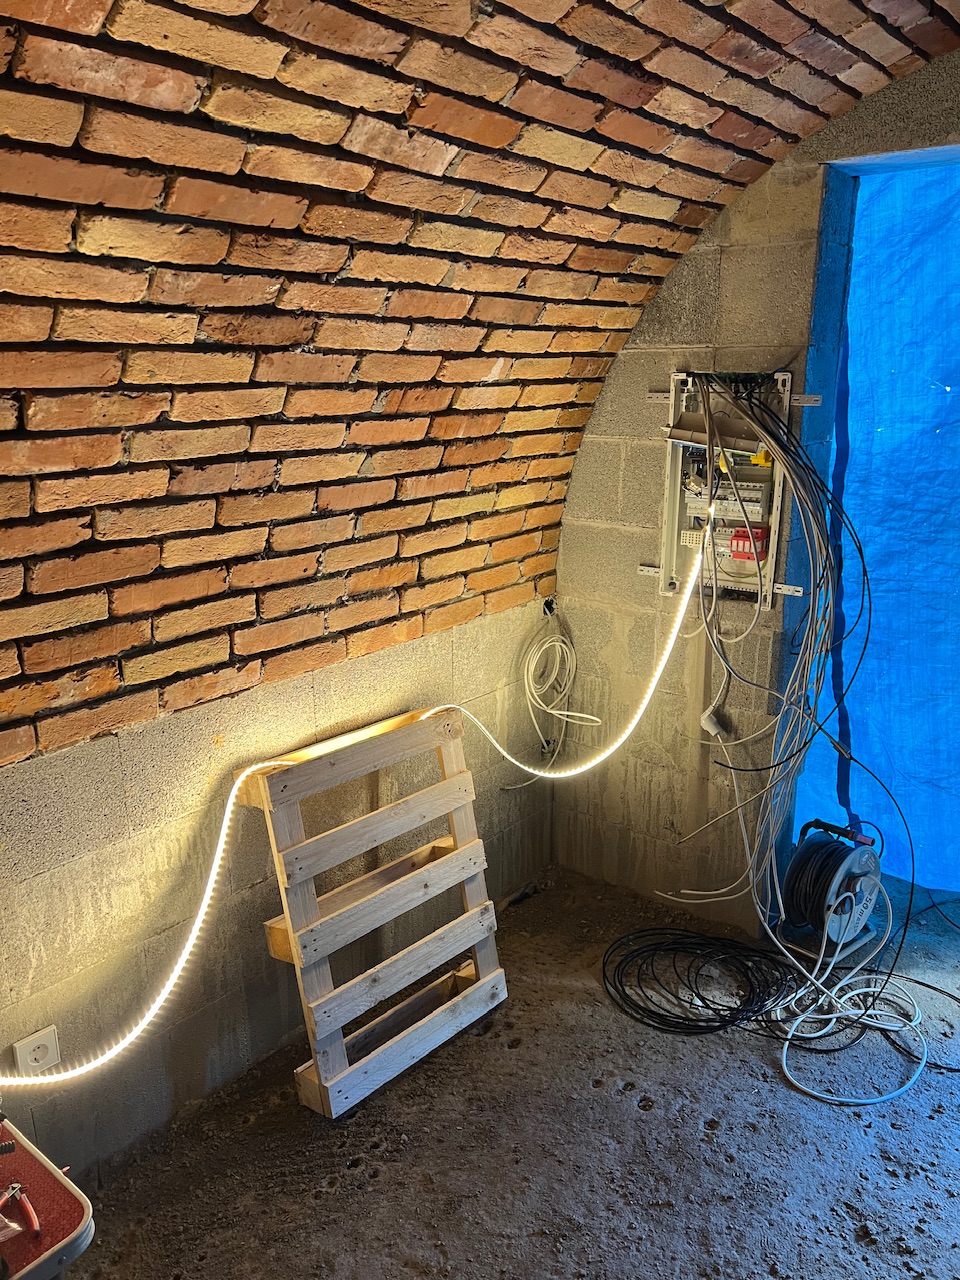
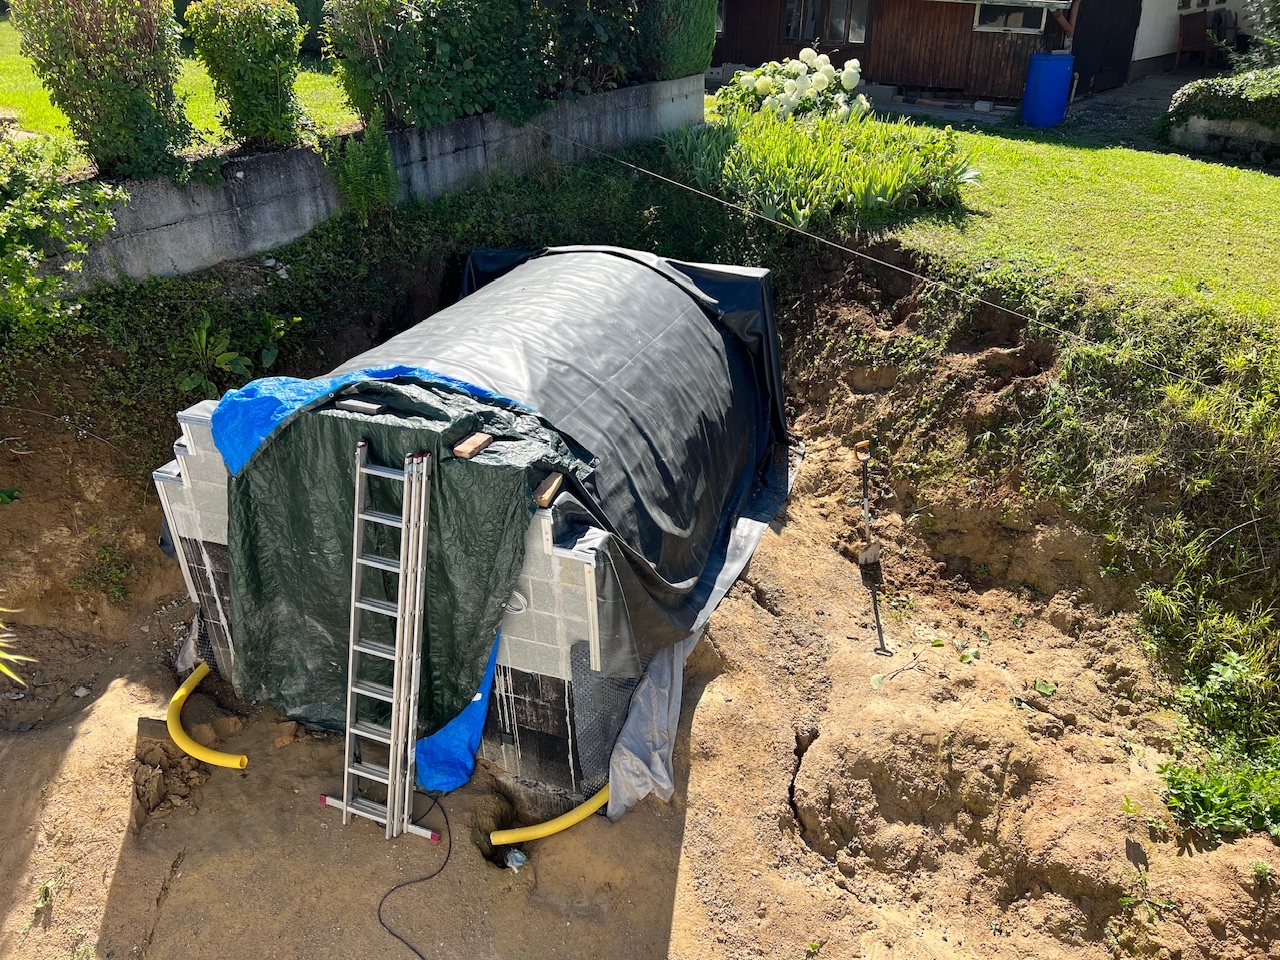
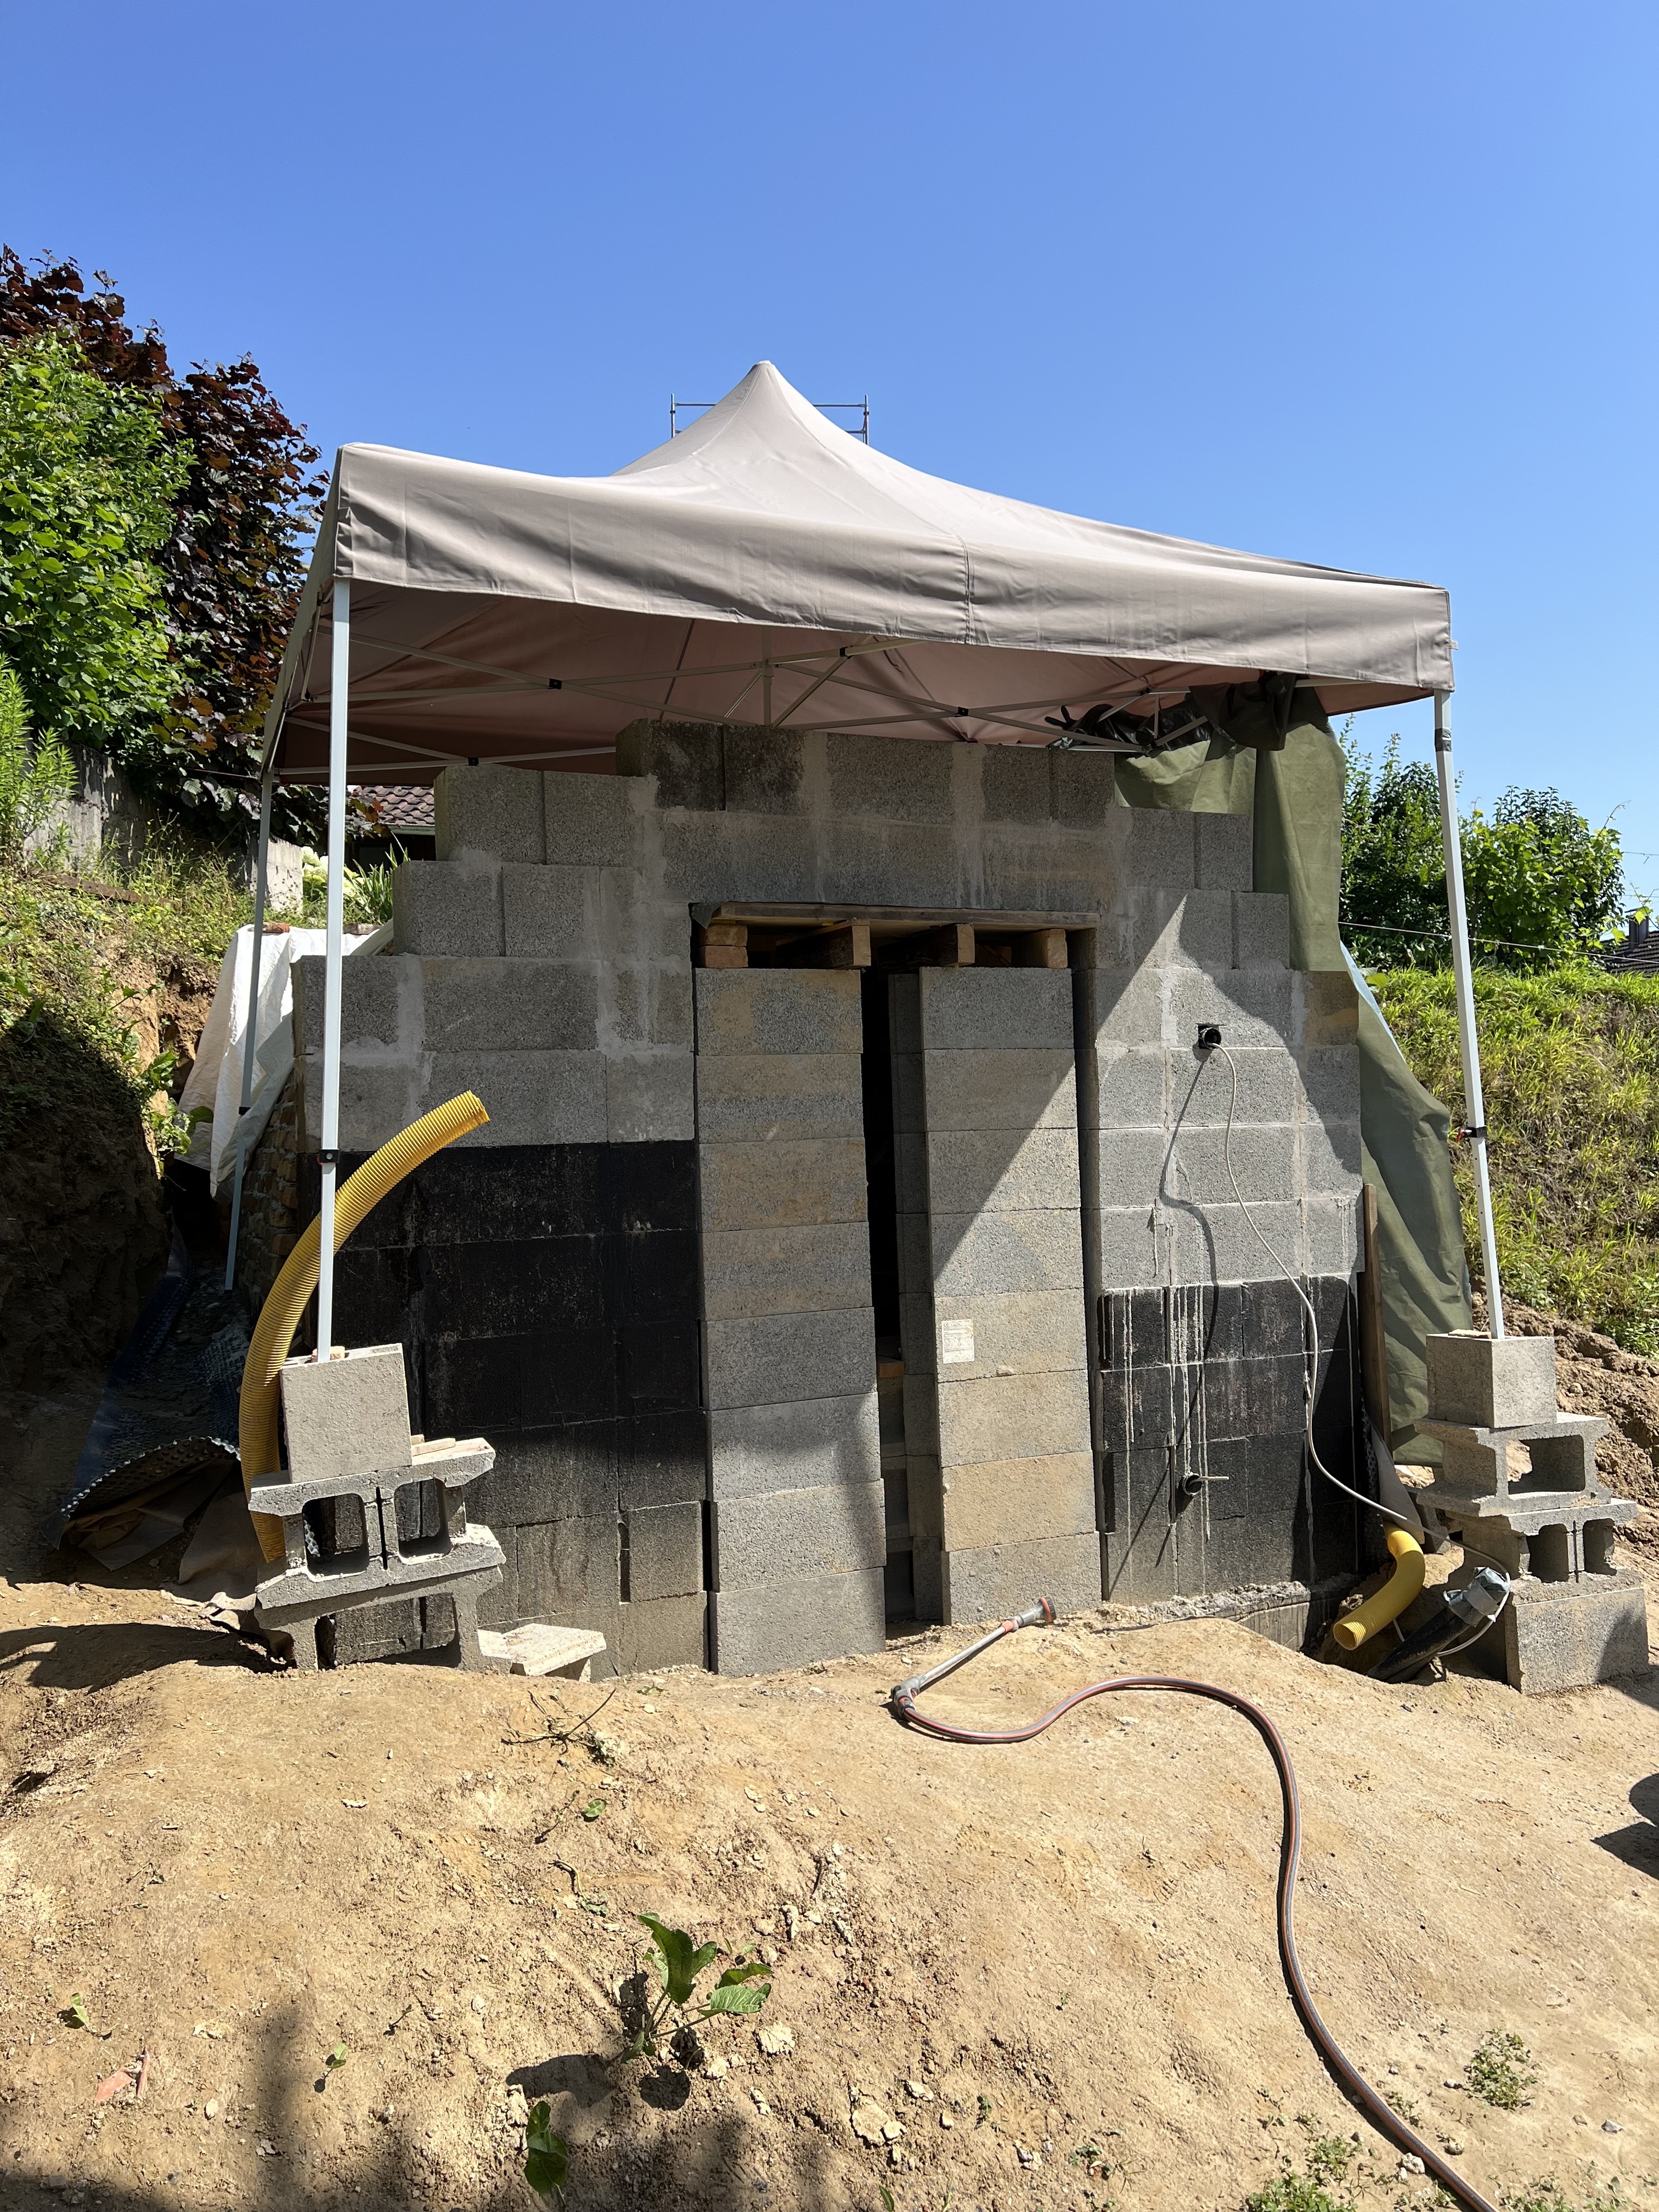
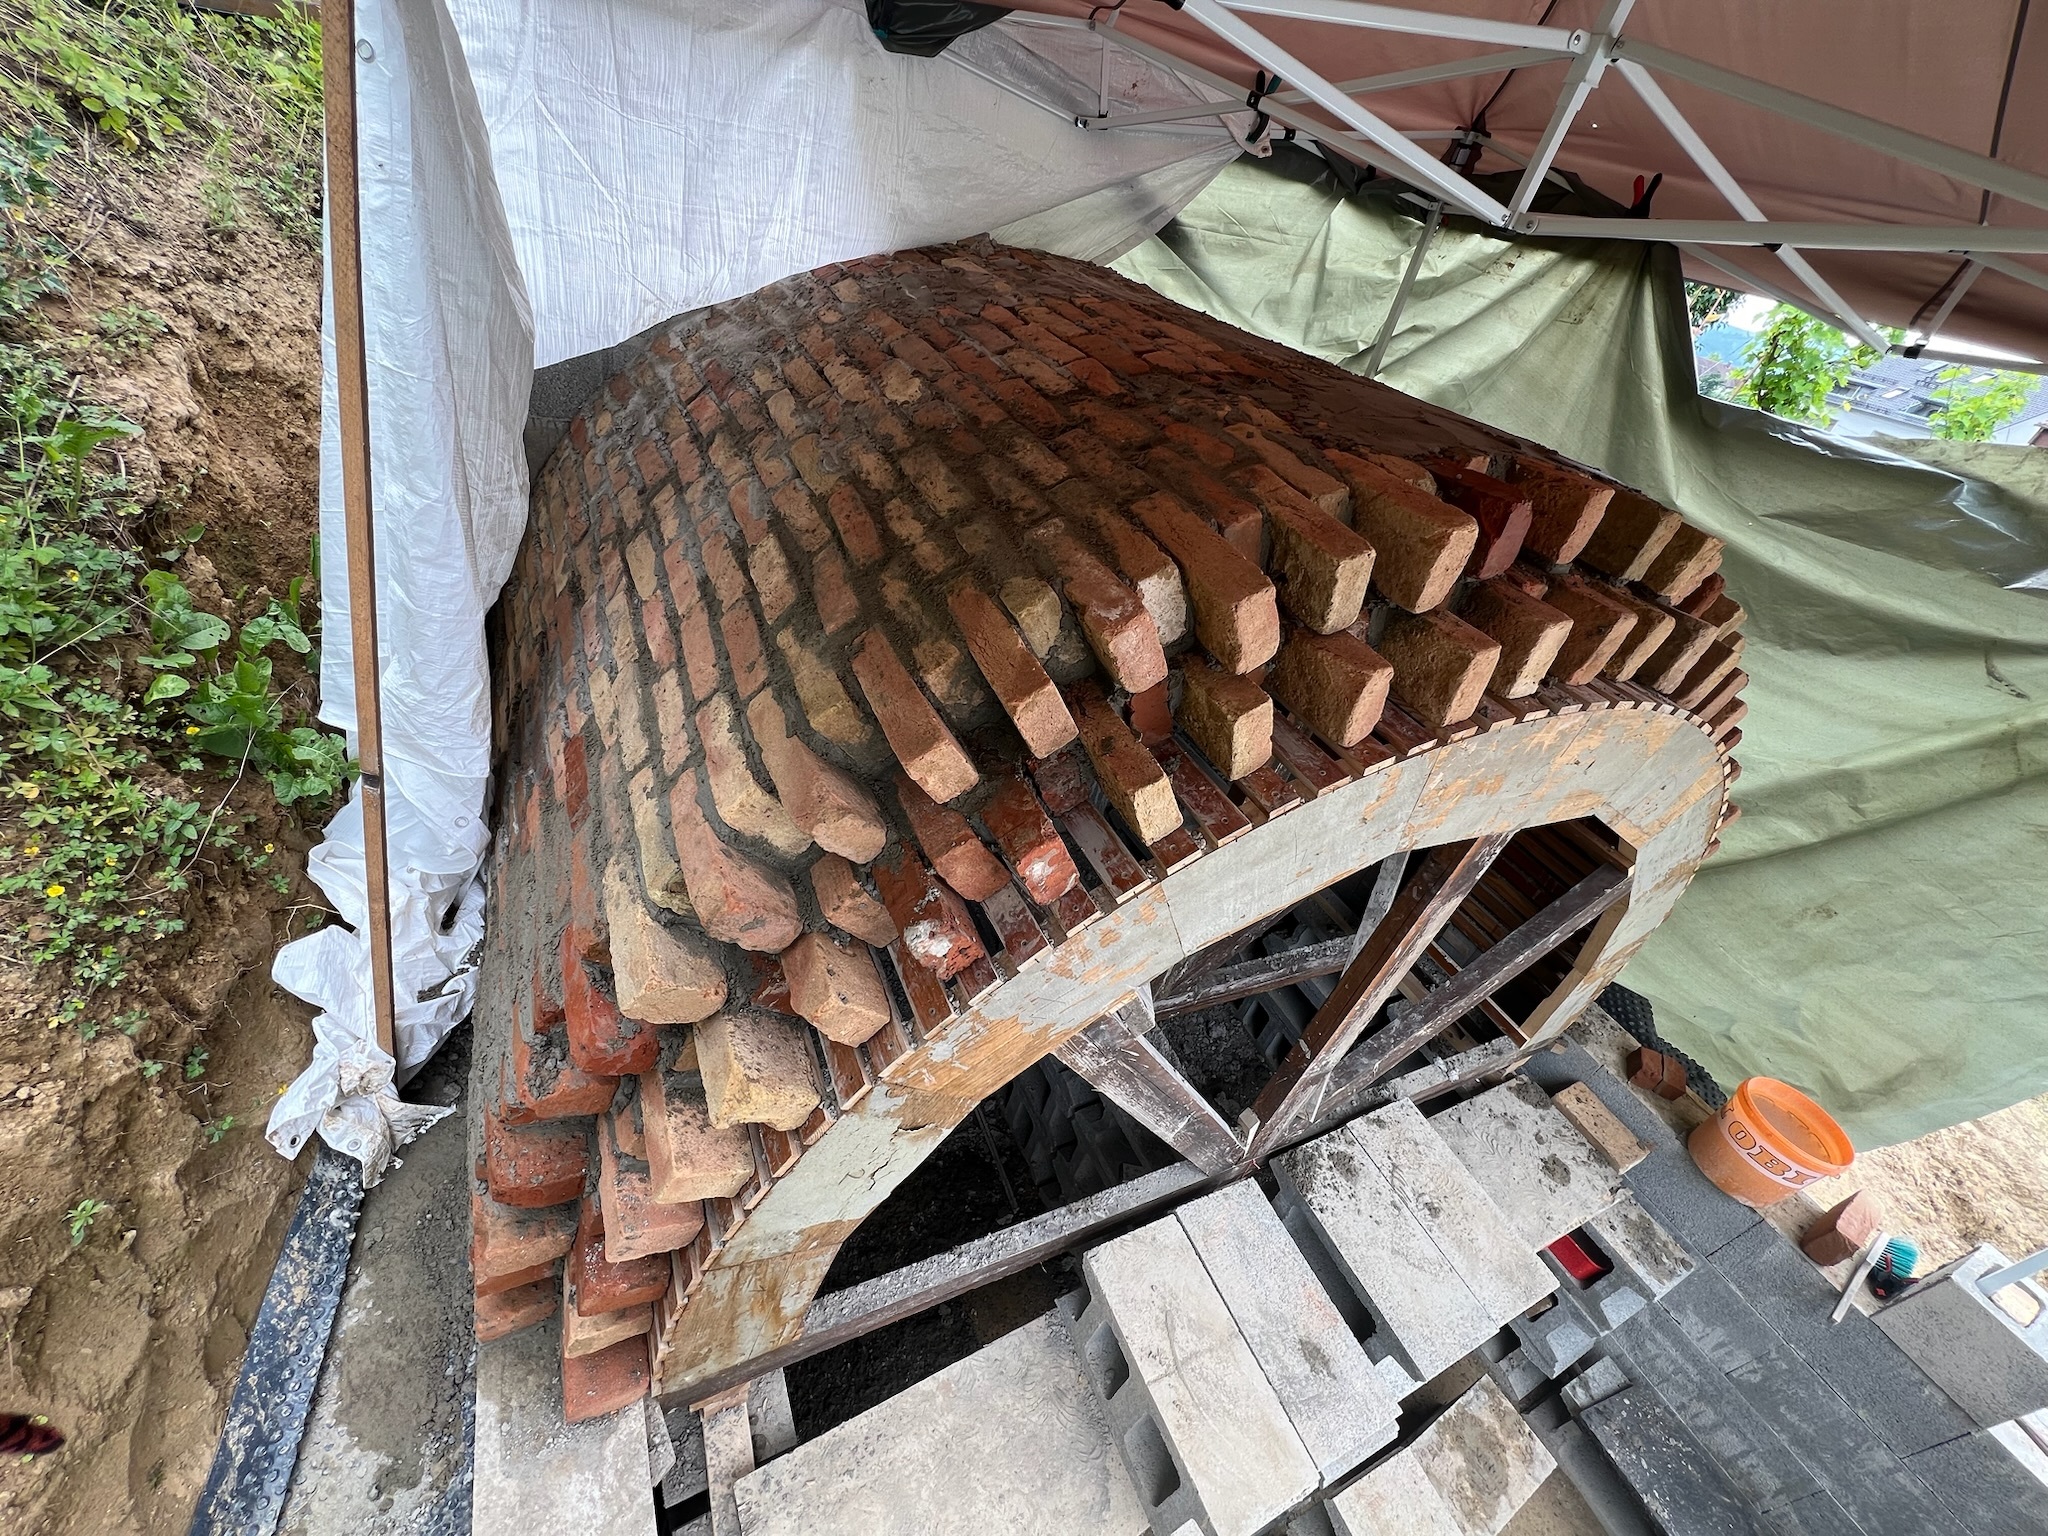
- Update 4: vaulted Root Cellar build
Hi everyone!
A slow week went by, with daily heavy rains it's not always easy to find the motivation to work outside.
We installed a 50 square meter fleece and pond liner on top of the build, and started backfilling with dirt.
It's a lot of work because we have to dig the overgrown pile of dirt that's been sitting for 5 years on our lot, first getting rid of the roots in the top soil. But we have to do this manually as the back is only reachable through a narrow path in our neighbor's garden.
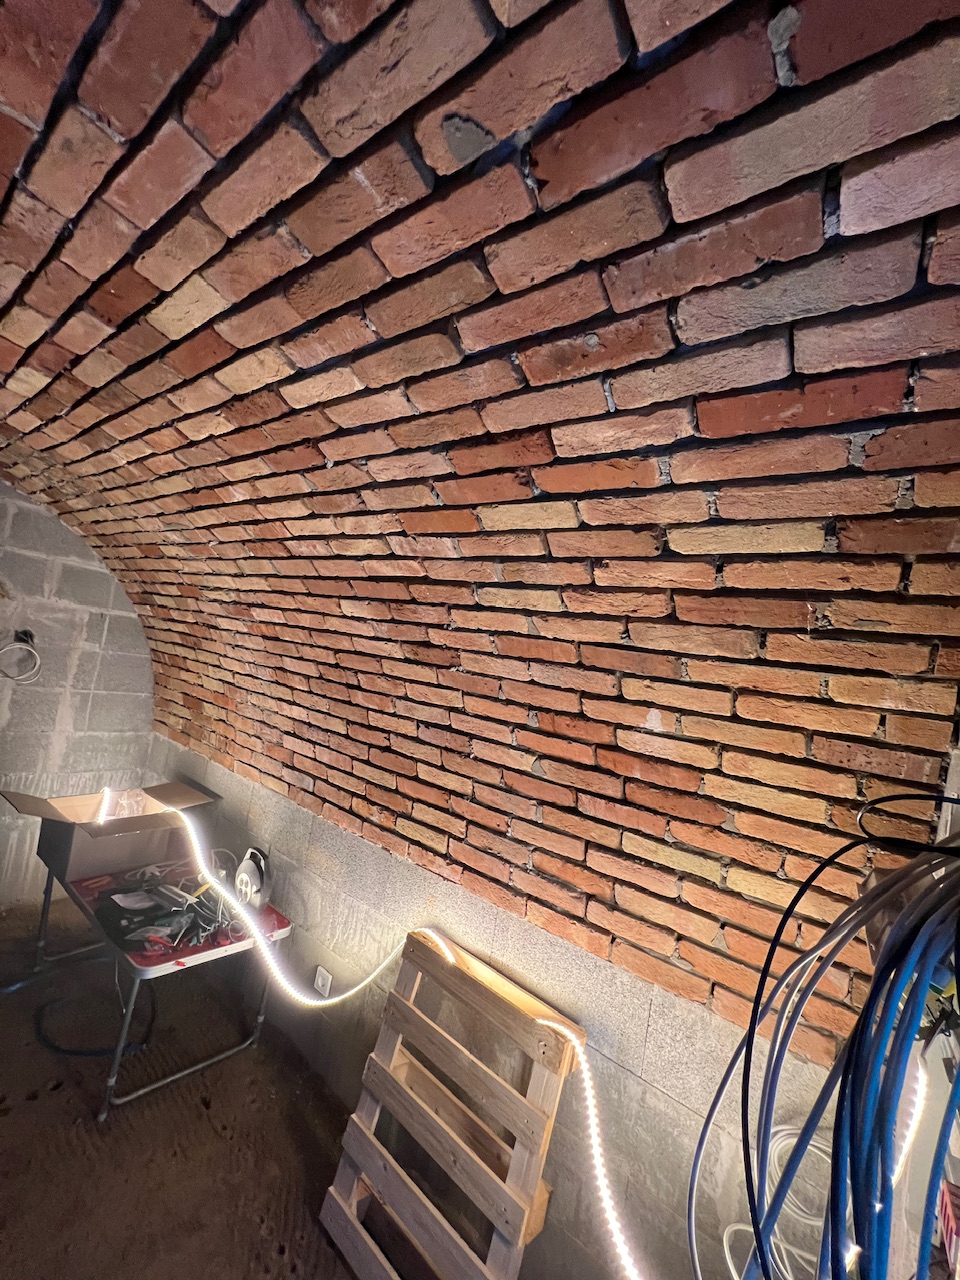
My partner also installed the electrical panel with 24V circuits for RGBW LED strips, a PoE WiFi access point and connected the wall outlets to the 230V main. It was temporarily connected to test how bright the strips will be. They will later be mounted in metal railings across the whole length of the lower brick line, with a wood cladding.
We will then have to dig a 20 meter trench from the house main electric supply, lay a PVC pipe and pull a 3-phase copper line to the cellar. This will be the garden hub to provide electricity to the future outdoor kitchen.
The next few days we will work on the mortar joints, using the multitool diamond blades that arrived in the mail to finish the cleanup before grouting all the joints cleanly.
Have a great week and keep on doing it yourself!
- Things you can ruin to realize it didn't make sense to DIY
jerk-sock
--- old car
--- perfectly good tennis balls
--- dry wall
--- sharp blades
!who needs sharp blades anyways
--- art degree
--- Any more suggestions?
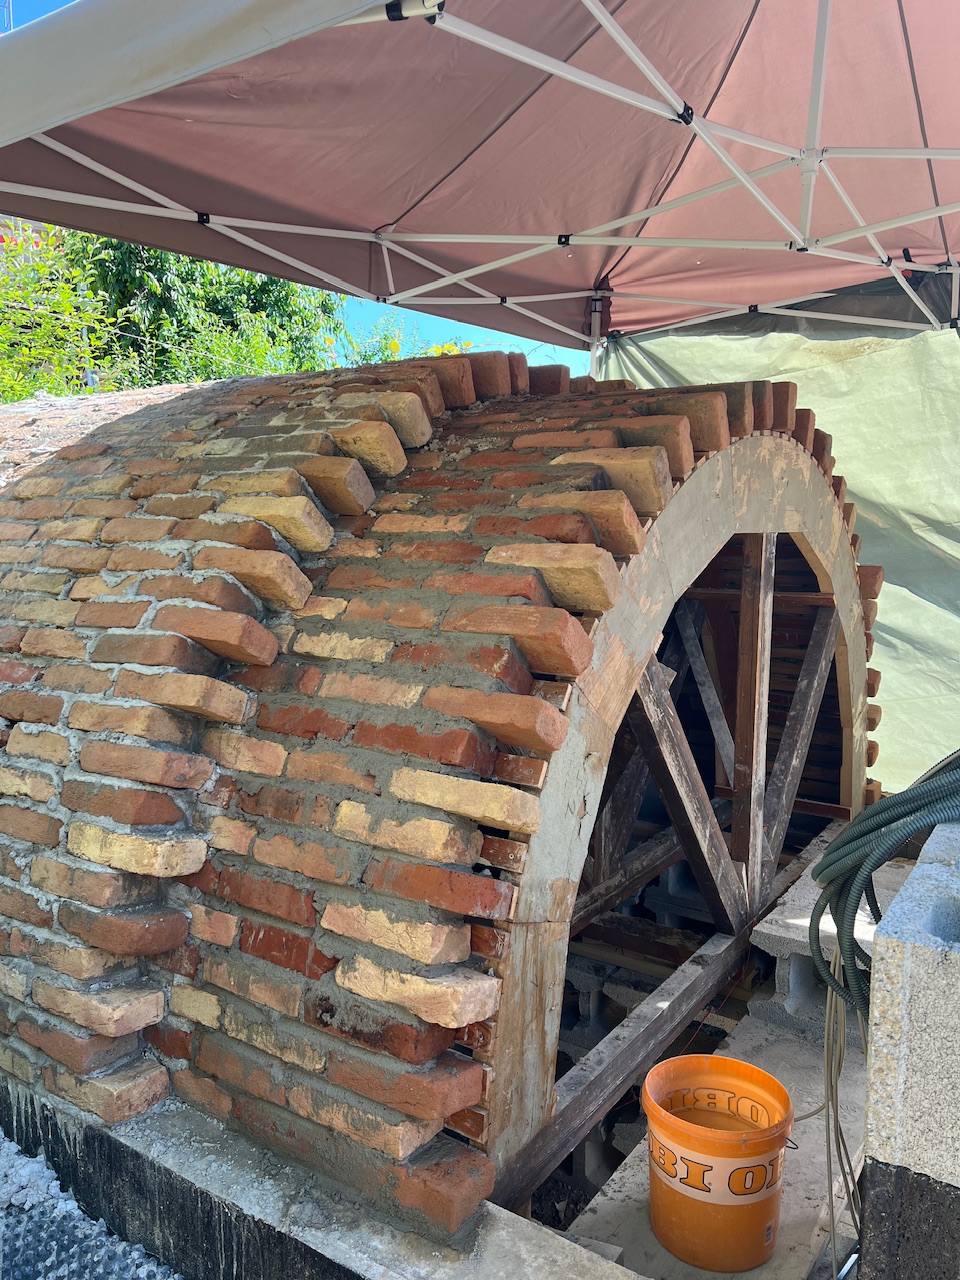
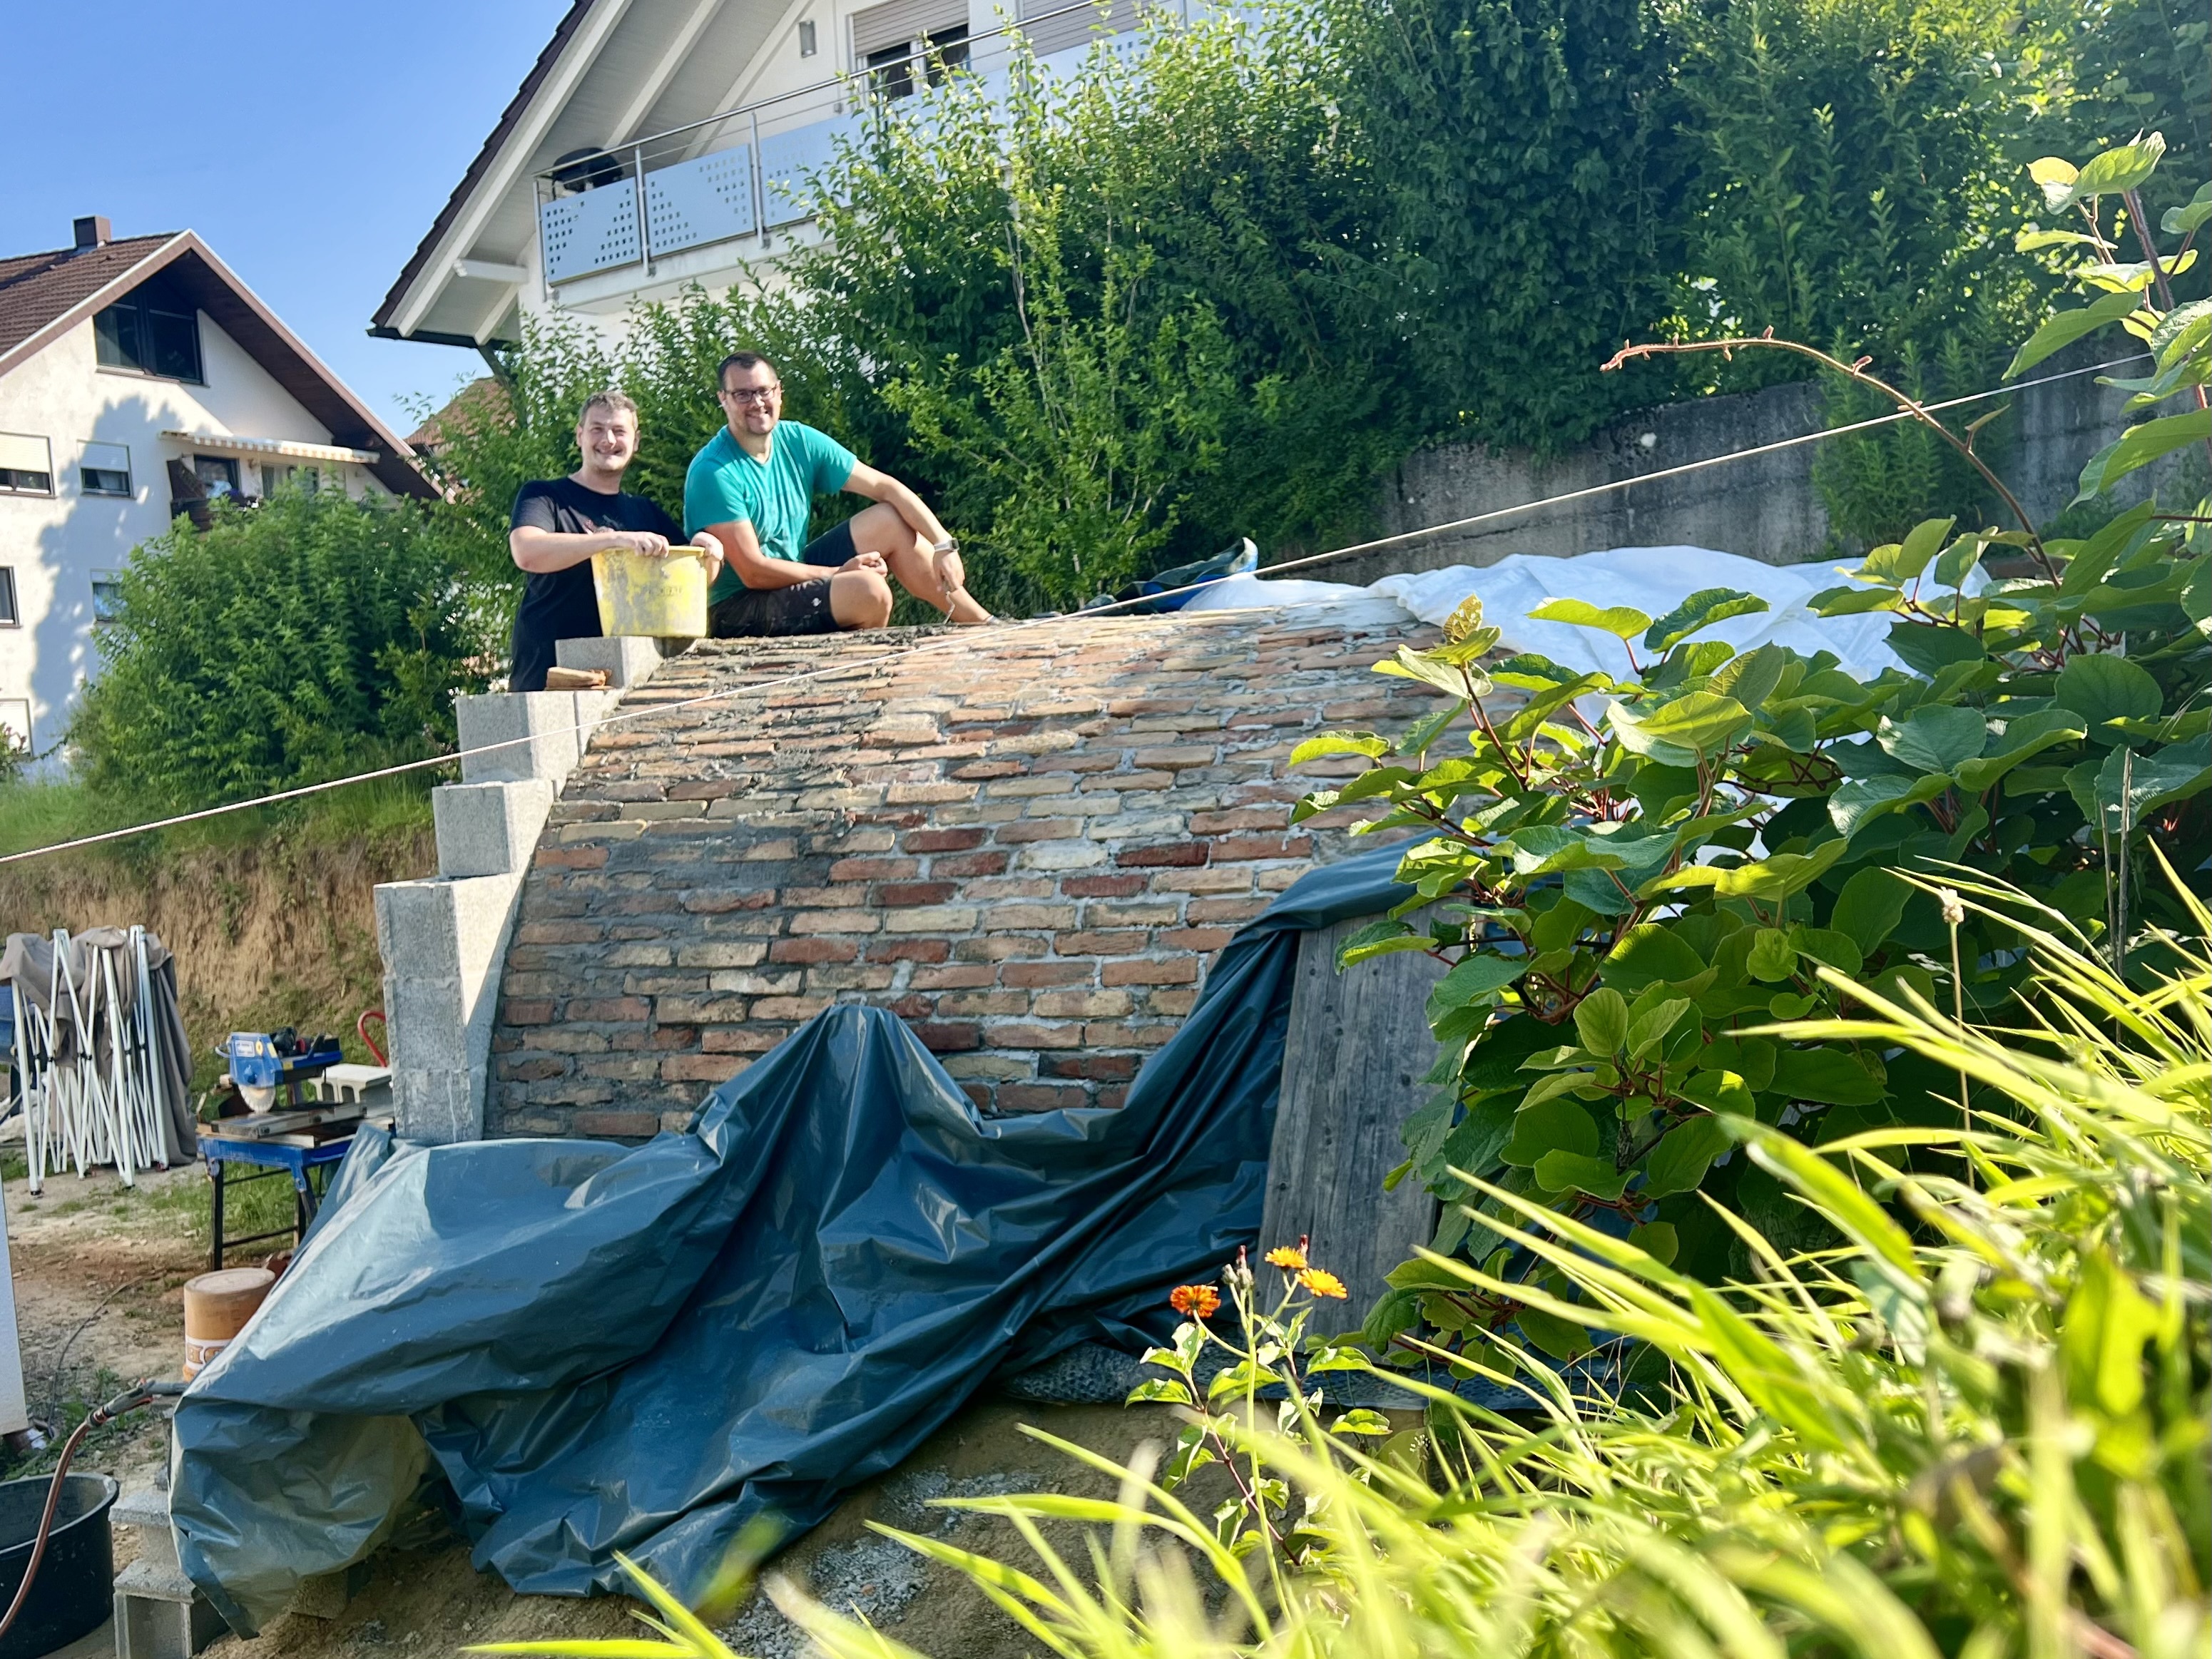
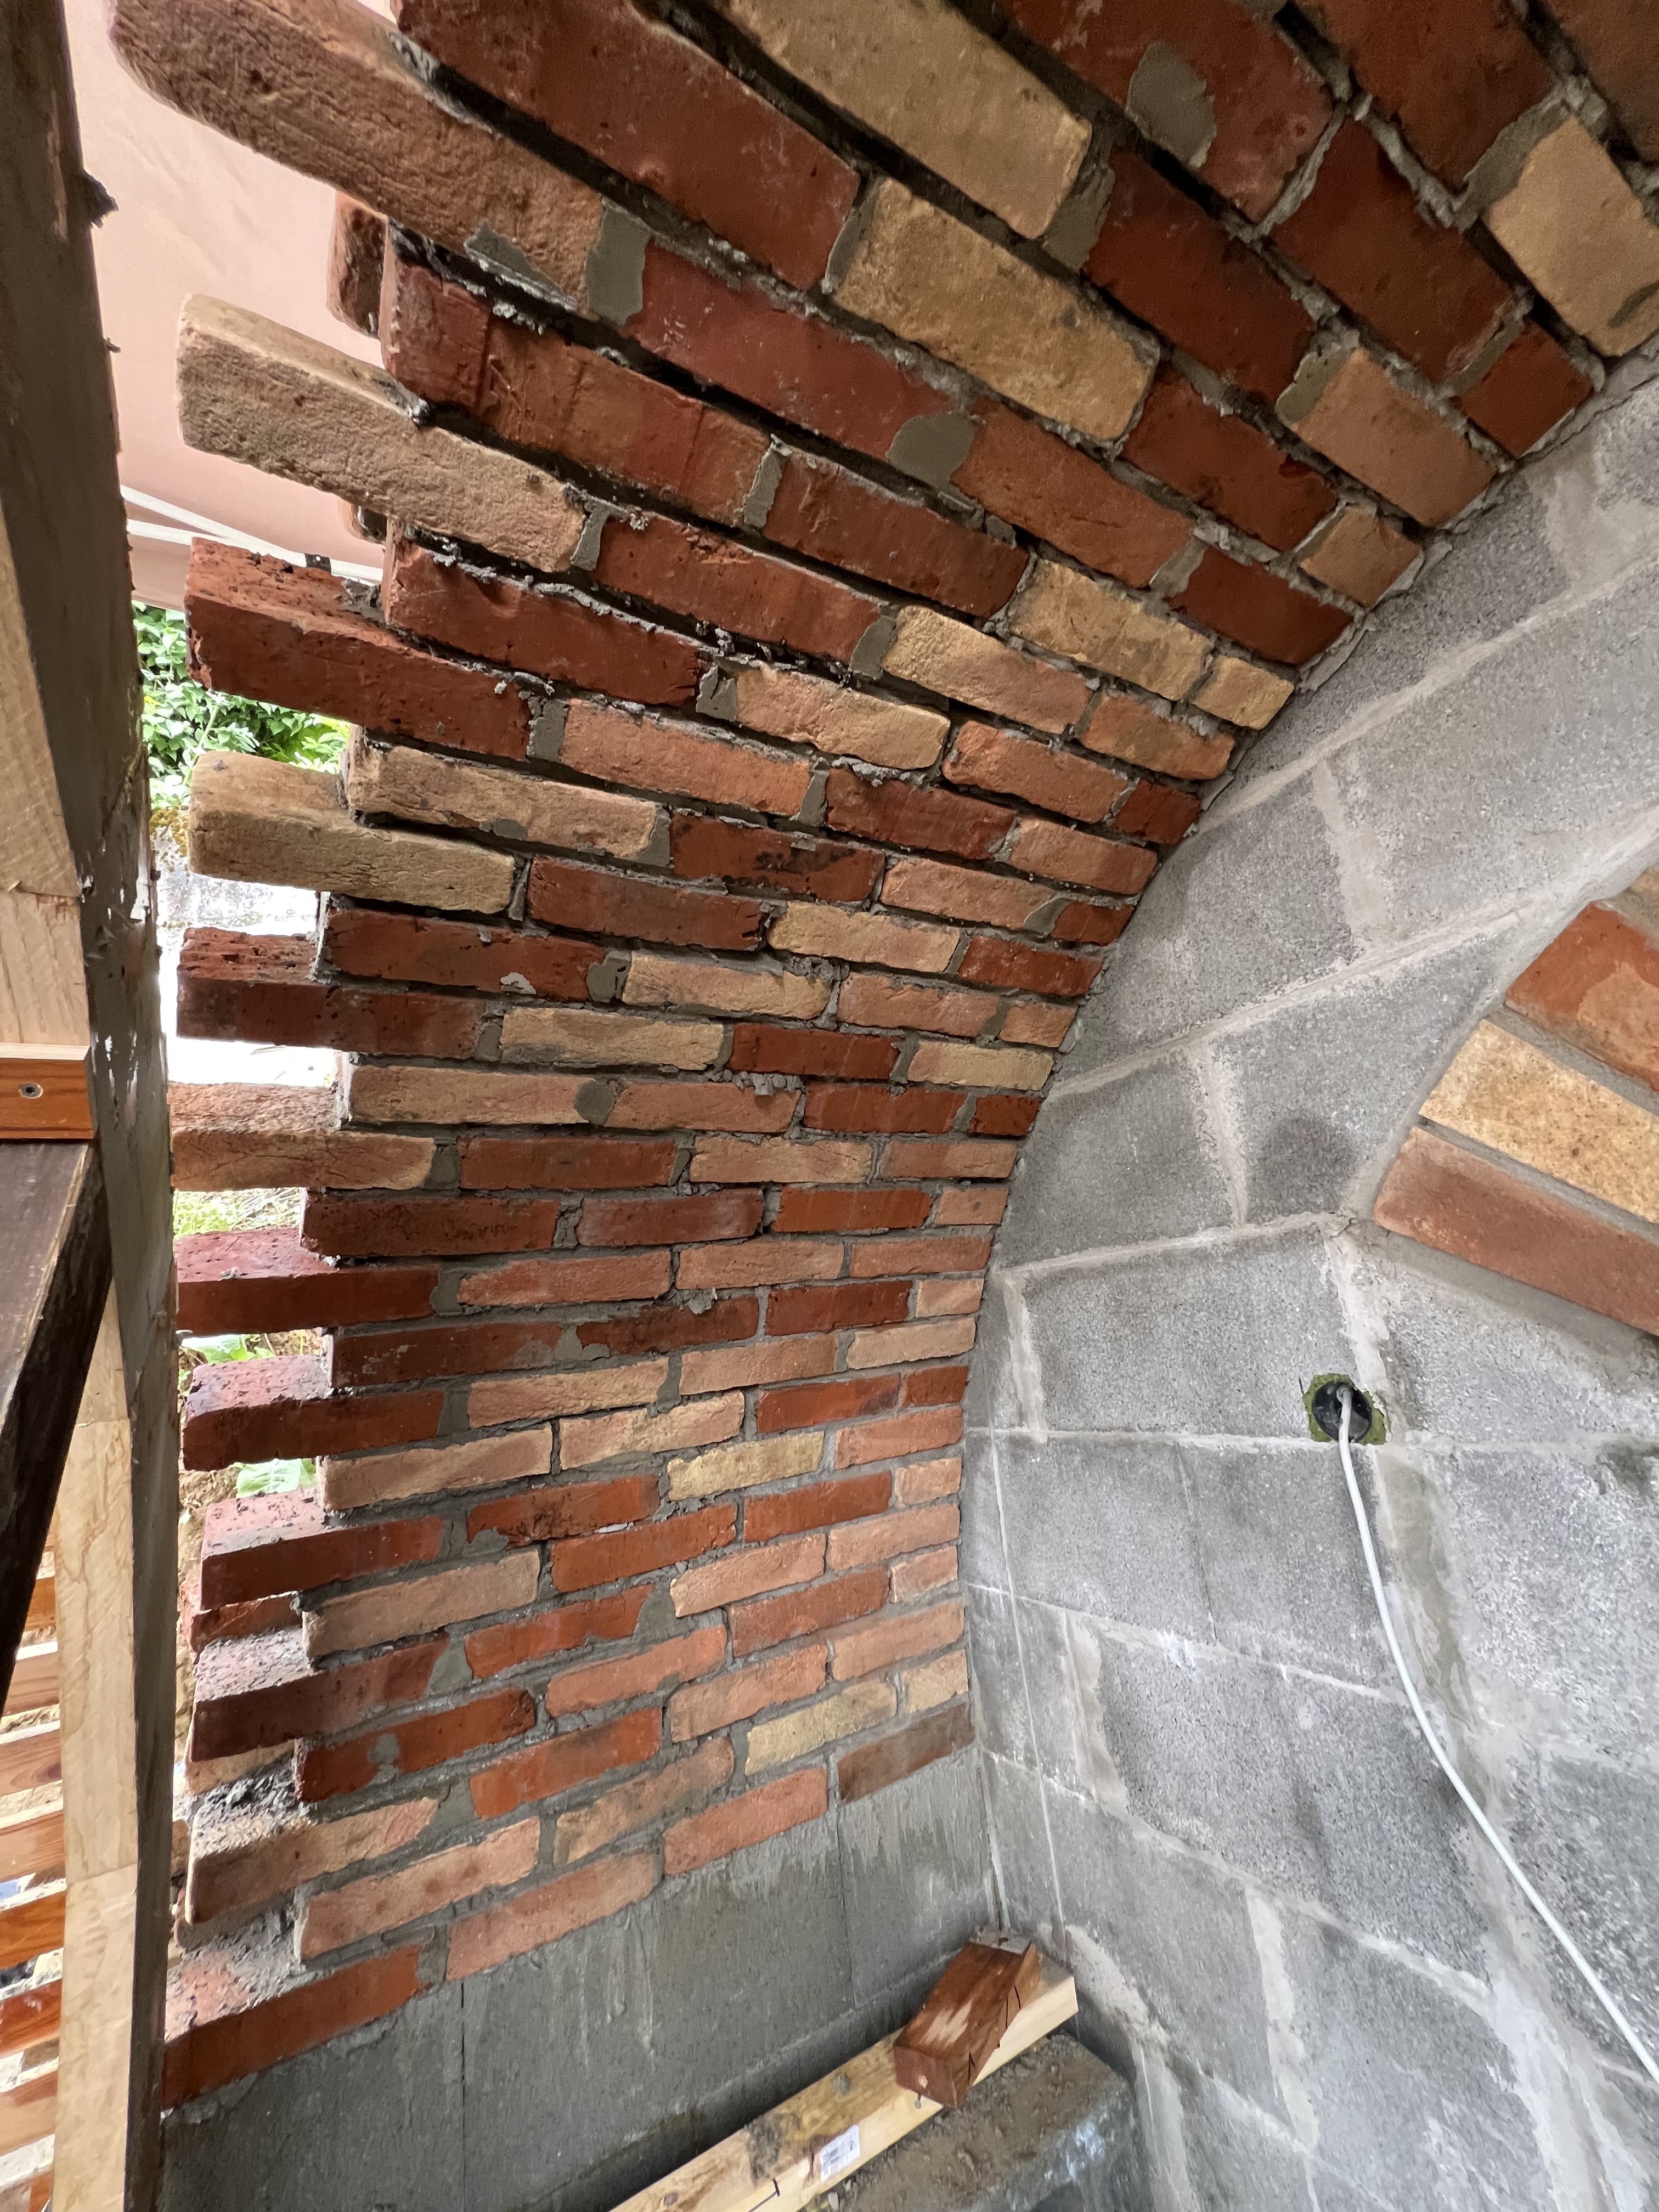
- Update 3: root cellar with vaulted ceiling
Hi everyone
It's been a while, I skipped a couple of weeks to get things going on our project!
Last time I wrote we had finished 3 slices of the roof. In the meantime, we finished the 4 next ones and completed the roof.
Eventually we were able to do a complete layer in one day, the second one on top the following day, and move the wooden structure the third day.
We held off laying the last slice to finish the front wall (and be eventually able to attach the ceiling to it), making a door lintel out of cinderblocks and reinforced concrete.
The suspense was high whether we would have enough bricks to finish the project and it turned out we had just 3 extra at the end!
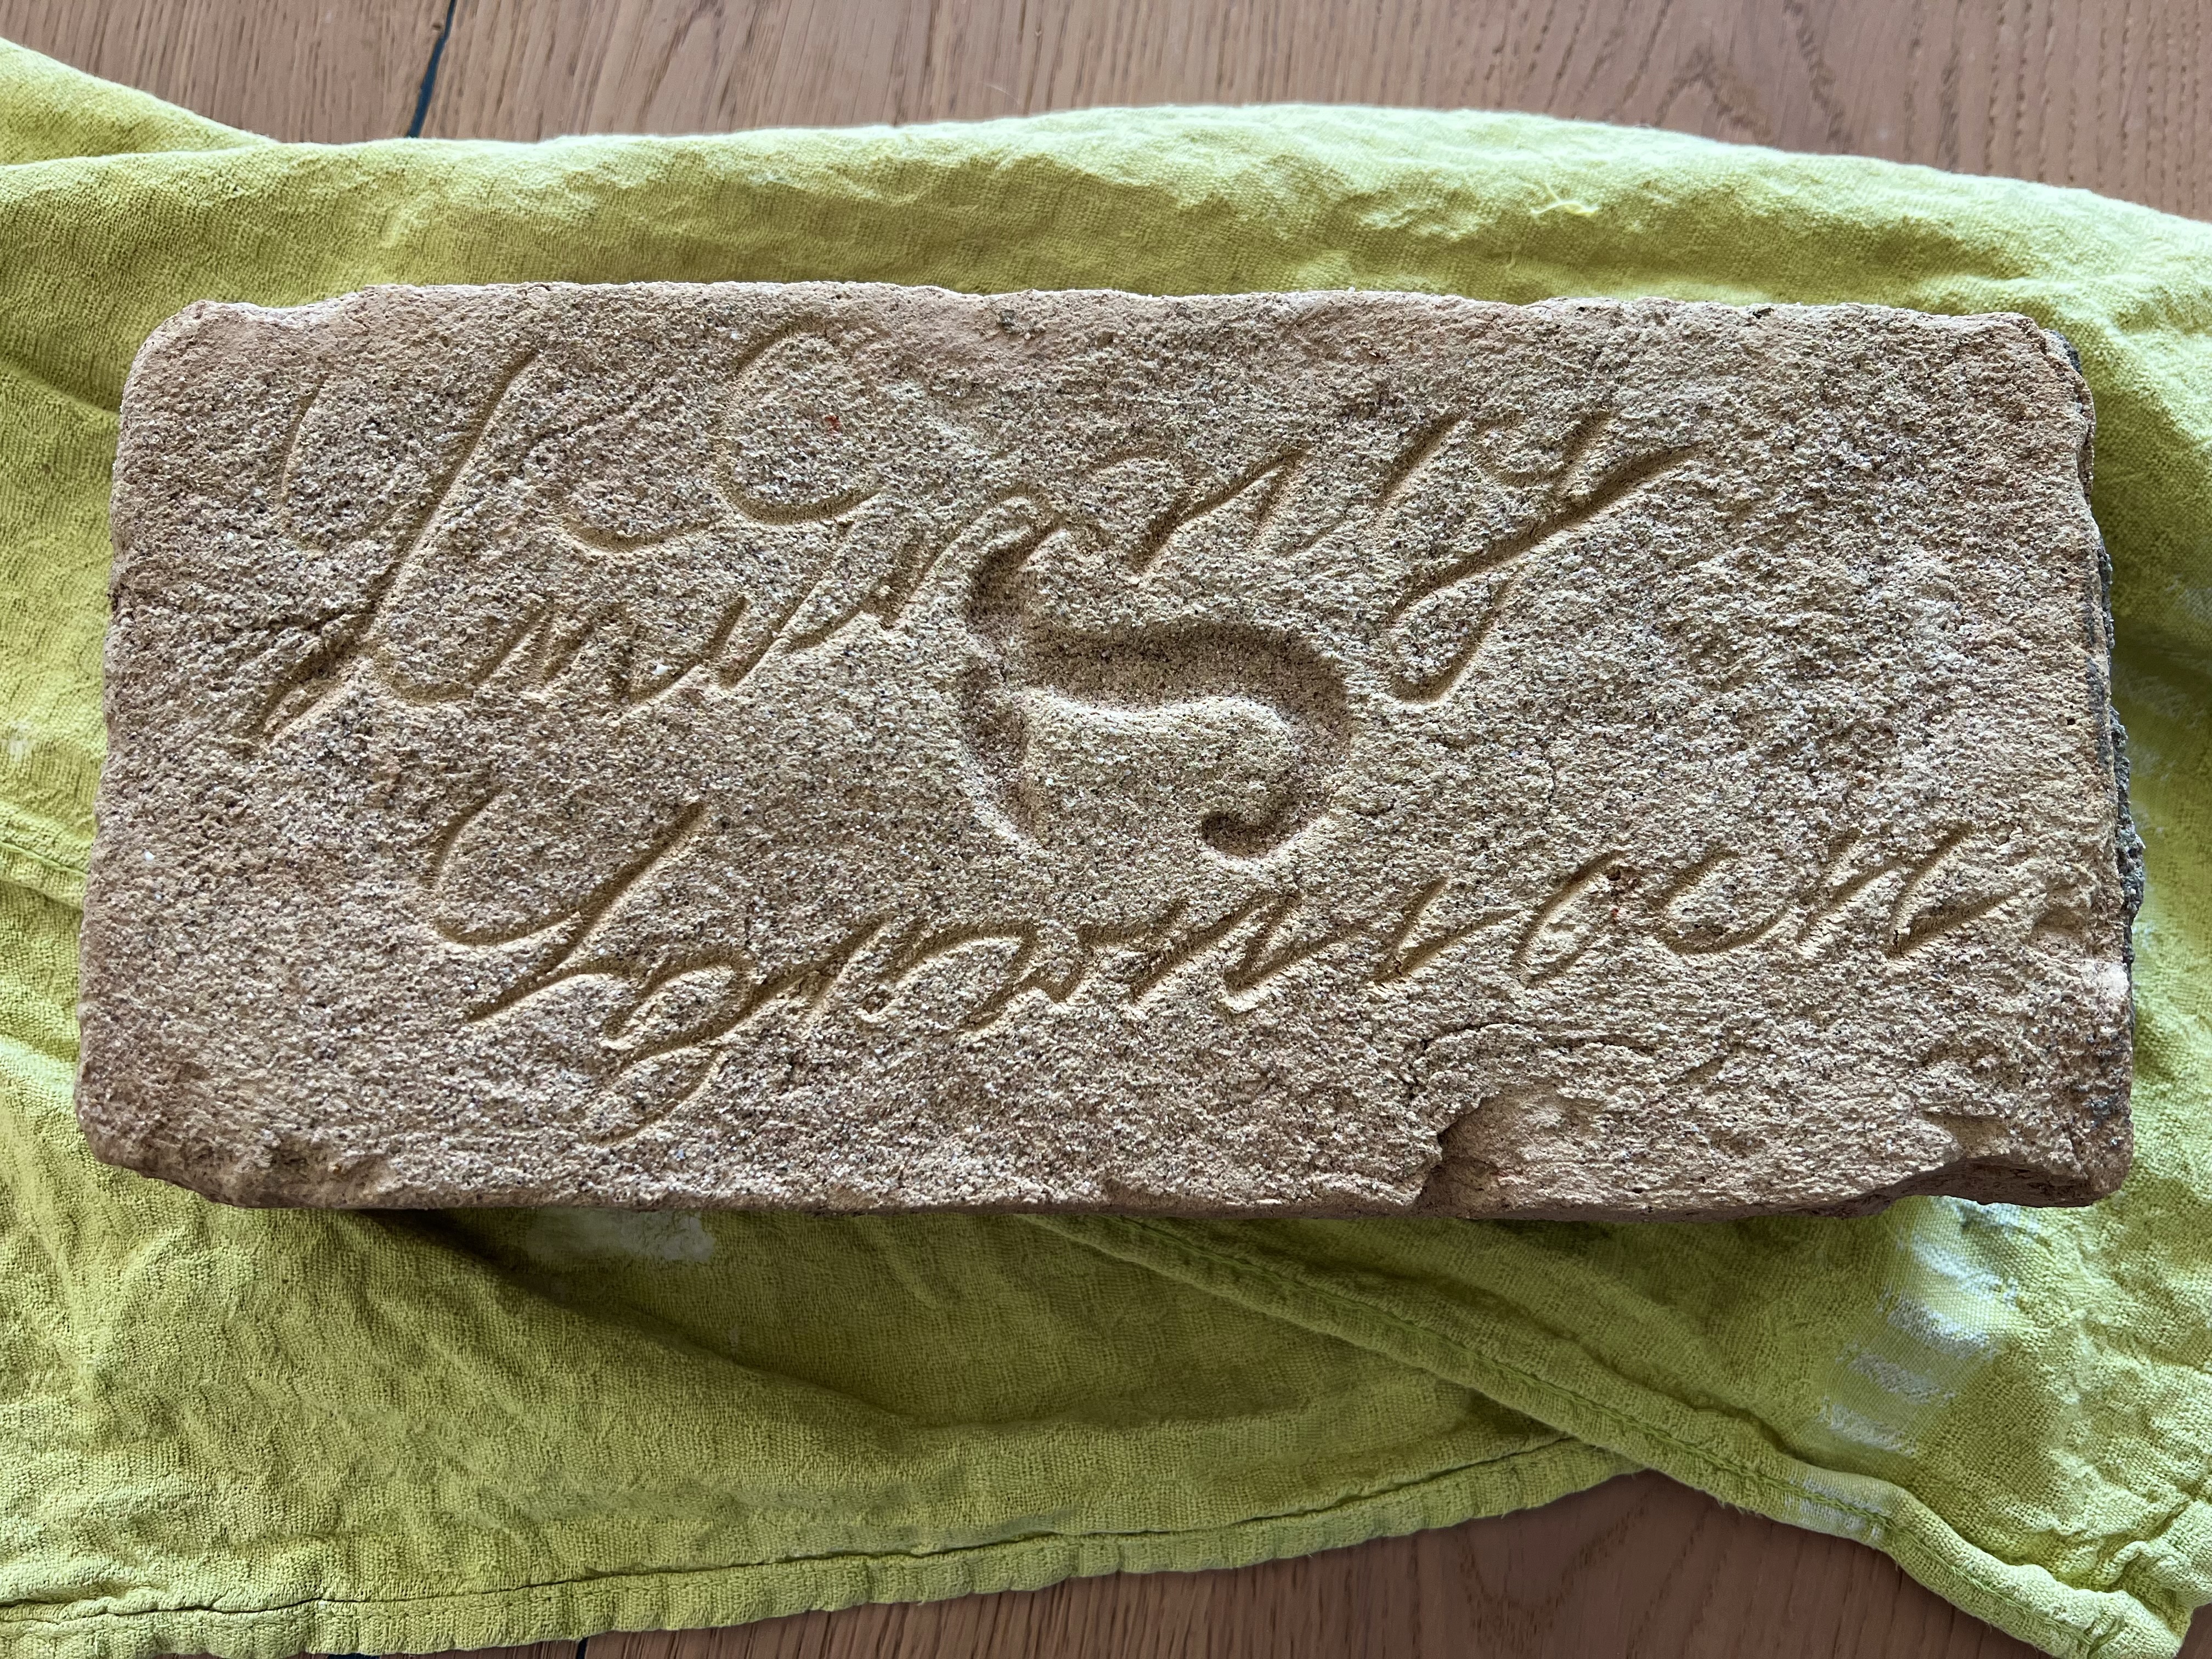
One of the bricks revealed a handwritten signature which turns out to mean "Ludwig Herman". We are still investigating who and when :)
Next, we will spend many hours cleaning the grout from the inside to free the bricks and make nice regular joints. Then we will insulate the outside with a pond liner and cover the root cellar under a thick layer of dirt.
See you soon!
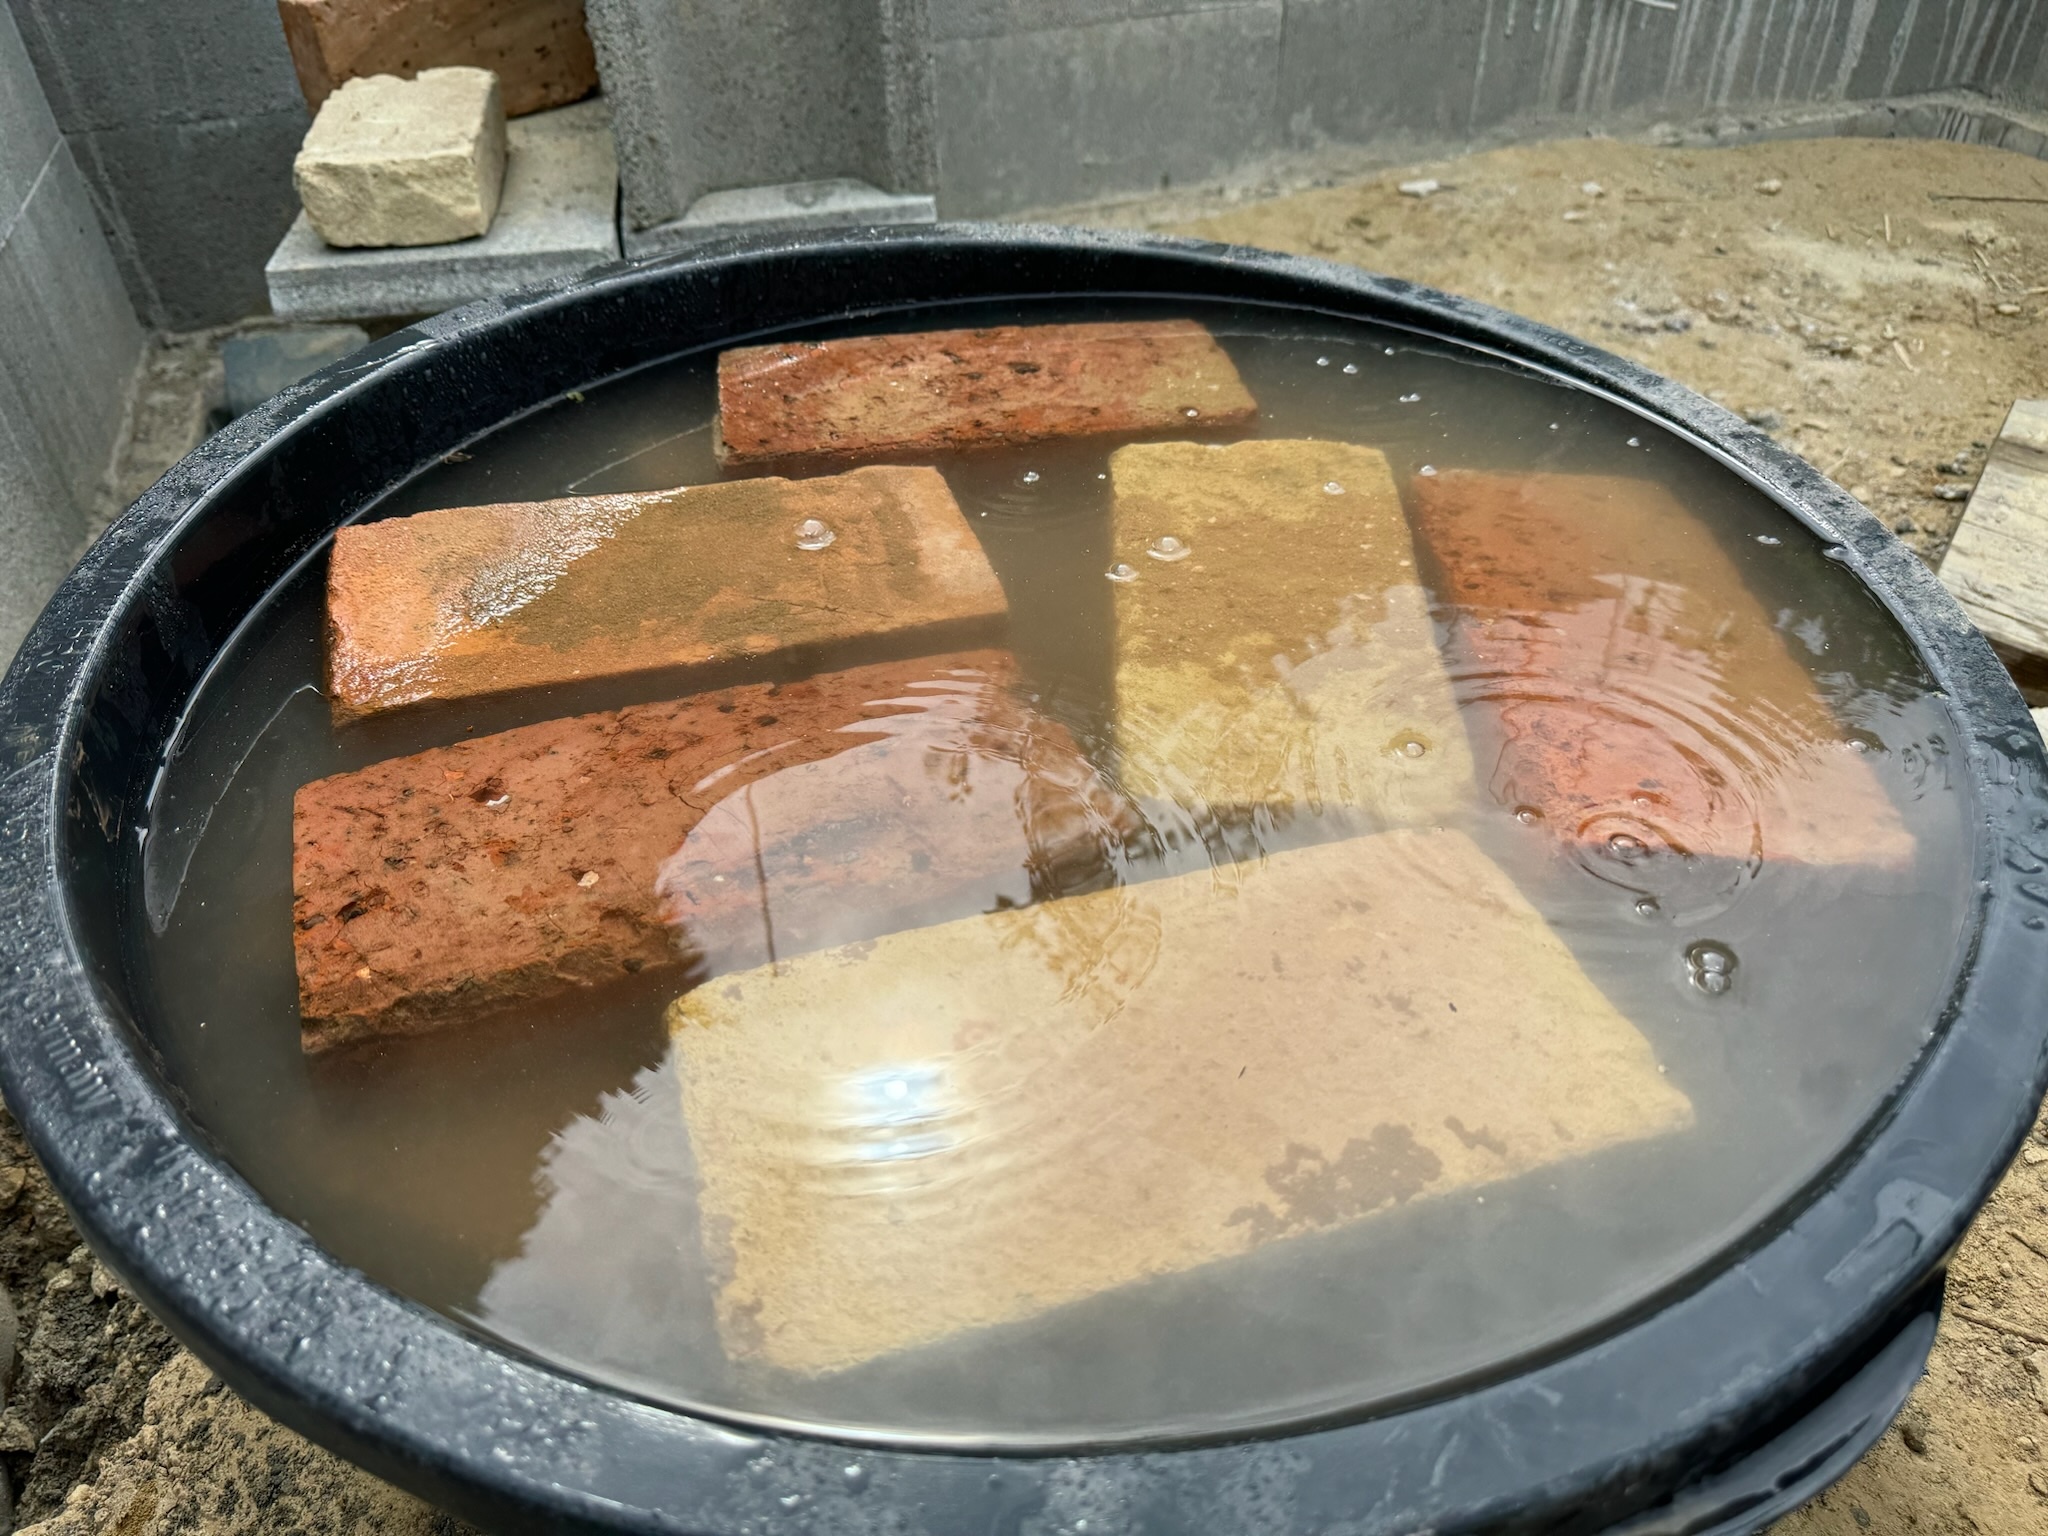
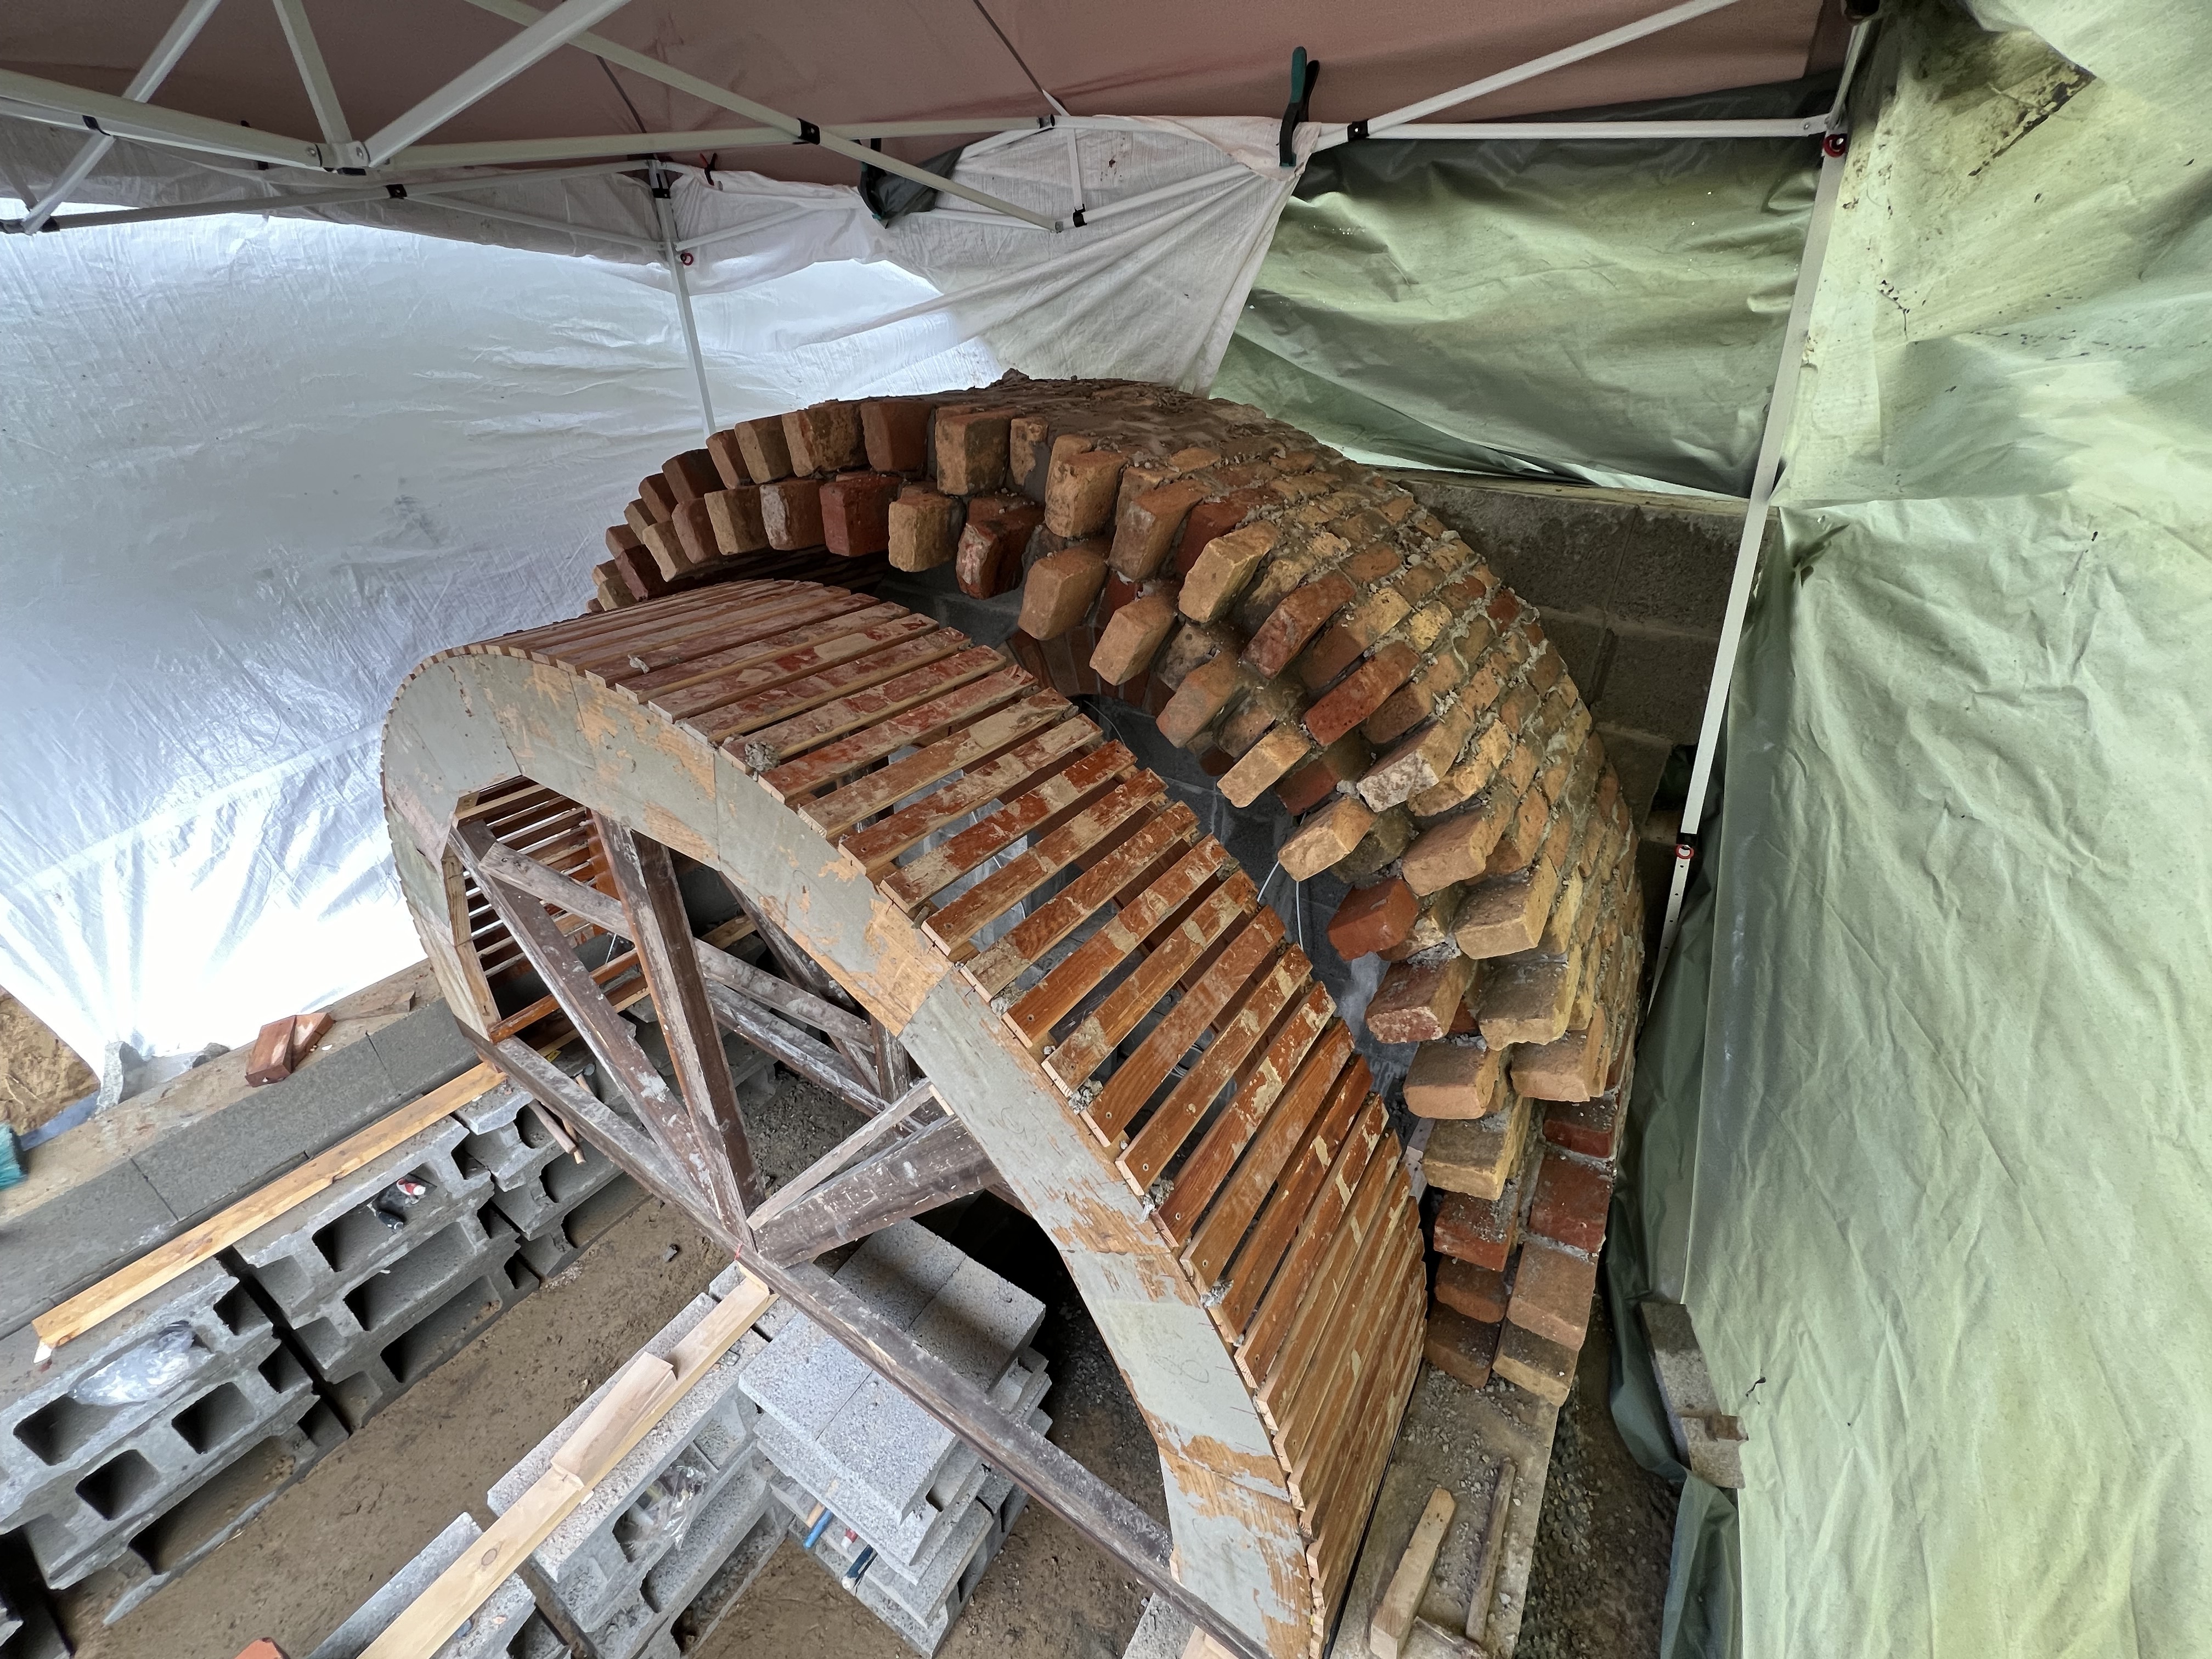
- Update 2: vaulted root cellar
Hello everyone! Thank you for all the positive comments last week.
We managed to double the length of the vaulted roof, laying the 3rd and 4th slice, in four 3 to 4-hour sessions.
The bricks are from old dismantled buildings, still covered in lime cement and need to be submerged in water and brushed individually. My SO is doing the laying, and I'm cleaning + assessing each brick.
We also get better with putting a smaller amount of grout to avoid spilling, because it's going to be a lot of work to clean all the joints.
This week, we expect to be able to lay 2 additional rows, and next week do the last slice, finish the door lintel (new word!) and front wall.
Lastly, a picture of me, because you know, we're getting familiar in the c/Do It Yourself family <3 Have a great week everyone!
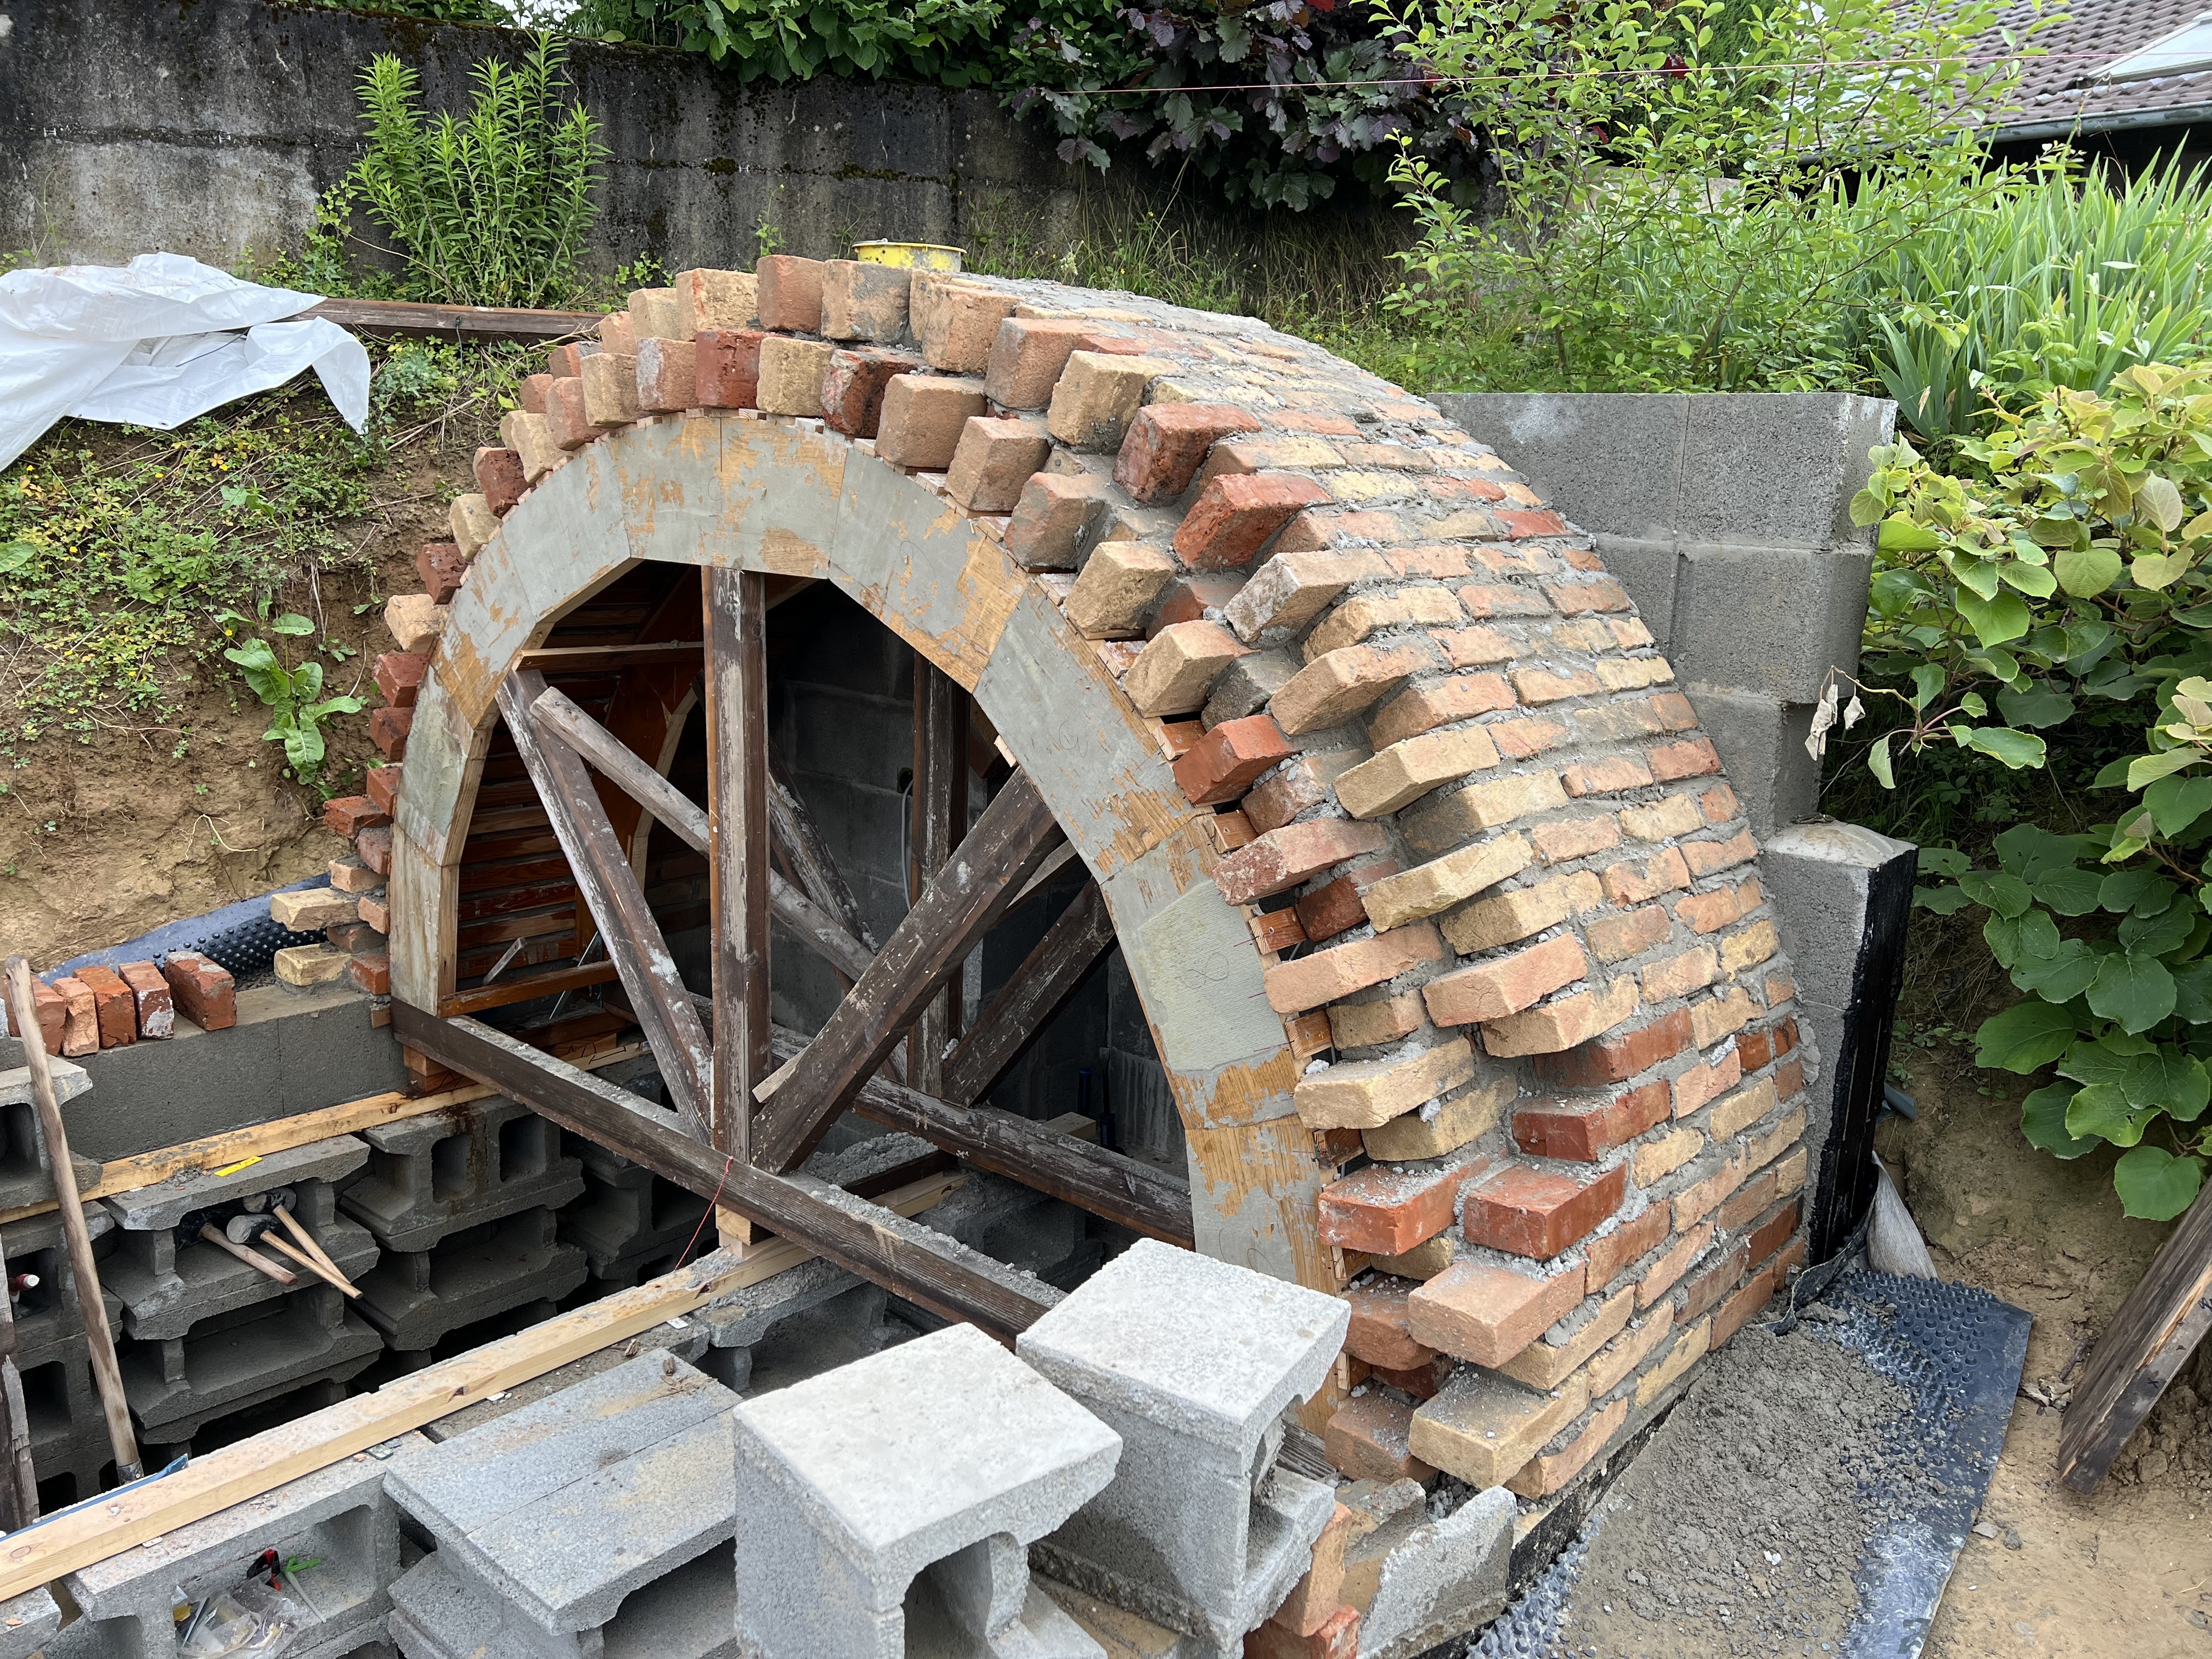
- Doing masonry for a root cellar vaulted ceiling
Decided to build something rather complex as a first project and it's proving challenging at ever step of the way, but I'm really proud of how it's turning out.
We'll have a lot of work to clean the joints but it's going to be worth it I think. Something for the generations to come, if it doesn't collapse :-)
- How to clean your flat or house
cross-posted from: https://beehaw.org/post/13852616
> Pretty cool guide. > > The guy says that he only recently realized that cleaning isn't intuitive so people need to be taught. This is for people who maybe haven't been taught how to clean or want to freshen up on their skills :)
- Make an DIY and FOSS Garage door opener in West europe...
Hi all,
I would like to install a door opener on my single panel jamb garage door
So for starter it seem hard to find brands that sell engine and accessory available for west europe.... (so, if you have any, fell free to share.)
My garage will be access by few peoples. therefore they need to have access but without being able to add or remove any other access..
So to start an external keypad might do.. and the engine should not have button that allow programming..
In the future I would like to be able to (trough Internet)
- open/close the door remotely
- add/remove code on the keypad
- add/remove remote control that are bind with the door.
I've found all-in-one solution but they are of course not FOSS[^foss].. \ So no thank you ! I would like to be able to connect easily a SBC or SBM[1][2]
So if you have any clue or if you think of a Lemmy community that might fit this post, I'm all ears.
Thanks.
cross-posted to
https://lemmy.world/post/14389868
[^1]: Single-Board Computer [^2]: Single-board microcontroller [^foss]: FOSS aka FLOSS
- imgur.com Epoxy takes a while
Discover the magic of the internet at Imgur, a community powered entertainment destination. Lift your spirits with funny jokes, trending memes, entertaining gifs, inspiring stories, viral videos, and so much more from users.
I'm almost wrapped up with filling voids, bark inclusions, and knot holes in the boards for the bookcase. If our garage was climate controlled I expect this process would have gone faster; the same could be said if I had more horizontal working space for staging and filling. Once everything is done curing I should be able to go back over each board with the finishing grits to reach 220 - after that it's cutting to have a plumb edge and to create the shelf supports.
Since we're popping the grain in between sandings (spraying lightly with water and allowing to dry, which swells the softer grain and allows for a smoother finish) I've been able to see what these will sort of look like once finished, but the small bits of epoxy that made it over the edges of some of these really make the grain look downright sexy.
- Deck Sealing Advice
My girlfriend's deck was built out of untreated pine that was never painted or sealed. I dont see anywhere that any wood is rotted or broken yet, but many boards are cupping from the humidity and temperature changes over the last 4 years. If I buy a few gallons of exterior wood sealant and brush on a few layers on top and bottom would that keep the wood from warping any further and protect it from rotting? Do I need to test that the wood humidity is below a certain threshold before sealing? Where can I get a tool for testing wood dryness? Does sealant brand make a difference? I've loved BEHR paints in the past, they do a great job, but there is a brand called READY SEAL that is much cheaper and I'm wondering if its worth the savings or if there is a reason it is cheaper. All advice is welcome. Thanks
- Parts Washer: What solvent are you using?
I've got one of those big red 20-gallon parts washers. You know the one. I mostly clean bicyle parts, and most bicycle lubricants are not petroleum-based. They're usually plant or wax-based. The idea is that a water-based degreaser, like Simple Green, should have no problem cleaning the stuff. My experience is that Simple Green is much better at rusting my parts washer than it is at actually washing parts. It never really got my bike parts clean, and now I'm left with a very rusty old parts washer.
I plan on refurbishing this machine, which is a fair amount of effort, but that puts me right back at square one; An imperfect system, susceptible to rust, with a solvent that doesn't really clean anything.
I'm considering moving to a petroleum-based solvent of some kind, like diesel. Or getting five gallons of that Saf-T-Clean stuff, assuming it's still available.
My main concerns are:
- Fire hazard.
- The fumes shouldn't give me cancer or kill too many brain cells.
- It actually cleans parts.
What solvent are you using in your parts washer?
Edit: I just checked the pump spec, and it's only rated for water-based cleaners. So that limits my options.
- imgur.com Older houses are fun to renovate update 1
Discover the magic of the internet at Imgur, a community powered entertainment destination. Lift your spirits with funny jokes, trending memes, entertaining gifs, inspiring stories, viral videos, and so much more from users.
Kind of a busy week otherwise but progress is progress. I put comments on each image in the album to explain reasoning, goals, and steps taken - if you haven't done much carpentry I hope they help; if you have done much carpentry I hope you'll share your expertise. I've been around a bit and done a few things but this is not what I would call my specialty. Still, I'll do my best to answer any questions folks might have, even if I end up invoking Cunningham's Law.
I should quickly note that our house was not built to the same kinds of specifications found nowadays. Hell, it's not even built to the specifications in my books about building which were published in the same decade it was built. Improvements like fully gutting to run proper 2x8 timbers just isn't in the cards, even though it's what I would do if we were building from scratch.
- In-house fiber network
Not sure if I should post this here or over in Technology, but here goes.
So I need to run two Gigabit (or better) network cables from the main switch in the garage into another room.
The problem is that that room is a shelter (small bunker), which according to Swiss regulations means no holes in the walls, and the 'door' is an airtight 35cm thick slab of reinforced concrete and steel. So the only way into that room is a small conduit for electricity. There's no way two Cat7 cables fit into that conduit, and power and data cables are not allowed to share the same space anyway. That means the only viable option is fiber - and, considering the conduit's dimensions, only fiber without a connector will go through.
There are copper/POF adapters readily available (such as this one), and they would probably do the job. However, POF is effectively limited to ~1Gbit half-duplex. If I go through all the trouble of installing fiber, I don't want it to be inferior to the existing Cat7 copper cabling. If there's a multimode solution that doesn't require me to buy two four-figure Cisco switches and five-figure tools, I'd much prefer that. Has anyone here heard of such a thing?
- A couple questions about clean up on some projects
Hello, I’m back again. A couple small questions this time, nothing major. But I do have a fun story to tell to explain one of the questions. I’ll put all the questions in bulk at the end though for those who don’t care.
For the story, I ran a new circuit for the lights in my basement. I got that project done fine and it works exactly as expected. But on the last step, when I hooked up the breaker I noticed the 15 amp single pole breaker above it had a white wire, not a black. Ok, not the biggest issue. I just need to figure out where it goes and reverse the wires on the circuit because I thought they had the black on the ground bar instead of the neutral. Instead the black wire went to a 20 amp single pole breaker. But it gets worse.
That side of the house has a lot of electrical stuff that doesn’t work. Several outlets, outside lights etc. it really could’ve gone to anything. But what it went to I wasn’t expecting. We have an electric radiator in our bathroom that hasn’t worked since moving in. I never payed attention because even on the really cold days the bathroom stayed warm since the rest of the house is fine with heating. Turns out the radiator, which requires a 220v circuit on a double pole breaker, was wired with a 12/2 romex NM wire and wired to 2 single pole breakers…. So that’s disconnected now.
My question is, since the slots are pulled out of the panel can I leave these breakers in there not wired to anything? What is the proper way to close those up?
Also, I took out some fluorescent lights and moved them from the window to the center of the room. In doing so I have a good bit of extra cable. It’s not Romex, but it is 600v NM cable. It’s the black rubbery coating. Is it worth saving this in case I need wire for a spare project or is there some kind of risk to using the old cable?
- Need beam for a 22-foot span. It's a carport. What to use?
I'd like to build a carport. It will basically just be a shed roof extending off the front of my garage. I'll need a beam, as thin as possible, to span 22 feet from side to side.
It looks to me like steel is the only thing that could easily do that, but the cost is high, and how thick does it have to be? I priced out some 6" i-beams. $500 each. How do I attach wood to those? Can't exactly nail into them.
That brings me to LVLs and such. Less pricey, but very thick. I suppose I could double up on a couple of thinner ones (like 6") but they don't seem to be rated for exterior use, and I'm pretty sure a carport would be considered exterior use, even though they'd be under a roof.
Any guidance?
- DIY smartphone?
I am looking to building my own phone from a SBC running a linux distro with plasma mobile and that can make calls. and I have some questions:
Where can I start?
Which SBC to choose?
How would I achieve the call functionality?
- Finished the cat paths!
We finished the last piece of the cat path I posted about earlier! This one goes from the laundry room, to the stairwell, and then into the guest bedroom on the upper floor (yes, I know the carpet needs replaced in that closet). They are already using them and seem to love the new path already.
https://imgur.com/a/QExCWgN
- Caps(?) for upside-down galvanized fence?
tl;dr: Neighbors' galvanized fence is upside-down and very sharp and pokey. How can I make it not be?
To start with, the neighbor is almost never home and therefore hard to contact. Also, they only bought their property last year and probably don't even realize they own the fence. Anyway.
As you may know, galvanized fences have a top and a bottom. The bottom has sharp bits which dig into the ground while the top is more rounded off.
When I bought my house, there was already a galvanized fence in place between my house and my neighbor's. I'm no fan of these fences in particular, but that's fine. Except that I later noticed that it had been installed upside-down, meaning that the top of the 3-ftish fence is covered in sharp spikes, while the safe end has been buried underground.
When I was younger, I had a dog who had her belly horrifically torn open while jumping over an upside-down galvanized fence, and I have two dogs, so this is a serious concern of mine. While my dogs have fortunately never tried so far, a dog could die trying to jump over a fence like that.
Question is, what can I do about it?
I would offer the neighbor for me to pay for it to replace the fence, except for the fact that we are on a serious and convoluted grade and it is no small matter to replace a fence. Because of the grade, there's no way for me to put up a second fence on my side (trust me, it would require some serious landscaping to do that, in the tens of thousands of dollars--we're on a hill).
So I feel at a loss except for to try to cap off the sharp tops of the galvanized fence, and my searching suggests that there is no pre-made product for this because this fence was just installed wrong.
Any advice?
- Running Electrical Wire through insulation
Hello, I’m back with another question. Everything a read is telling me yes I can, but it really does not feel right so I’m gonna ask here for good measure. Can I run electrical wire through fiberglass insulation?
In several rooms upstairs the wire comes out of the center of the ceiling then goes across to the window where a fluorescent tube light is installed. Below all that is a drop ceiling tile with insulation packed on top of it. I want to take the fluorescent light out and put a normal light back in which is easy enough. My concern is running the wiring through the insulation. Everything says running it through insulated walls is fine and the insulation itself says it’s non-combustible. But can someone confirm that I’m reading the right stuff?
There’s a gap between two pieces of insulation that I want to run the wire between. Picture attached. Not sure how old the insulation is if that is important.
- Older houses are fun to renovate
I appreciate a creative use of scrap lumber as much as the next person, but jeez. I'm getting tired of floating sistered joists and framing.
- Kinda DIY, Kinda Pets
My partner and I have been talking about making some cat paths in our house since long before we owned our house. We recently got 2 new dogs, so now it is a high priority project. The first step was putting up some shelves in the hallway and making a portal from the hallway to the bedroom closet (you can see it just above the tent). The surround for the portal is this 3D printed tunnel
https://www.printables.com/model/3068-cat-door
The next project is going to be putting a portal from the spare bedroom into the stairwell so they can go up and down floors without the dogs being in the way
https://i.imgur.com/rxI55E4.jpg
- To anyone in this DIY community who has a motorcycle or a car:
If you need advice that particular kind of DIY, feel free to post here and tag me or DM me directly. Hopefully I can be very helpful to some of you folks who either can't afford to pay expensive mechanics or want to learn on your own.
I work as an independent mobile mechanic in middle Tennessee (for now). My primary work is motorcycles and small engines, but I've done plenty of work on cars too. I used to post quite often on r/fixxit back before I left Reddit.
Pic is an example of my work. That's one of my motorcycles, which I resurrected from the dead. I took that picture while was riding to the small town of Cave-In-Rock, Illinois, to rebuild 4 carburetors for a customer, and in line waiting on a ferry to cross the Ohio river.
- Edges of caulk pulled up from surface
I'm (obviously) not great with caulk but needed to re-caulk where our kitchen counter meets the outside wall as it has a crack all along the counter. House was built about 20 years ago and it may be original and just settled.
Anyway, I watched a video and the person put down painters tape on the wall and along the counter so you could get a straight edge. They showed pulling off the tape pretty quickly after applying the caulk. I did so and the caulk pulled up from the counter (and, to a lesser extent away from the tile on the wall.)
Is this an OK technique to use, generally? What could I have done to keep this from happening? I had cleaned the surface well. Should I have pulled the tape off with an angle closer to the counter? I think I pulled it off about 45 degrees. Would it hurt to wait a little longer for the caulk to adhere to the surface a bit? I'm concerned if it starts to cure much at all that it will be harder to pull off the tape without pulling the caulk away from the wall.
Going to wait until it dries, then scrape it out and try again. This is a small section that I'm using to work on my technique.
Thanks.
- What do you recommend as a solution to harden paper?
I have a few project ideas, and I thought of reusing the paper from various shop catalogs that I receive in my physical mailbox. I'd like to make it stiffer, something more like cardboard. I read somewhere online that you could use corn starch for this, mixed with water. Would it work? Do you have better ideas?
- XLR Splitter Impedance Matching - Worth It?
Hi all. I'm splitting 2 XLR line level audio signals into 3 channels each. I bought one nice device (used) online called the Whirlwind SPL1x3LL (line level). Unfortunately I can't find another used one for a decent price. However there are plenty of mic impedance matched units, SPL1x3MIC which according to the manufacturer are identical except the impedance difference. I'm good at soldering and the devices are fully analog (no PCB), so I'm considering doing the conversion myself.
I was curious what it would likely take to convert the mic box to a line level box? Is it just a matter of adding a resistor somewhere? Seems like an easy way to save $100 without buying a brand new unit. I looked into my line level box and the is one component I don't recognize where the out signals split away from. My only hesitation is that I buy the device and end up needing a specific part or it turns into a larger job than anticipated. Just figured I'd entertain the idea before buying brand new. Thanks.
- Re-sealing shower surround
I am stripping and re-sealing a corner shower stall, and am having a hell of time removing all the old caulk. I also discovered the previous homeowners decided to just caulk over the previous caulk that was on there, so I am removing 2 or 3 layers depending on the location. It was leaking in the spots that had 3 layers so I think they just added more caulk to "fix" leaks. I have the chemical caulk remover, and that certainly helps, but it still is taking a metric fuck-ton of manual labor. Any tricks/suggestions for removal of very old caulk? I am about to throw a scotch brite on a palm sander and go to town.
- Fished new wire for the first time!
I posted on here the other day about some suspicious 240v cable and followed the recommendations to replace it. I was already leaning that way but was kind of hoping to be told I was overthinking it. But you all confirmed what I thought. I ran close to 25’ of 10/2 cable from the second story to the basement. Nothing is wired yet because it is late and I don’t want to turn on the main breaker.
My step dad let me borrow a 50’ fishing tape and 10’ endoscope which were really helpful. I did not have to cut any walls!
- Need help identifying type of 240 wires
Hello,
I have been doing a lot of work remodeling a house I bought. The house was in really rough shape so I was expecting a good bit of work but the last owners laziness and incompetence has really made things worse.
They had the house split into two apartments and we are converting it back to a single home unit. We knocked out a wall and installed new stairs to connect the top and bottom floors. Next we are converting the upstairs kitchen to a laundry room. We have been using the makeshift room for a few months, but we are getting a new washer and dryer. Our current dryer is a compact electric dryer that runs on a 120v outlet. The new will be a standard electric dryer and need a 240v outlet. There is 240v outlet in the room for a range. I am going to pick up a new breaker from lowes with the proper amperage but wanted to check everything else first and I think I ran into an issue with the wire itself.
There are 3 wires, which matches the outlet so I am assuming it is supposed to be 2 hots and a neutral. However, upon closer inspection there is no insulation on the neutral. I peeled back more of the larger insulation around all 3 wires but the neutral wire is uninsulated like it was a ground. Now, I have encountered this in the house elsewhere. Most of the outlets have grounds cut off, but a 3 way switch didn't have the second hot wire so they used the ground as the second hot. I got that "fixed" (I unhooked everything and made it a single switch/light circuit and eliminated the second switch). But I don't know of any 240v wire combinations that would only be 3 wires and include a ground. The wire is definitely thick enough to be 240v wire and each individual wire has multiple "threads" like a 240 wire would. But it is older wire as well so I am not sure if it is just that old that they didn't insulate neutrals when they did this. Is this wire safe to use?
A second, and more minor question, deals with a separate circuit. The house electric is still split and I pay 2 bills, one for upstairs and 1 for downstairs. The upstairs does have an outdoor AC unit on it as well that was installed after we moved in by an HVAC tech so I am trusting that to be installed right. But the entire box for the "upstairs" has 4 breakers. There is a 50amp, 40amp, and 20amp double pole breakers and a 10amp single pole. The 10amp controls a single light and one of the 240v breakers controls the AC. Another controls the range/future dryer outlet. The The 20amp double pole controls everything else upstairs which is ALL 120v. There are a few lights and all of the outlets. Is that safe? Is there a reason to do that? The upstairs is pretty small if that makes a difference, I have just never seen a double pole breaker used for a 120v circuit even if it is pretty large.
Edit: I made the original post on my PC due to the size but I’m adding some pictures from my phone
Edit 2: I am going to buy and run new wire with the new breaker. I showed a picture to my dad and he said nothing matters because that’s an aluminum ground which means the wire needs replaced due to its age regardless. So even if it’s wired wrong now, I am stripping the wire out and putting a new wire and breaker in so it should be done right
- solar.lowtechmagazine.com How to Build a Small Solar Power System
This guide explains everything you need to know to build stand-alone photovoltaic systems that can power almost anything you want.

- comfortable wooden seats
I have been investigating the fine art of dishing out a wooden chair seat for comfort today, and made discoveries that can be readily condensed into a, imho miraculously easy formula. So here goes:
Your "sitz" bones or ischial tuberosities are prominences of the pelvis that are the hard spots when you sit. They are pretty consistently located in adult humans as it turns out, though you'll have a hard time finding dimensional data if you go looking! I measured approximate spacing among a slightly inebriated and jovial crowd who endured the indignity with humor and made a rough prototype seat to check my theory. Drill two 2-inch diameter holes spaced five inches apart at center (3-inches of material remaining between the holes). For a finished seat, one would shape the edges, but don't even bother for this experiment - just drill the holes in a piece of lumber and sit down on it. shift around for comfort and when your ischial tuberosities align with the holes you will say aaah!
I will be making two holes in a rectangular stool seat at this spacing, centered about three inches from the "back" edge of the stool, and sanding smooth and dishing out the seat a little. I'll try to remember to post a finished picture, but I found this preliminary result too great and dramatic to wait.
Some individuals might be grateful for a third hole at the centerline and about two inches closer to the back edge - where a tailbone-afflicted person does not need hard support and an average person will not miss it. I have not tested this third hole yet, maybe others will report...
- Arduino chrono-thermostat
Crossposted from: https://lemmy.ml/post/9698836
> This setup allows Arduino to read temperature, control relay based on setpoints, display info on OLED screen, and manage date/time settings with user input through buttons. Adjust based on specific hardware/project requirements. > > Designed to replace the faulty electronic control of a blue heat radiator. > > Code and simulation at Wokwi > > Licensed under GNU GPLv3.
- Problem with the dishwasher
Hi, I have an Indesit 15b1 and it won’t run a cycle. When I turn it on, I get a error code, 3 green solid, amber start light and red flashing salt light. Nothing about it in the manual, Indesit said the same thing.
It sometimes starts working after I tilt it for a bit.
It’s not the anti flood device, the bottom is dry. I took the drain pump out, it’s clean, so is the drain hose and inlet hose.
When I turn it on, it drains the water, then I THINK it tries running the wash pump, and then tries draining again, and the pump again, and the error code.
Is there anything I can do before I take the wash pump out? I kinda don’t wanna do it cos it has those one time pinch clamps and I’d need to buy them and all
Thanks :)
- Laptop DIY
I am using an old HP Pavillion 15 to make a tablet. I have all of the internal components, and am making a shell. Does anyone know what the easiest way to make a case for those parts would be?
- How to get cigarette smell out of my apartment?
So my roommate is a habitual cigarette smoker. He doesn't smoke indoors (thankfully) but he does smoke about every other night outdoors. I don't think he realizes that when he's done smoking the smell sort of... lingers on him and his clothes. Last night after he was done he was in the kitchen for a bit cooking. I came in this morning to make a sandwich and the smell was all over the kitchen and very pungent, it made me think some food was rotting. This kind of thing happens probably once a week, and while I'm kind of used to it by now I do want to have people over and have them actually be comfortable.
Apart from asking him to quit (I doubt it) is there any sort of concotion or thing I can make / spray / sanitize to get rid of the smell? Some days it's nonexistent but other days it's almost unbearable.
- Woodworking Projects for Children: Educative and Enjoyable Options for Young Artists
Introduction
Kids can learn a lot about motor skills, creativity, and problem-solving skills by participating in woodworking projects, which can be wonderful and educational.
A sense of success and self-confidence are also fostered in children who work with wood as they witness their projects come to life. Additionally, it gives children the chance to learn about various wood species and tools, broadening their knowledge and comprehension of the natural world.
Here are some enjoyable and suitable woodworking project ideas for younger artisans:
1. Birdhouse
One of the classic woodworking projects is a basic birdhouse. To build a comfortable home for birds, kids can learn how to measure, cut, and assemble pieces of wood.
Children can learn the fundamentals of woodworking while building a birdhouse, which also inspires them to notice and value nature by attracting birds to their backyard and giving them a place to live.
Furthermore, children can use paint or decorations to personalize this project, letting them show their creativity and create a genuinely unique birdhouse.
2. Wooden Puzzle
Make a straightforward puzzle with sizable parts. Youngsters can cut out the pieces after painting or decorating them. This project improves problem-solving and woodworking abilities.
Children can enhance their fine motor skills and cognitive abilities as they design and construct their own wooden puzzles and learn how the pieces go together. With this project, children can push their mental limits and have fun expressing their creativity. The completed puzzle can also be enjoyed repeatedly, giving both adults and children hours of enjoyment.
3. Picture Frame
Make custom picture frames out of wood. Children can cut and put the parts together, then apply paint or decorate them. Add a sentimental photo for a personal touch.
With this project, kids can show off their artistic abilities and produce a one-of-a-kind memento that will be treasured for years to come. Kids may hone their problem-solving abilities while working on this project by figuring out how to build the frame and make it sturdy enough to hold the photo. These personalized picture frames are sure to make kids and their loved ones happy, whether they are given as a kind present or displayed in their own room.
4. Treasure Box
Construct a tiny treasure box with a hinged cover. Children can use this to save unique treasures or tiny trinkets. A creative touch is added by decorating the box.
Kids can use making a small treasure box as a creative way to express their creativity, in addition to having a useful storage solution. With the help of this project, kids may be creative and add personal touches to their treasure box, turning it into a treasured memento for years to come.
5. Toolbox
Build a little toolbox to contain their own collection of kid-friendly instruments. They will learn how to keep tools organized and in one location with this activity.
Children can develop a sense of responsibility by making a tiny toolbox and learning how to maintain and arrange their tools. It gives kids a useful ability that they can use in a variety of scenarios, like doing do-it-yourself projects or fixing items around the house. As youngsters learn how to use tools safely and effectively, this project fosters independence and the development of problem-solving skills in them.
6. Bookends
Construct and design wooden bookends. Youngsters can use their favorite book themes to paint or decorate them.
Children can express their creativity through this activity, which also teaches them to value and care for books. Children can gain control over their reading materials and an understanding of the value of organization by designing and making their own bookends.
This exercise can also be an excellent way for parents or guardians to have important discussions with kids about the books they enjoy and the tales that motivate them.
7. Wooden Toys
Make easy-to-use wooden toys, including animals, boats, and cars. Painting the toys and sanding their edges are two creative processes.
In addition to letting kids explore their creativity, making basic wooden toys like cars, boats, or animals improves their hand-eye coordination and fine motor abilities. Children can be further encouraged to take care of their creations by painting and sanding the edges of the toys, which can be an enjoyable and engaging exercise. Furthermore, these handcrafted toys can be treasured mementos or presents for loved ones, encouraging children's generosity and sense of achievement.
8. Coat Rack
Construct a coat rack with hooks so that hats, coats, and backpacks can be hung. Through this activity, children are introduced to the ideas of measurement and space.
Children gain knowledge of organization and precision by measuring and marking where the hooks should be placed. As they work out how to place the hooks on the coat rack evenly, they also learn how to solve problems. Children can see the real-world applications of math through this interactive experience.
9. Garden Markers
Make wooden plant and herb markers for your garden. Each marker can be painted and labeled by children, making it into a little gardening project.
This craft educates kids about various plants and herbs while also fostering their creativity and artistic expression. Kids can gain a deeper understanding of nature by learning the names and traits of different plants by naming each marker. Children can also take charge of their own garden and learn responsibility by taking good care of their plants through this endeavor.
10. Name Plaque
Create a personalized wooden name plate by cutting wooden letters or even just one wooden piece and painting or engraving your name on it.
You can hang this personalized name plaque next to the garden to give it a special touch and to add to the project's uniqueness. Children can also use it as a regular reminder to be proud of their garden and to experience a sense of success when they see their plants flourish.
11. Simple Stool
Make a modest yet reliable stool. Pieces for this project need to be measured, cut, and assembled, and the finished product is useful.
The straightforward stool can be given a natural wood finish or a flash of color by painting or staining it to fit the garden's décor. It can be a useful tool for getting to higher spots in the yard or a comfortable bench for kids to relax on while caring for their plants. Children can learn the fundamentals of woodworking from this do-it-yourself project, which also helps them recognize the value of handmade goods.
12. Painted wooden beads
Bright necklaces and bracelets are created using wooden beads that have been string-painted. This project combines fine motor abilities with woodworking.
Kids can have fun painting the wooden beads and stringing them to make one-of-a-kind, customized accessories. Their concentration and hand-eye coordination increase, along with their creativity, when they engage in this pastime.
Conclusion
Never forget to put safety first by employing age-appropriate tools and offering adequate supervision. Permit the children to use their imaginations by giving them free reign to select the colors, embellishments, and unique elements for their crafts.
Children may show their uniqueness and make something of their own by choosing the colors, embellishments, and personal touches for their crafts. This gives them more self-confidence and inspires them to explore their creative potential and think beyond the box.
Check out for more information Exotic Wood Zone.
- How to pass low voltage ethernet cables through drywall with insulation
Hello everyone, I am pulling my home's existing ethernet cables from the garage and into my home to install a network rack. Currently my garage does not have insulation (for a future project), so it get's too hot during summer for my router to live there, so I want to install it in my mudroom where there is insulation. My question is if I drill a hole to put some sort of cable cover (ie. https://a.co/d/1hHosME) will it affect my home's insulation too much where I should be doing something else? If so, what should I do to improve the cable runs?