Yeah, I need to look into this further because it is either confusing or incorrect in my diagram. I'm very close to issuing a major update (maybe less than a week?), so stay tuned.
If you're new to Anduril, you might find my diagrams useful. https://lemmy.world/post/1038159 The TS10 is a great little light, and can be easily updated since the driver has flashing pads.
This is an awesome mod. The time and effort and skill that goes into something like this is really impressive.
Yeah, I'm thinking it has the wrong emitters. I figured that Jackson would take care of it.
Thanks for this feedback. Sync still isn't converting the dashes to bullets, but at least I got the line breaks to show up now. I guess the web interface is more forgiving than Sync.
Yeah, I just noticed that Sync on Android butchered my bullet lists. I wonder if that can be resolved?
So I'm finally posting a build to contribute to the community...
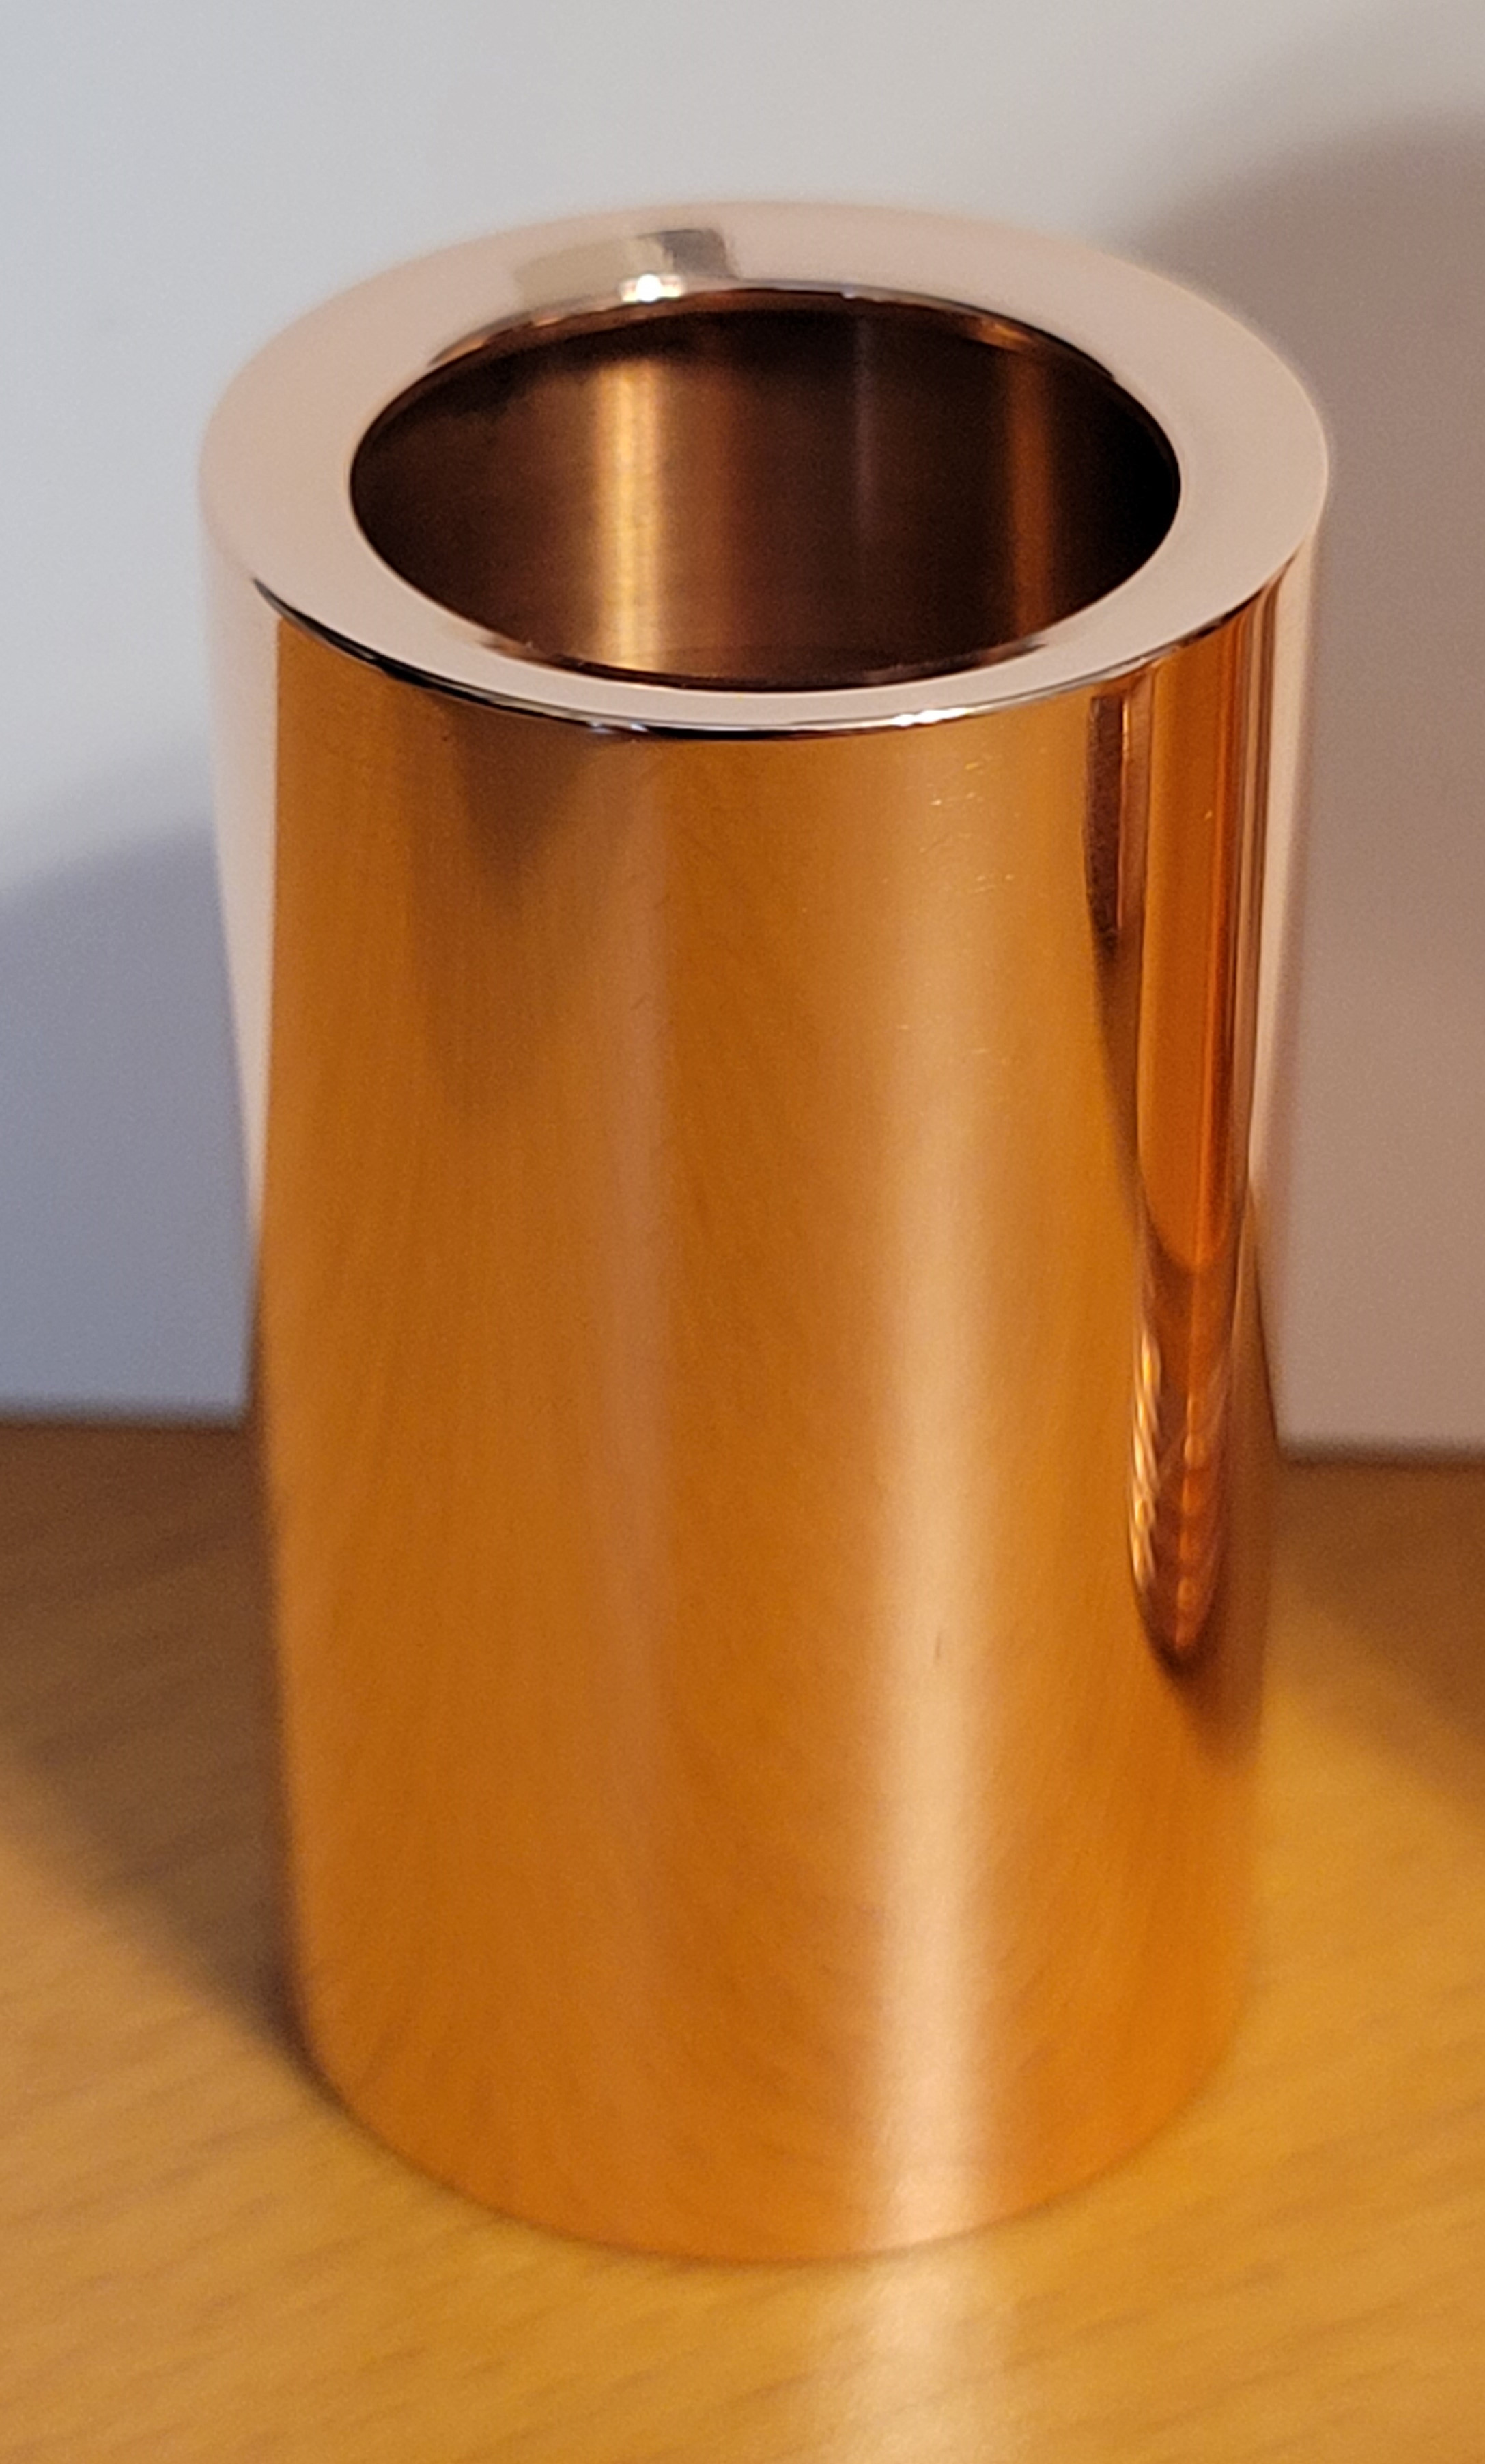
A while back, I purchased a copper Convoy S2+ along with a copper 18350 tube. I originally built it as-is with the brushed finish and clear coating, but then I decided that I wanted it to patina naturally. The only way to do that properly was to remove the clear protective coating, and a panel of flashlight experts told me that a mirror finish produces the best patina. So I broke the light down, and polished the host. I also took the opportunity to take some pictures of the internals, and provide all of the details here.
Let's start with all the parts:
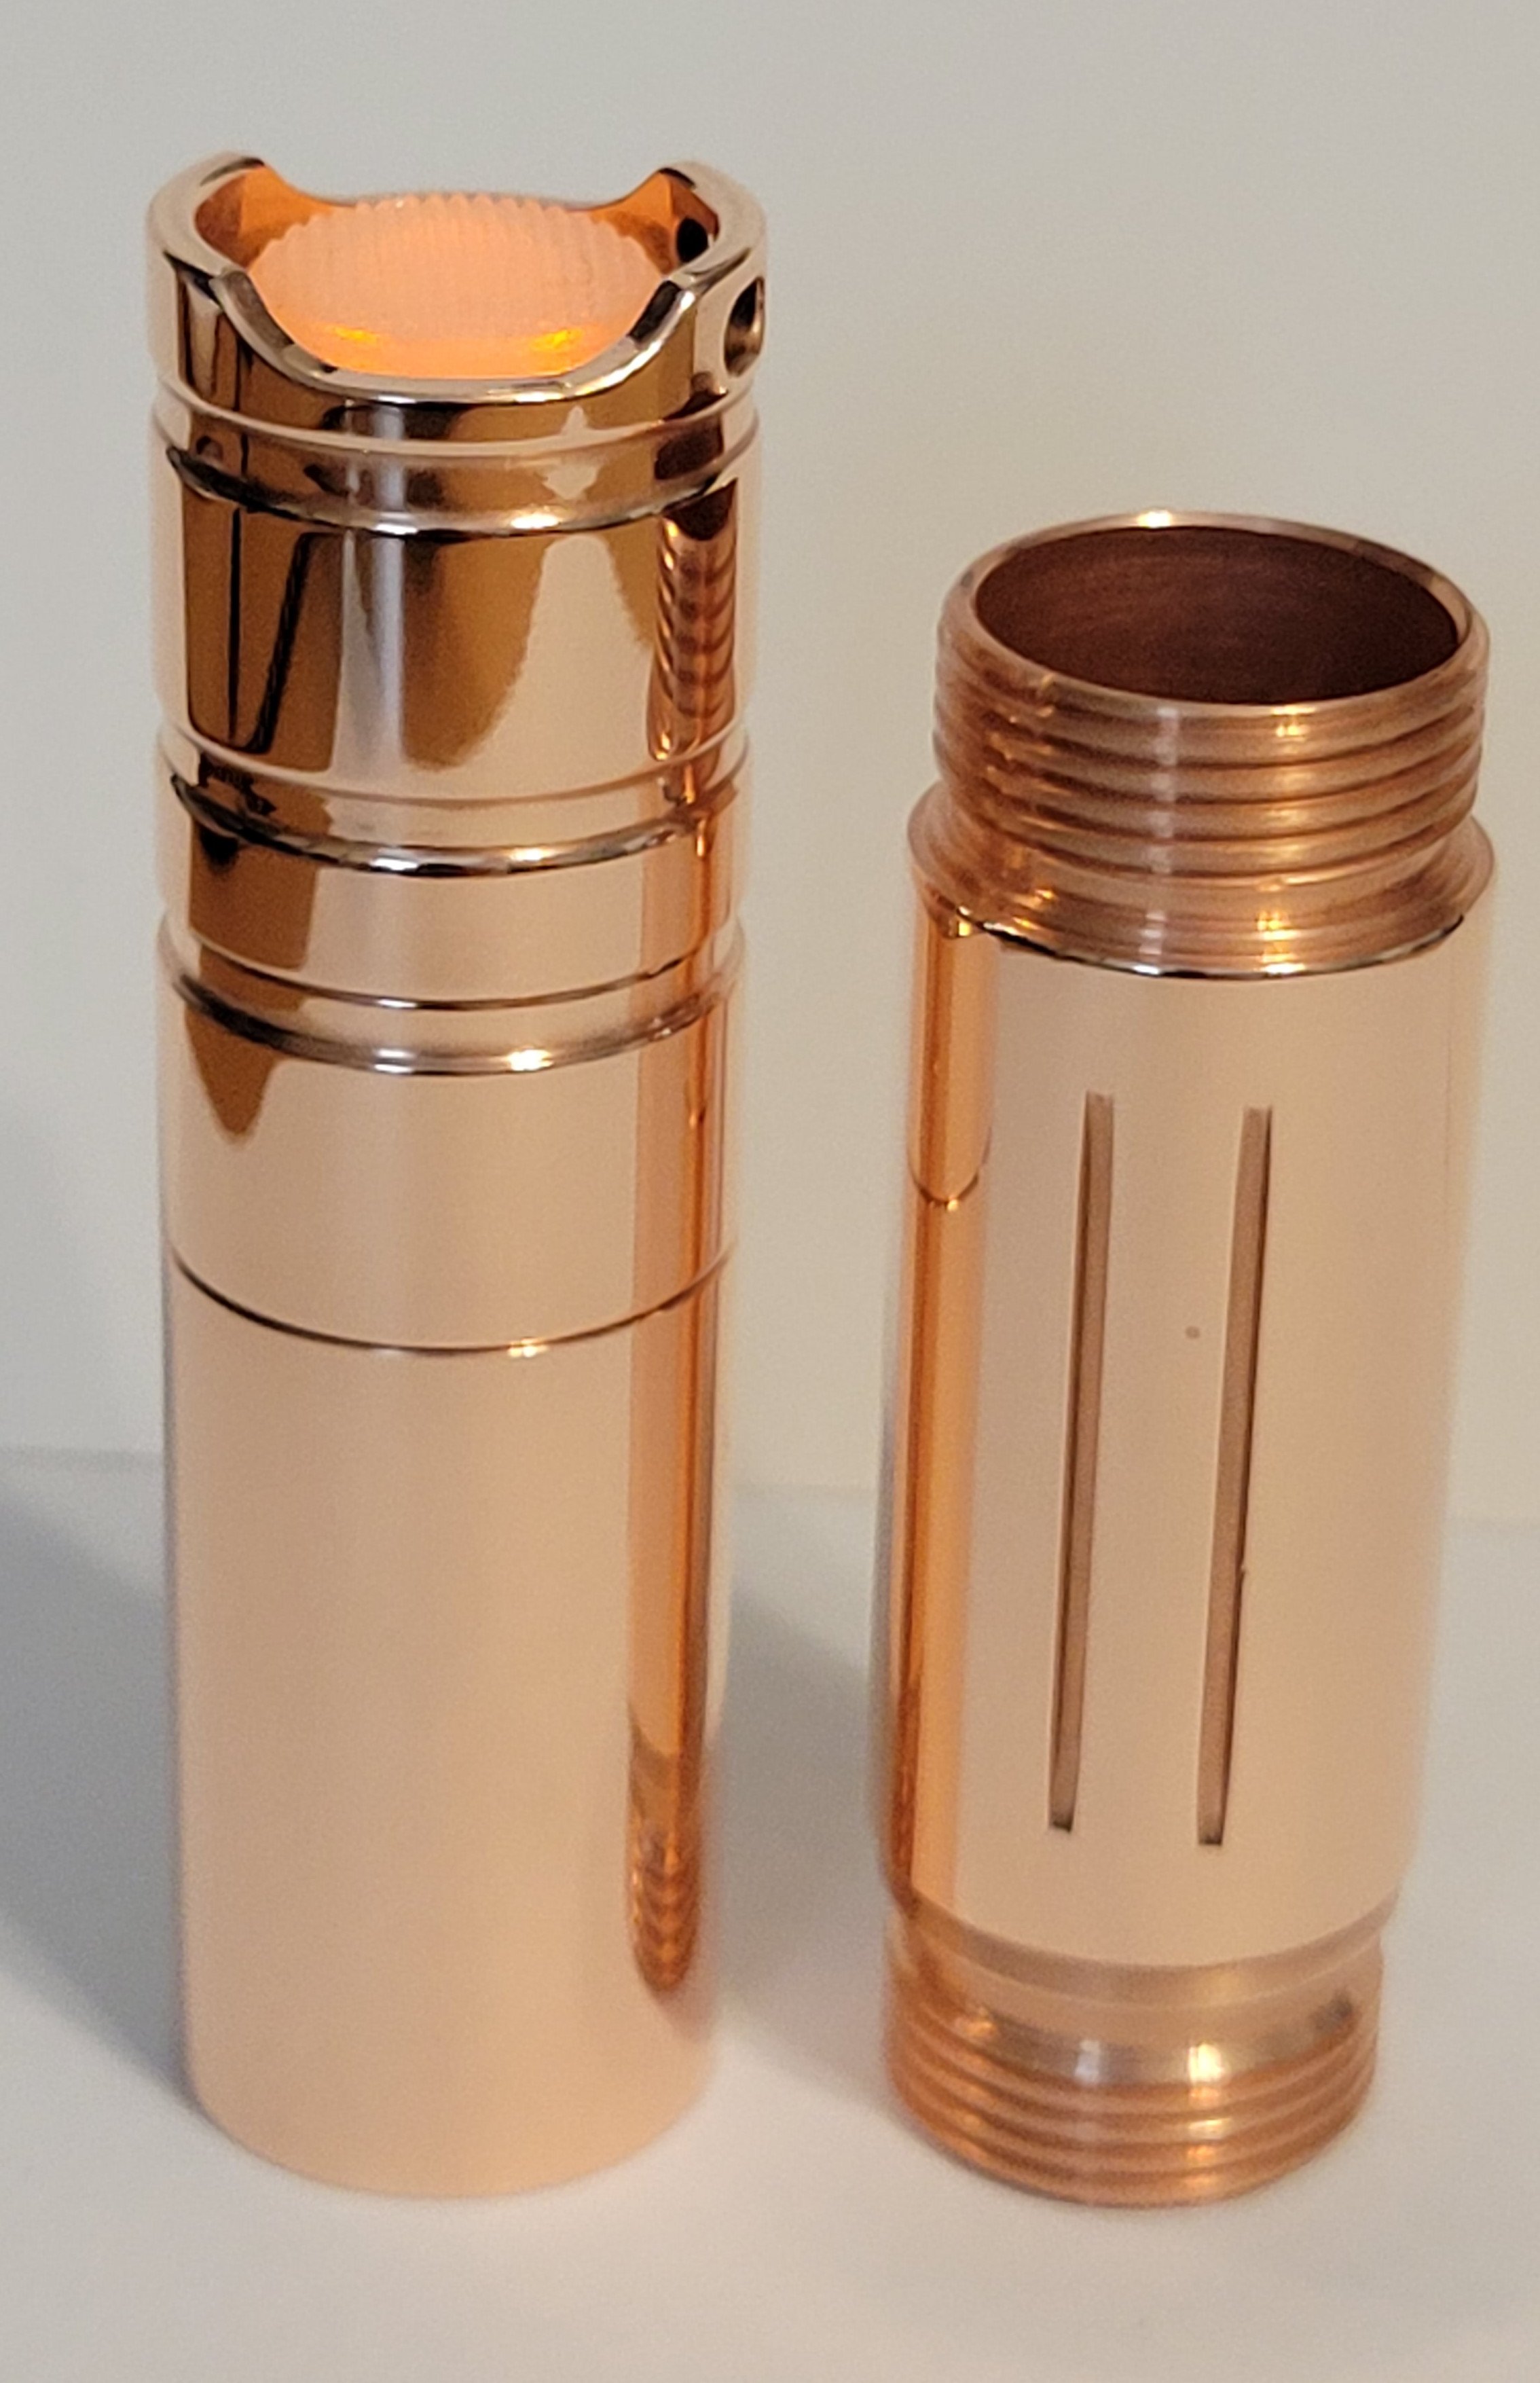
- copper Convoy S2+
- copper 18350 tube
- 17mm DrJones H17Fx Driver
- Carclo 10509 Frosted Wide Optic
- 3 x Nichia 519A sm273 2700K - Link is to Convoy, but I actually got mine from Clemence (Eurekatronix).
- Kiriba-ru S2+ Copper Spacer - He's no longer making parts, but I have some for sale if you need them.
- Kiriba-ru S2+ Thin Retaining Ring for double-sided drivers
- gChart's 16mm LVP CC
Parts for the LVP CC:
- 16mm LVP CC PCB
- onsemi MAX809SQ293D1T1G LVP
- onsemi NCV553SQ30T1G LDO
- Infineon BSS209PW H6327 P-FET
- 0805 475Ohm Resistors - One for the LVP CC and one to serve as a bleeder for the H17Fx.
- Orange 0805 LEDs - You can find them for crazy cheap all over AliExpress.
And materials for the polishing process:
- WEN 4208T 8 Inch 5 Speed Drill Press - In hindsight, I wish I had gotten one with more travel like a 10 or 12 inch, but they are quite a bit more expensive. I also use this drill press to drill holes in pills and spacers.
- EmilyPro Buffing Wheels - These were the first wheels I bought. The included wheels are, from coarsest to finest, treated cotton (yellow), cotton, and flannel.
- Keadic Buffing Wheel Kit - This kit includes four different wheels and three different compounds. The included compounds are, from coarsest to finest, brown tripoli, white diamond, and general green. Be careful when buying polishing compounds because different manufacturers use different colors. The wheels are, from coarsest to finest, denim, treated cotton (yellow), cotton, and flannel.
- Jeweler's Rouge - This is the finest among the polishing compounds I have purchased.
For this particular project, I decided to use three different polishing wheels and compounds, although I probably could have gotten by with two. I opted for the white diamond on treated cotton first, general green on cotton second, and jeweler's rouge on flannel third. Let's look at some pictures to see how it turned out...
This is the polished 18650 tube next to the rest of the parts with the stock brushed finish for comparison.
A little closer...
All the parts completely polished to a mirror finish...
Some closeups of each part...
Just look at how the parts reflect the wood grain from my desk! I'm pretty happy with it.
Now let's take a look at the other internals for this particular light...
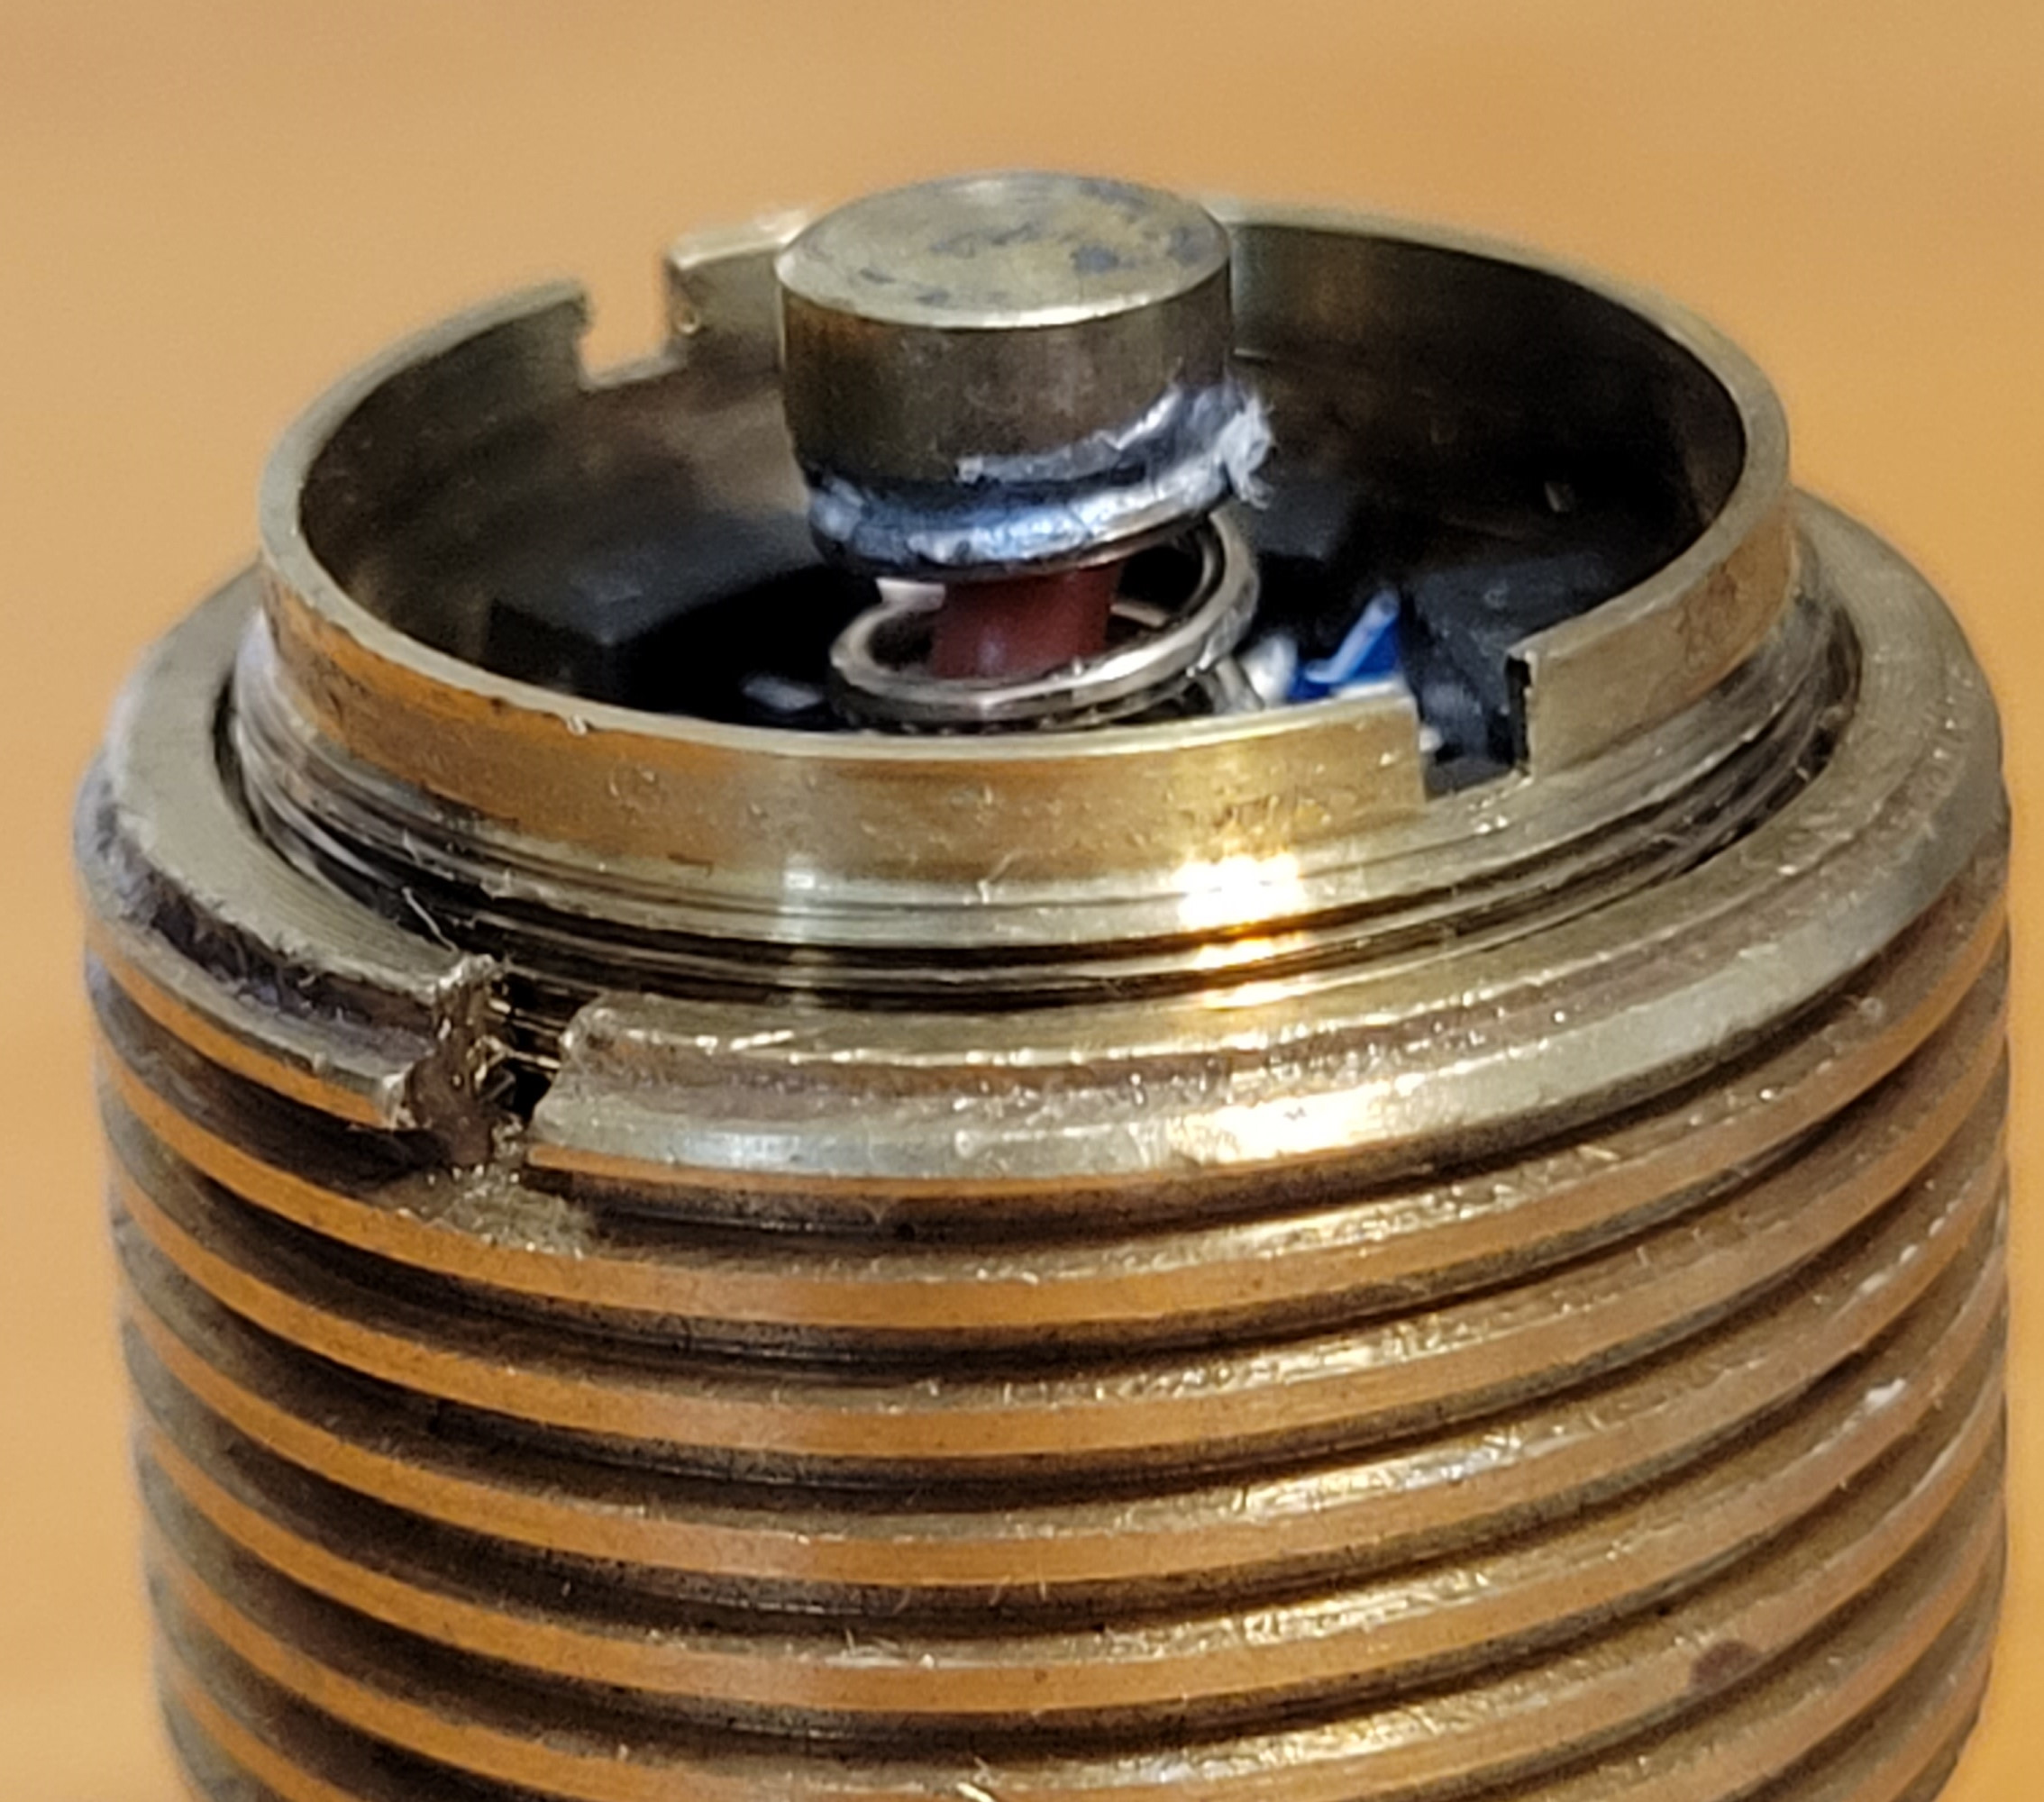
The DrJones H17Fx is a double-sided driver, so the standard S2+ retaining ring for the pill won't work unless you grind the inside out to make it thinner. Or, if you're fortunate enough, you use one of Kiriba-ru's thin retainer rings specifically for this purpose. See how nicely it fits over the 7135's?
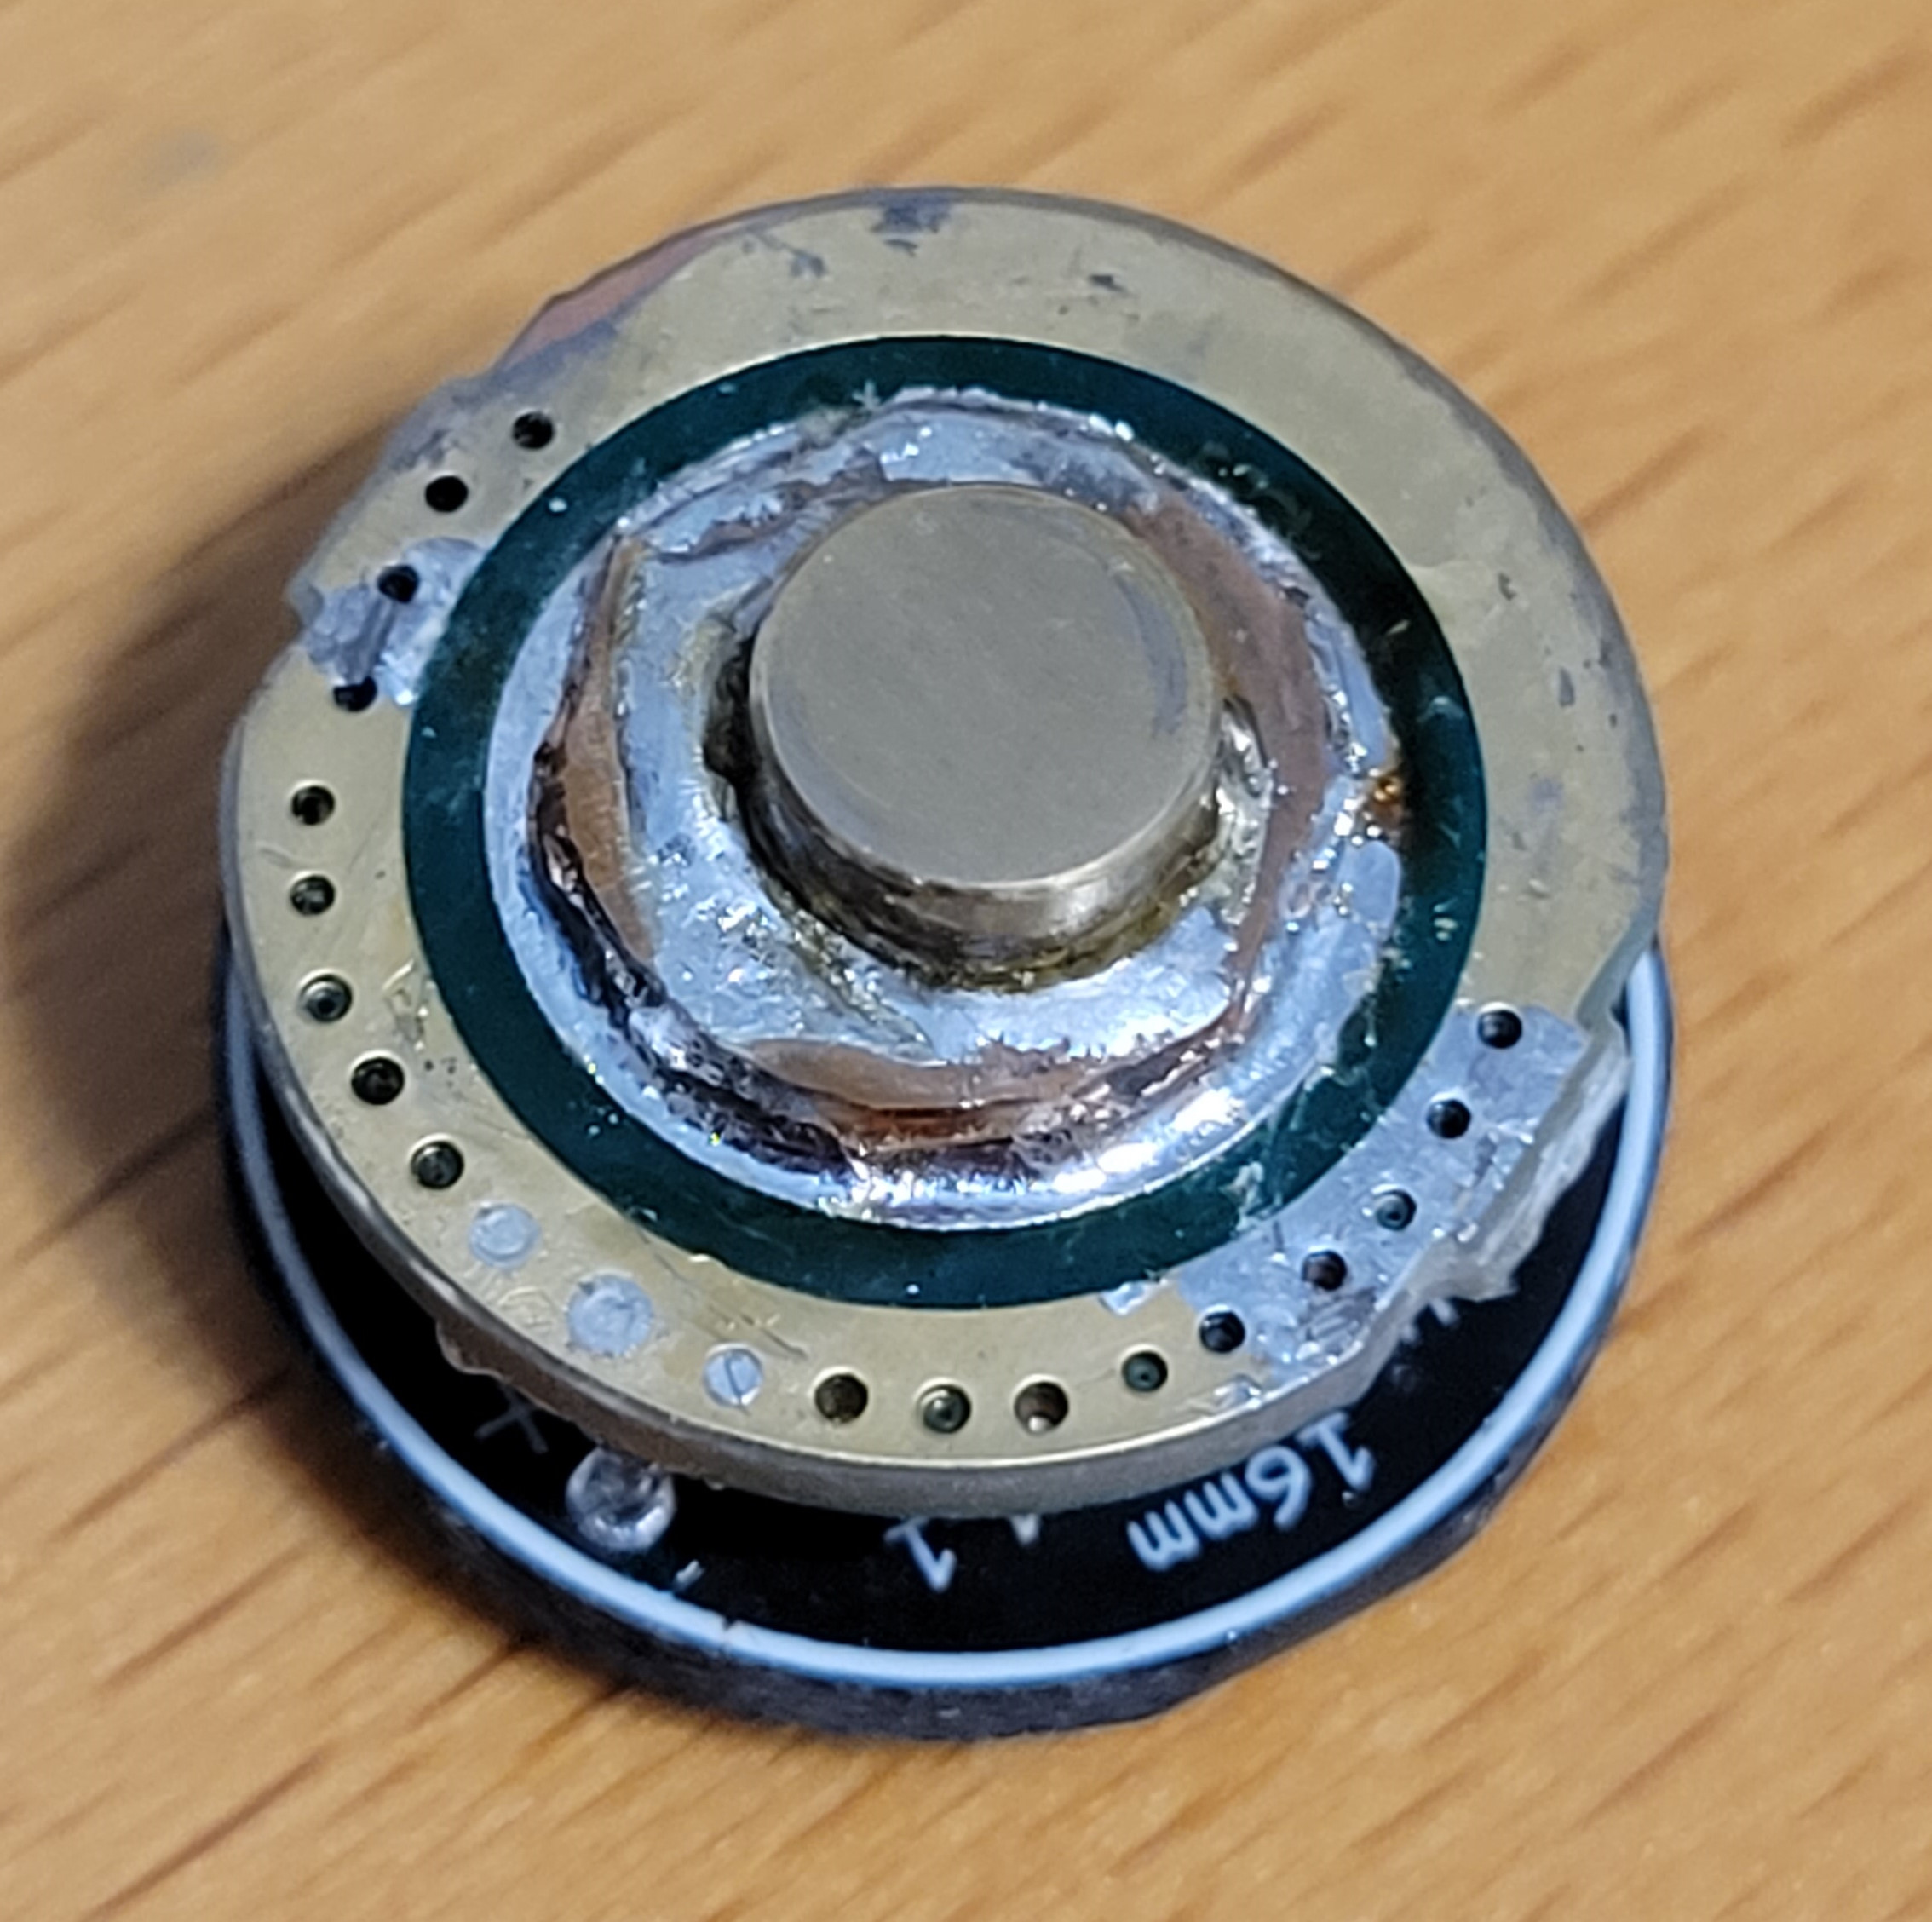
The only issue with Kiriba-ru's thin retainer ring is that it's rather tall. The spring on an H17Fx is rather short. I had to solder a brass button to the top of the spring to ensure that the ring wouldn't hit the cell. I even managed to cram a bypass into the center of the spring. What a pain!
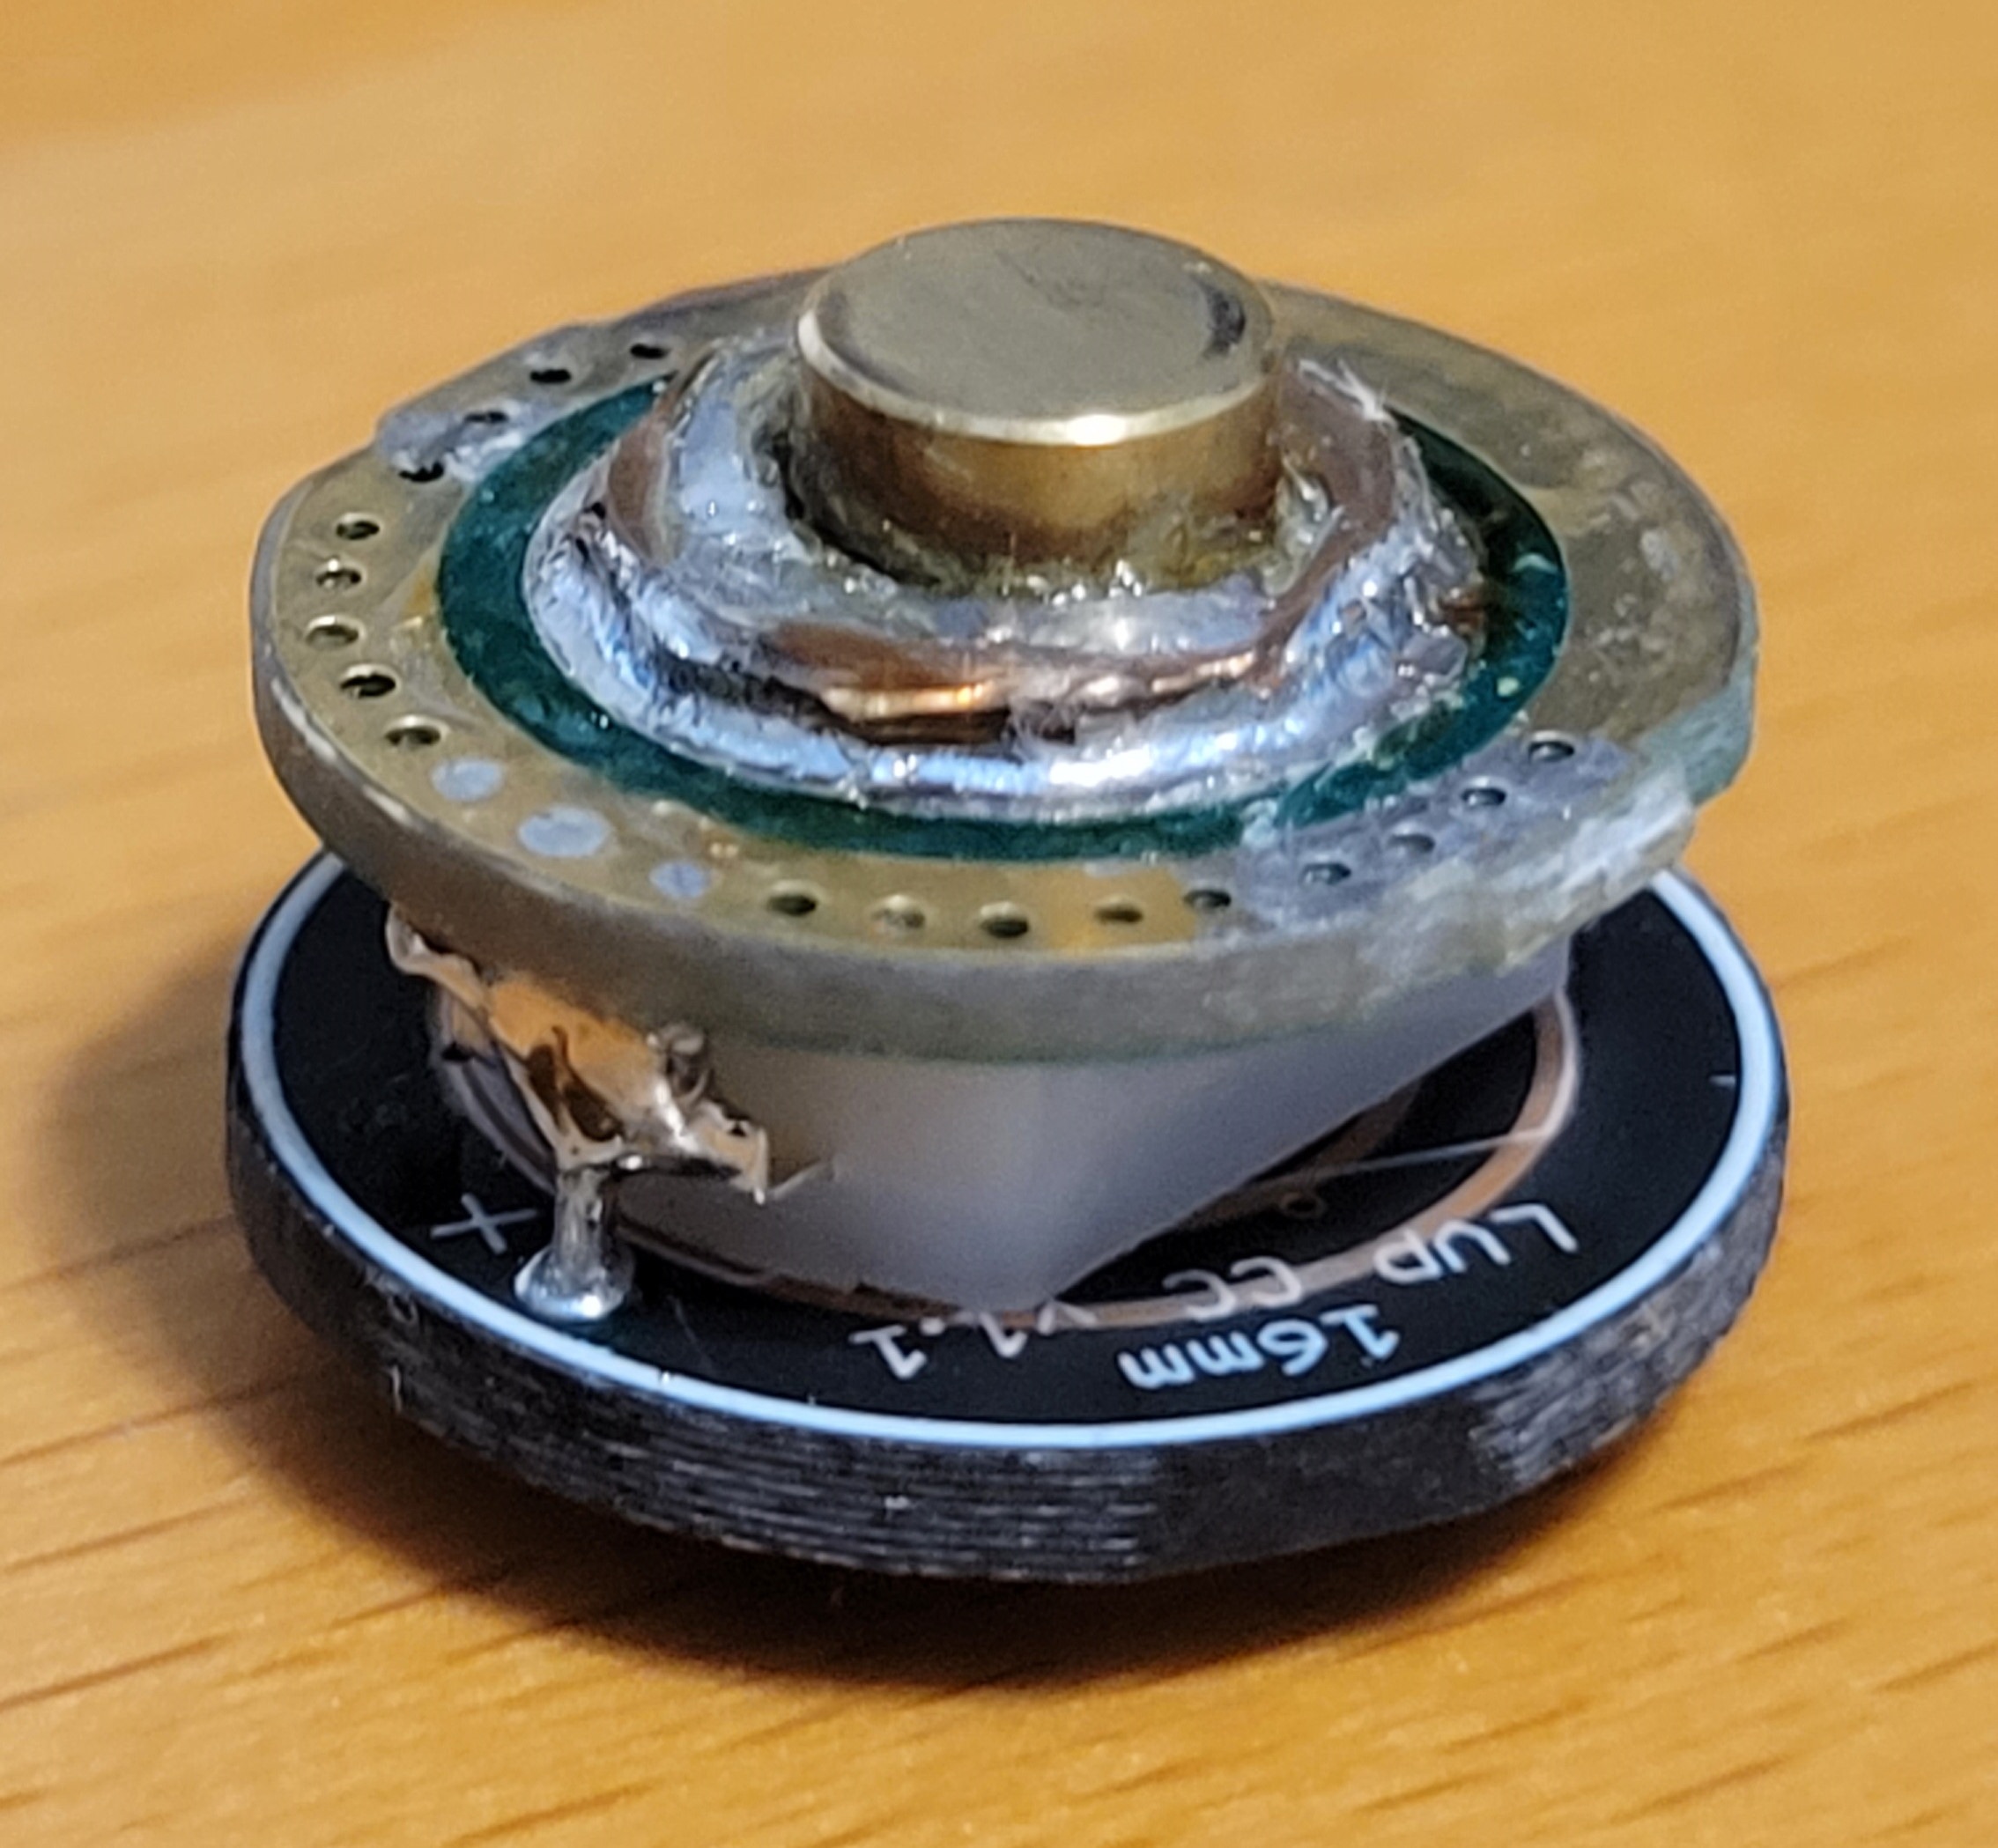
With the driver spring now being so tall, the tail spring was too long. When I screwed the light together, the driver didn't work properly. Too much pressure. So I did an absolute Frankenstein job on the tail to add a brass button and a small copper spacer that I crudely cut from a blank.
Yeah, it's really ugly, but it works. You know what's amazing? I somehow didn't melt the switch during all of this.
The gChart LVP CC is much nicer to look at than my hack job on the tail spring.
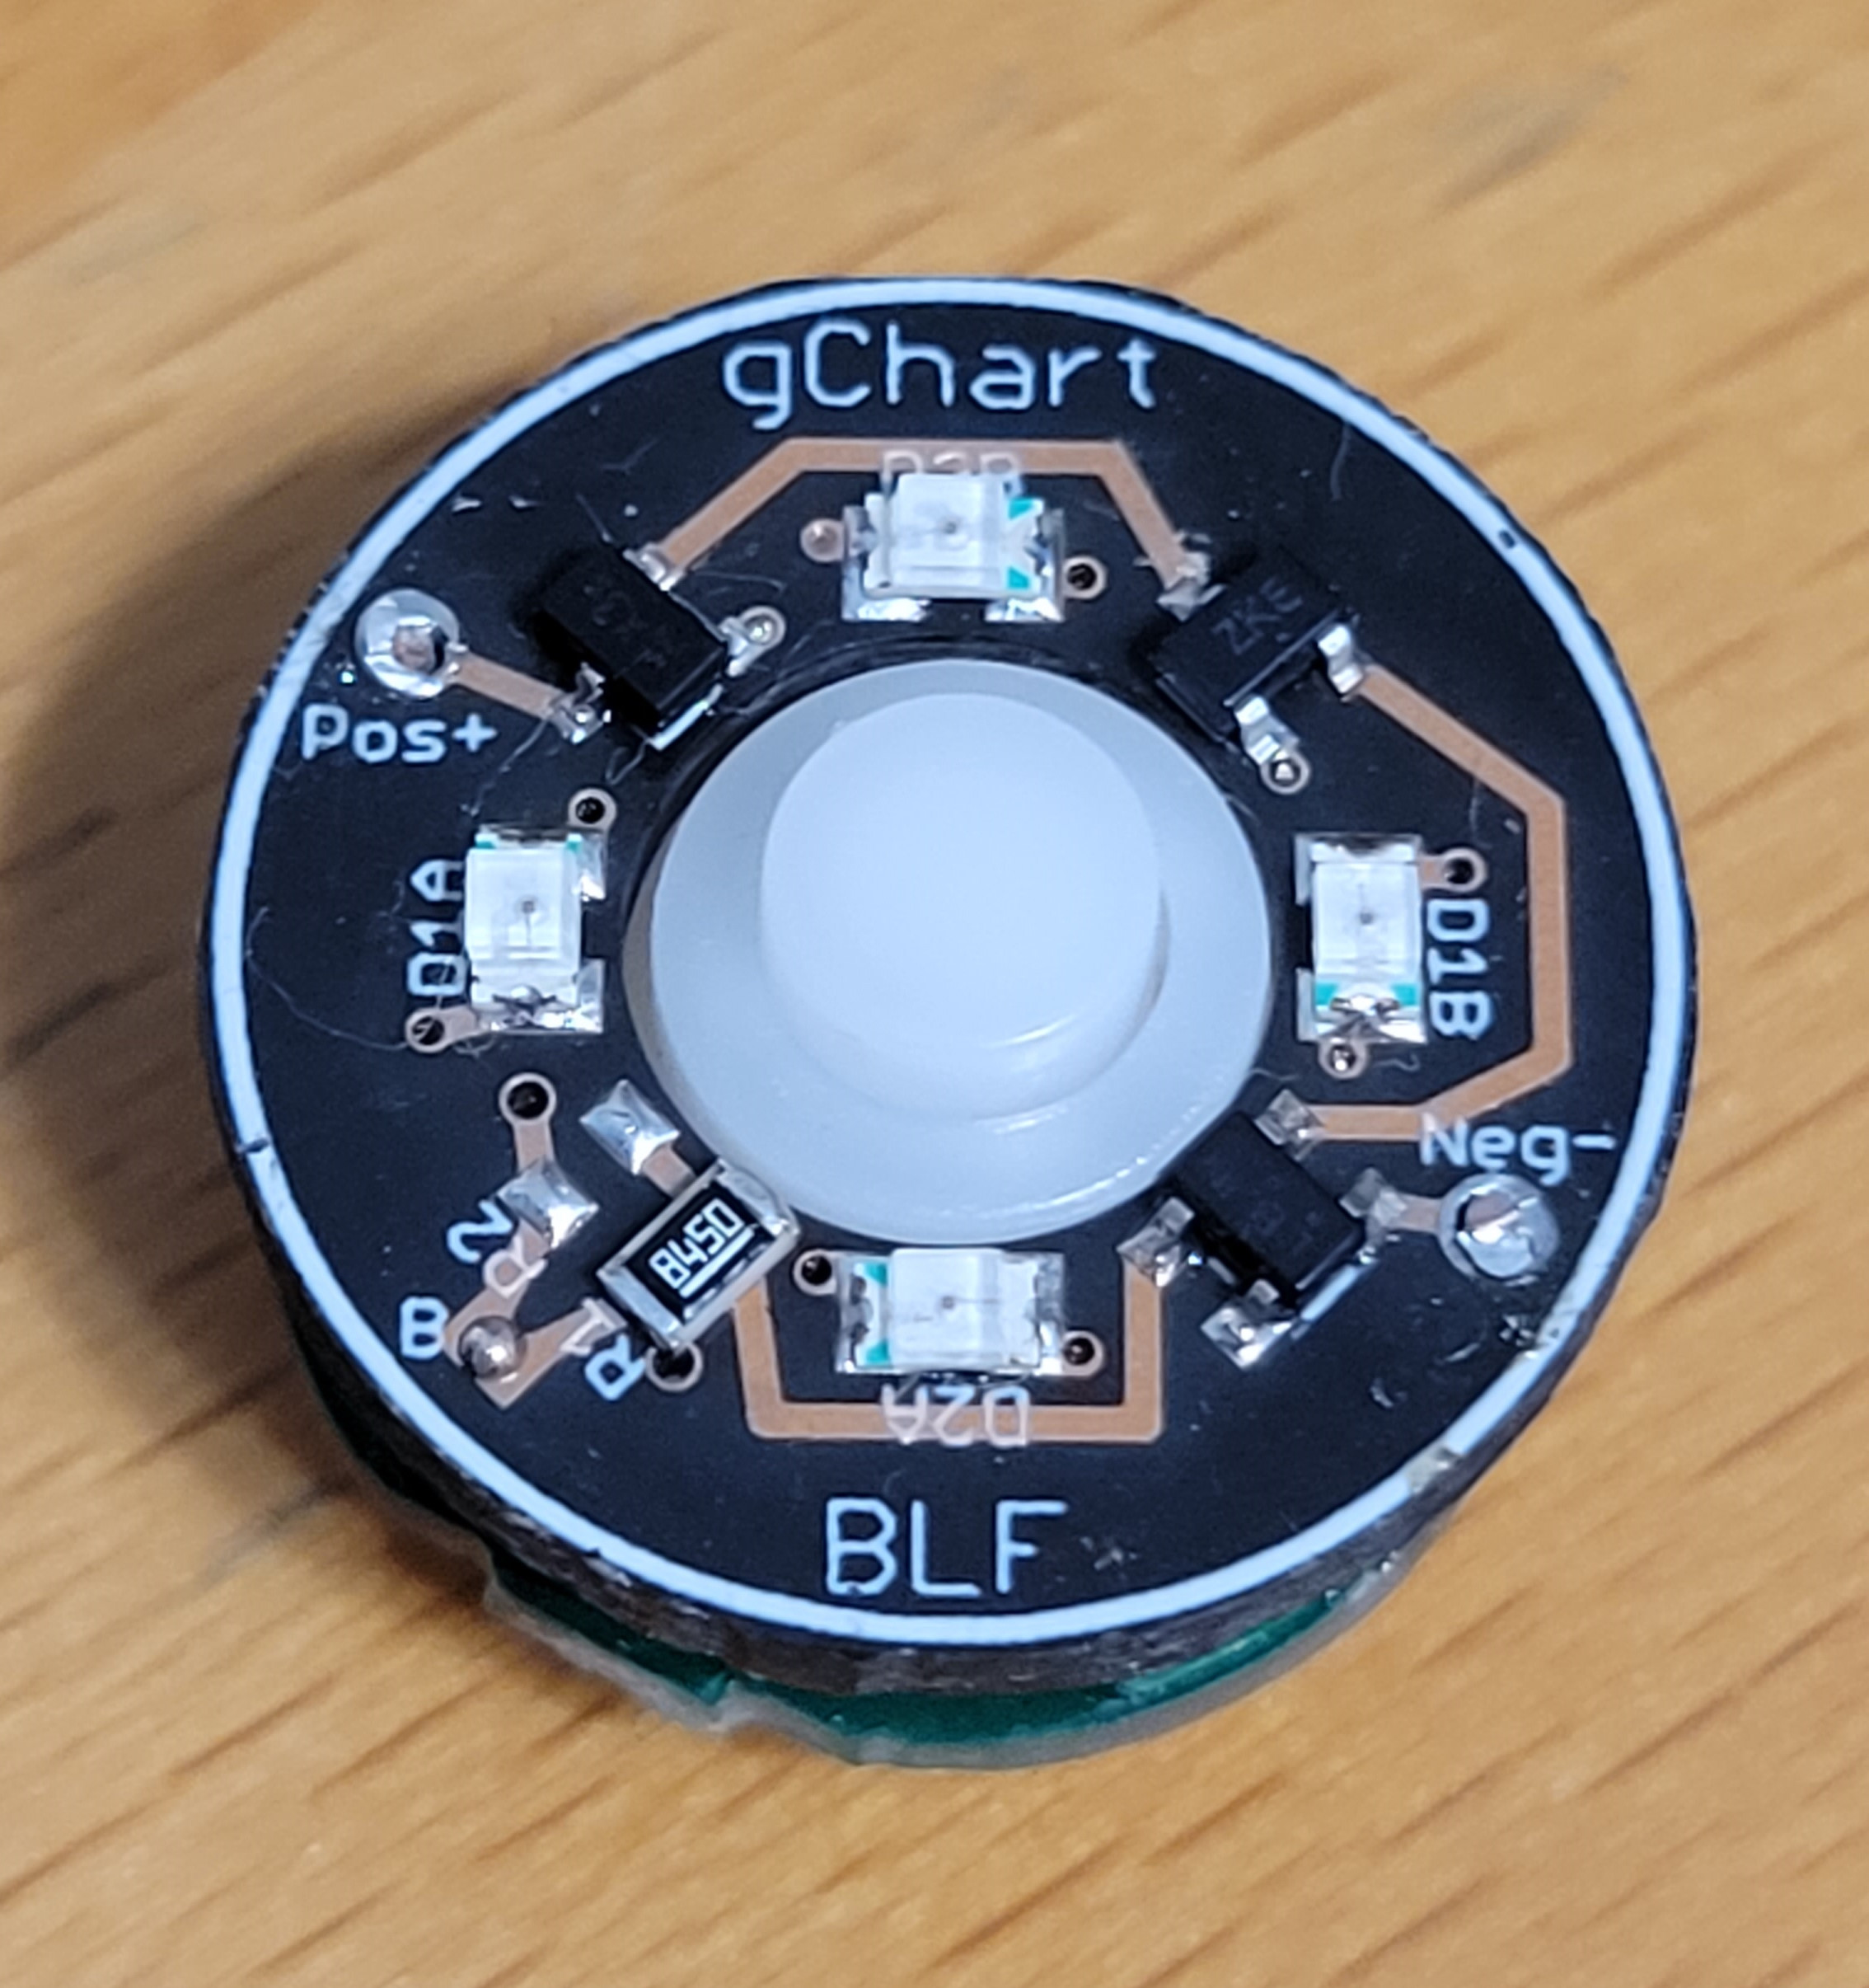
You can find more detailed information about it in gChart's original thread on BLF. Here's what it looks like installed...
And here's a shot of the beautiful, warm 519A 2700K's on moonlight...
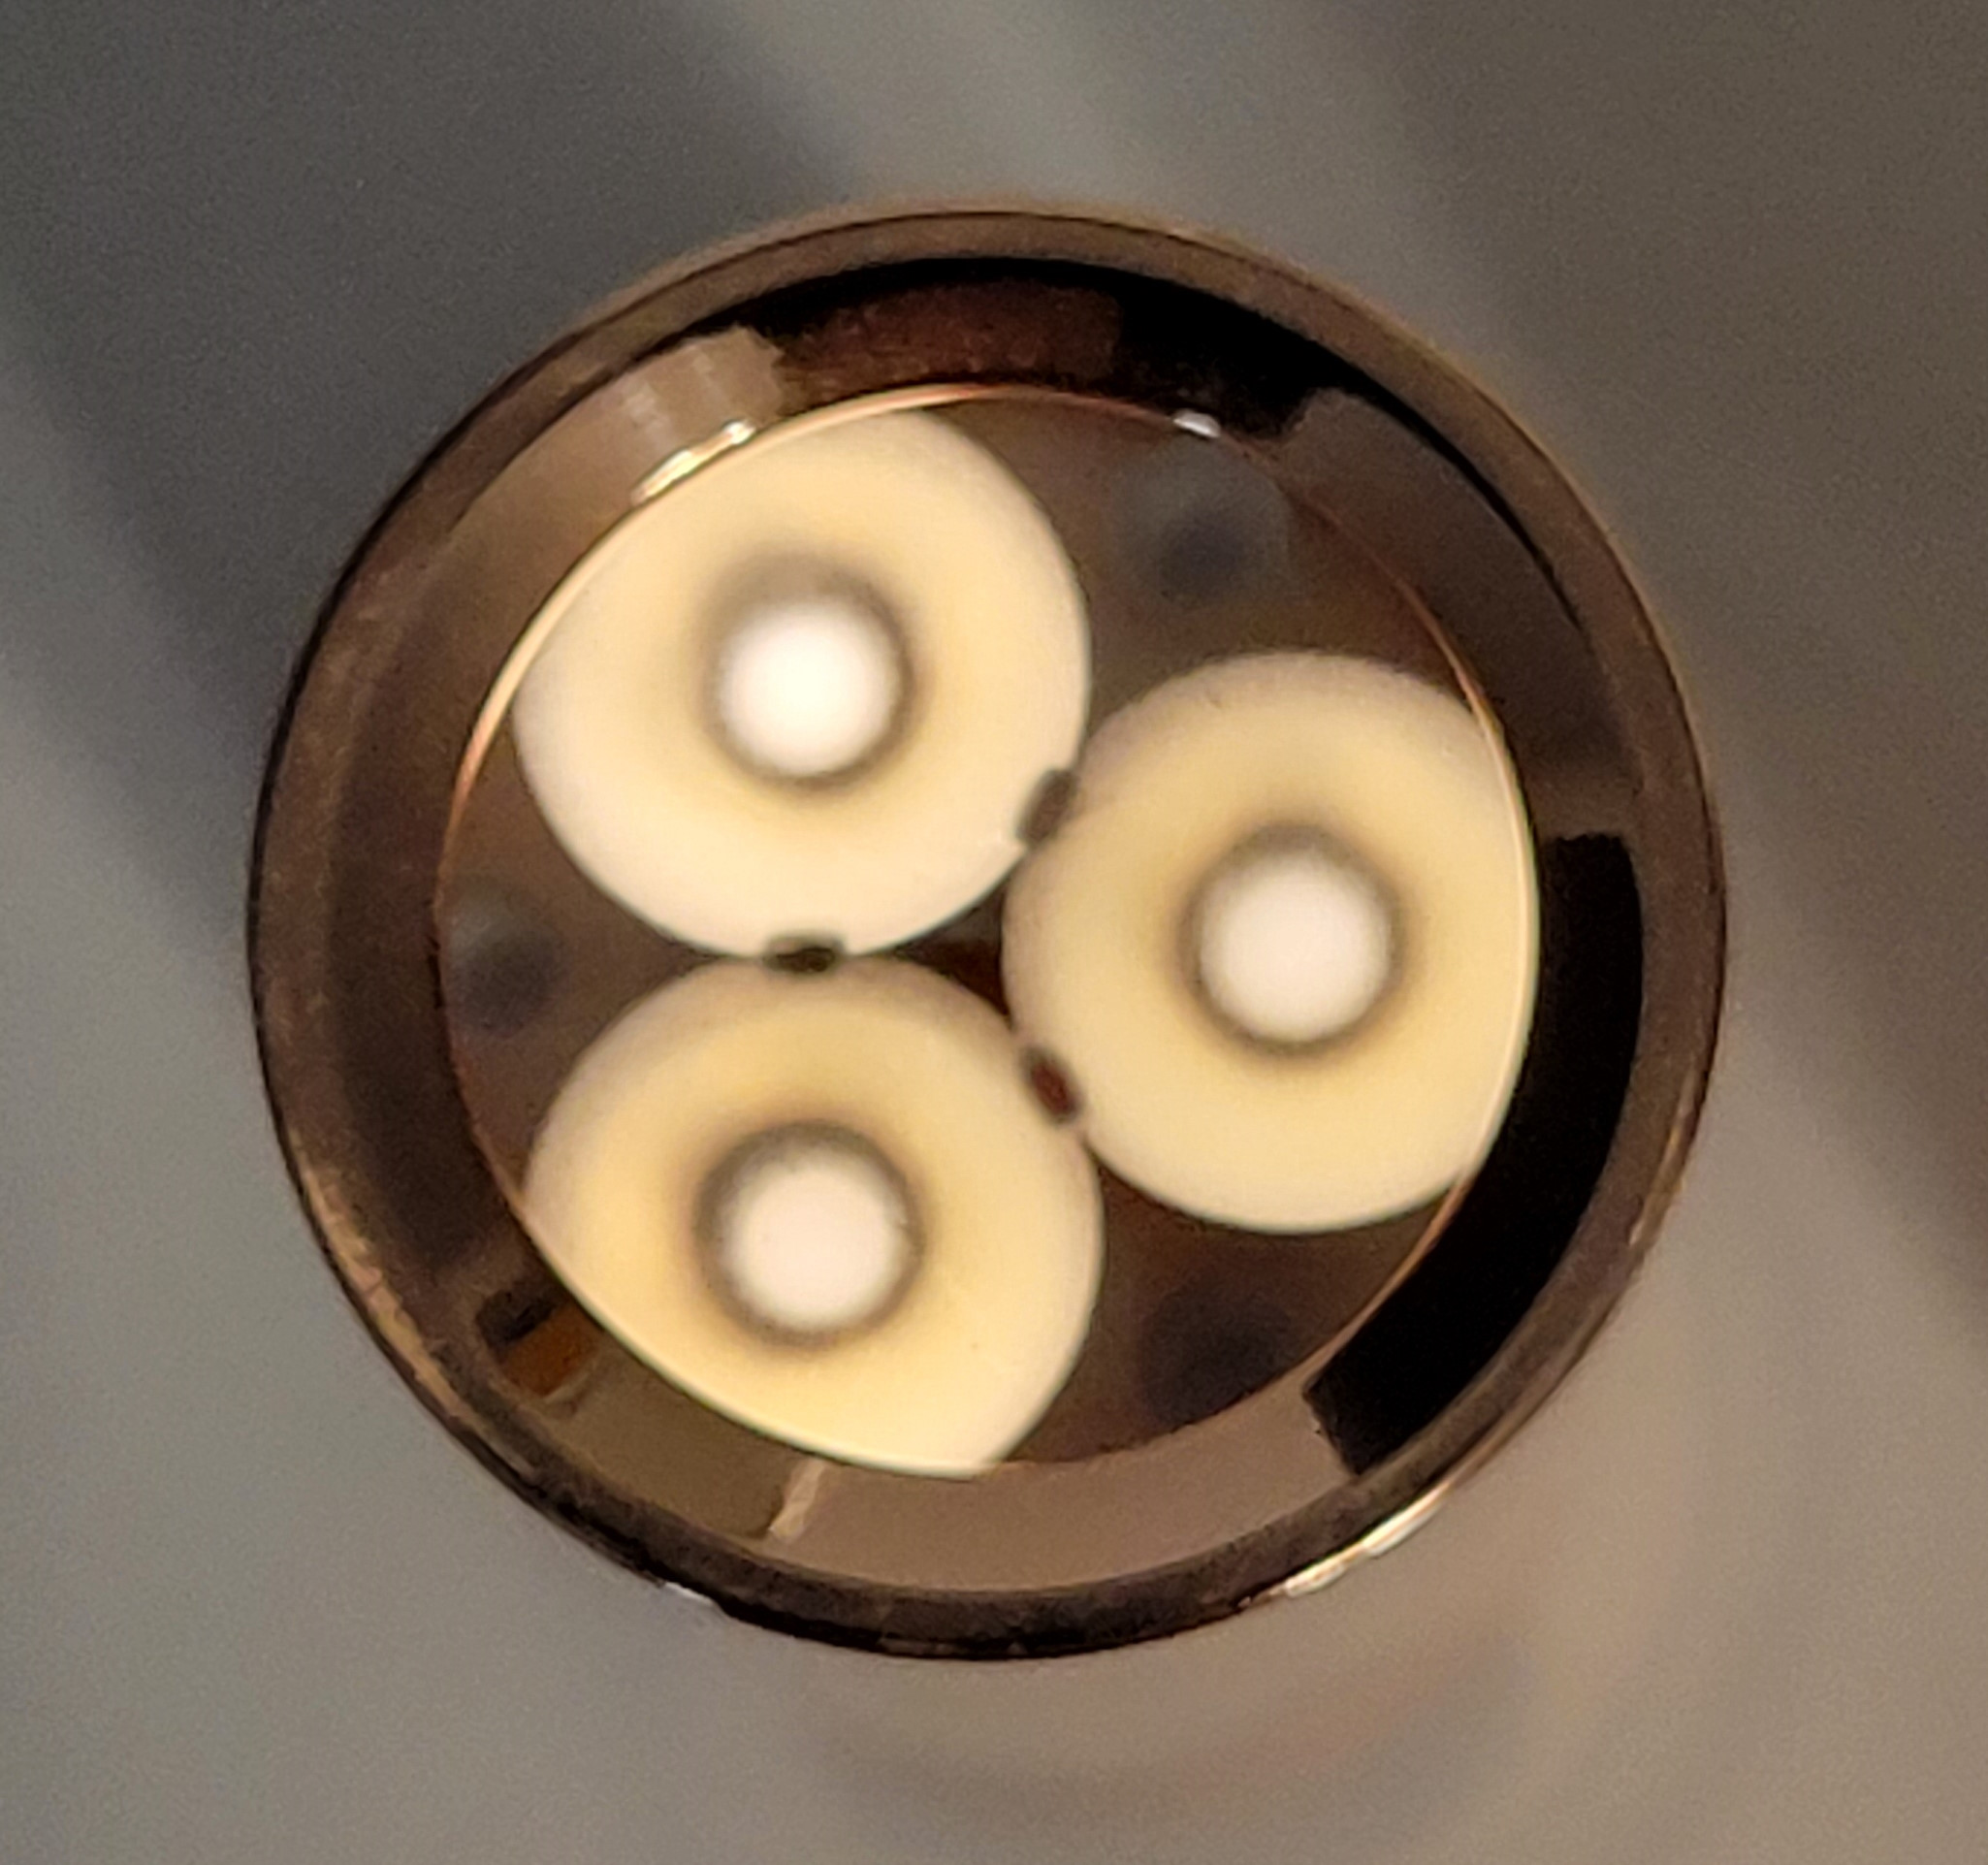
And finally, the finished product...
If you have any questions at all about this build, please post them. I'll try to respond as soon as I can. Thanks for reading.
I think that all of us who are already here just need to start posting more content (myself included), and that will draw more people in. Lemmy is now the home of my Anduril 2 diagrams, but I also need to update and port over some of my old posts from Reddit because some of you may get some use out of them. The more we post, the more information we have available, and that has enormous value. I personally love to see mod posts. @Adair21@lemmy.world is one of the most gifted modders out there, and he shares his mods and builds here. It's absolutely incredible the sort cool stuff folks are doing to their lights. It's also great to see "measurement" posts where folks share the results of testing out different emitters (CCT, CRI, lumens, etc.), cells, optics, entire lights, etc. That's all extremely useful information for the rest of us. And let's not forget about good old fashioned New Light Day (NLD) posts where folks simply share info about their latest haul. It's fun to chime in on those, and share your own experiences and mods for those lights. The bottom line is that the content doesn't magically show up for us. We have to create it ourselves.
Yeah, there are a couple of things I'm working on (very slowly):
- I'm converting the diagrams over to Inkscape from Visio for a couple of reasons: 1) Folks don't have to buy a license for Inkscape since it's open-source, and 2) Inkscape saves the diagrams to the SVG format which should allow folks to scale them up and down without losing resolution.
- I want to use version control on GitHub so that folks can select the version of the diagram that goes along with the version of Anduril they have on their lights. Not everyone has the ability to flash to the latest version.
It's a slow process because I'm using Inkscape for the first time and I've just been busy. But any updates will always be posted here.
18350 is my favorite format as well. Too bad there isn't something like a 21400 format.
Yeah, possibly if I can find a way to squeeze it in. Can you confirm which mode lack thermal regulation? I think it's more than just candle mode. Does it apply to all of the blinkies? For some reason, I thought this was fixed in a later version.
It's awesome to see so many familiar folks over here. So glad this community is growing.
This is going to sound silly, but I didn't realize that I could post in-line images. I added both per your suggestion, and it's much more functional. Thanks for getting me to finally look into it!
Yes, maybe if I had Adobe Acrobat Professional, I might be able to produce high-quality PDFs. But the cost is insane, and I just haven't had a need for it. Perhaps I'll have better results if I can ever get the diagrams switched over to an open-source alternative for Visio.
It appears in the diagram because it works. Just tested it again on my dual-channel D4V2, and it works like a charm.
I originally saved the file as a PDF in Visio, and as you noted, the results were not good. Then I tried printing it to PDF in a couple of different ways, and I think the result is much better. Take a look at it again, and let me know what you think. The Simple UI diagram will always be smaller because that's how the source is. When Visio saves it to a PNG file, it chops it down to just the canvas size needed for the diagram. Then when you print it, it gets enlarged to cover the whole page.
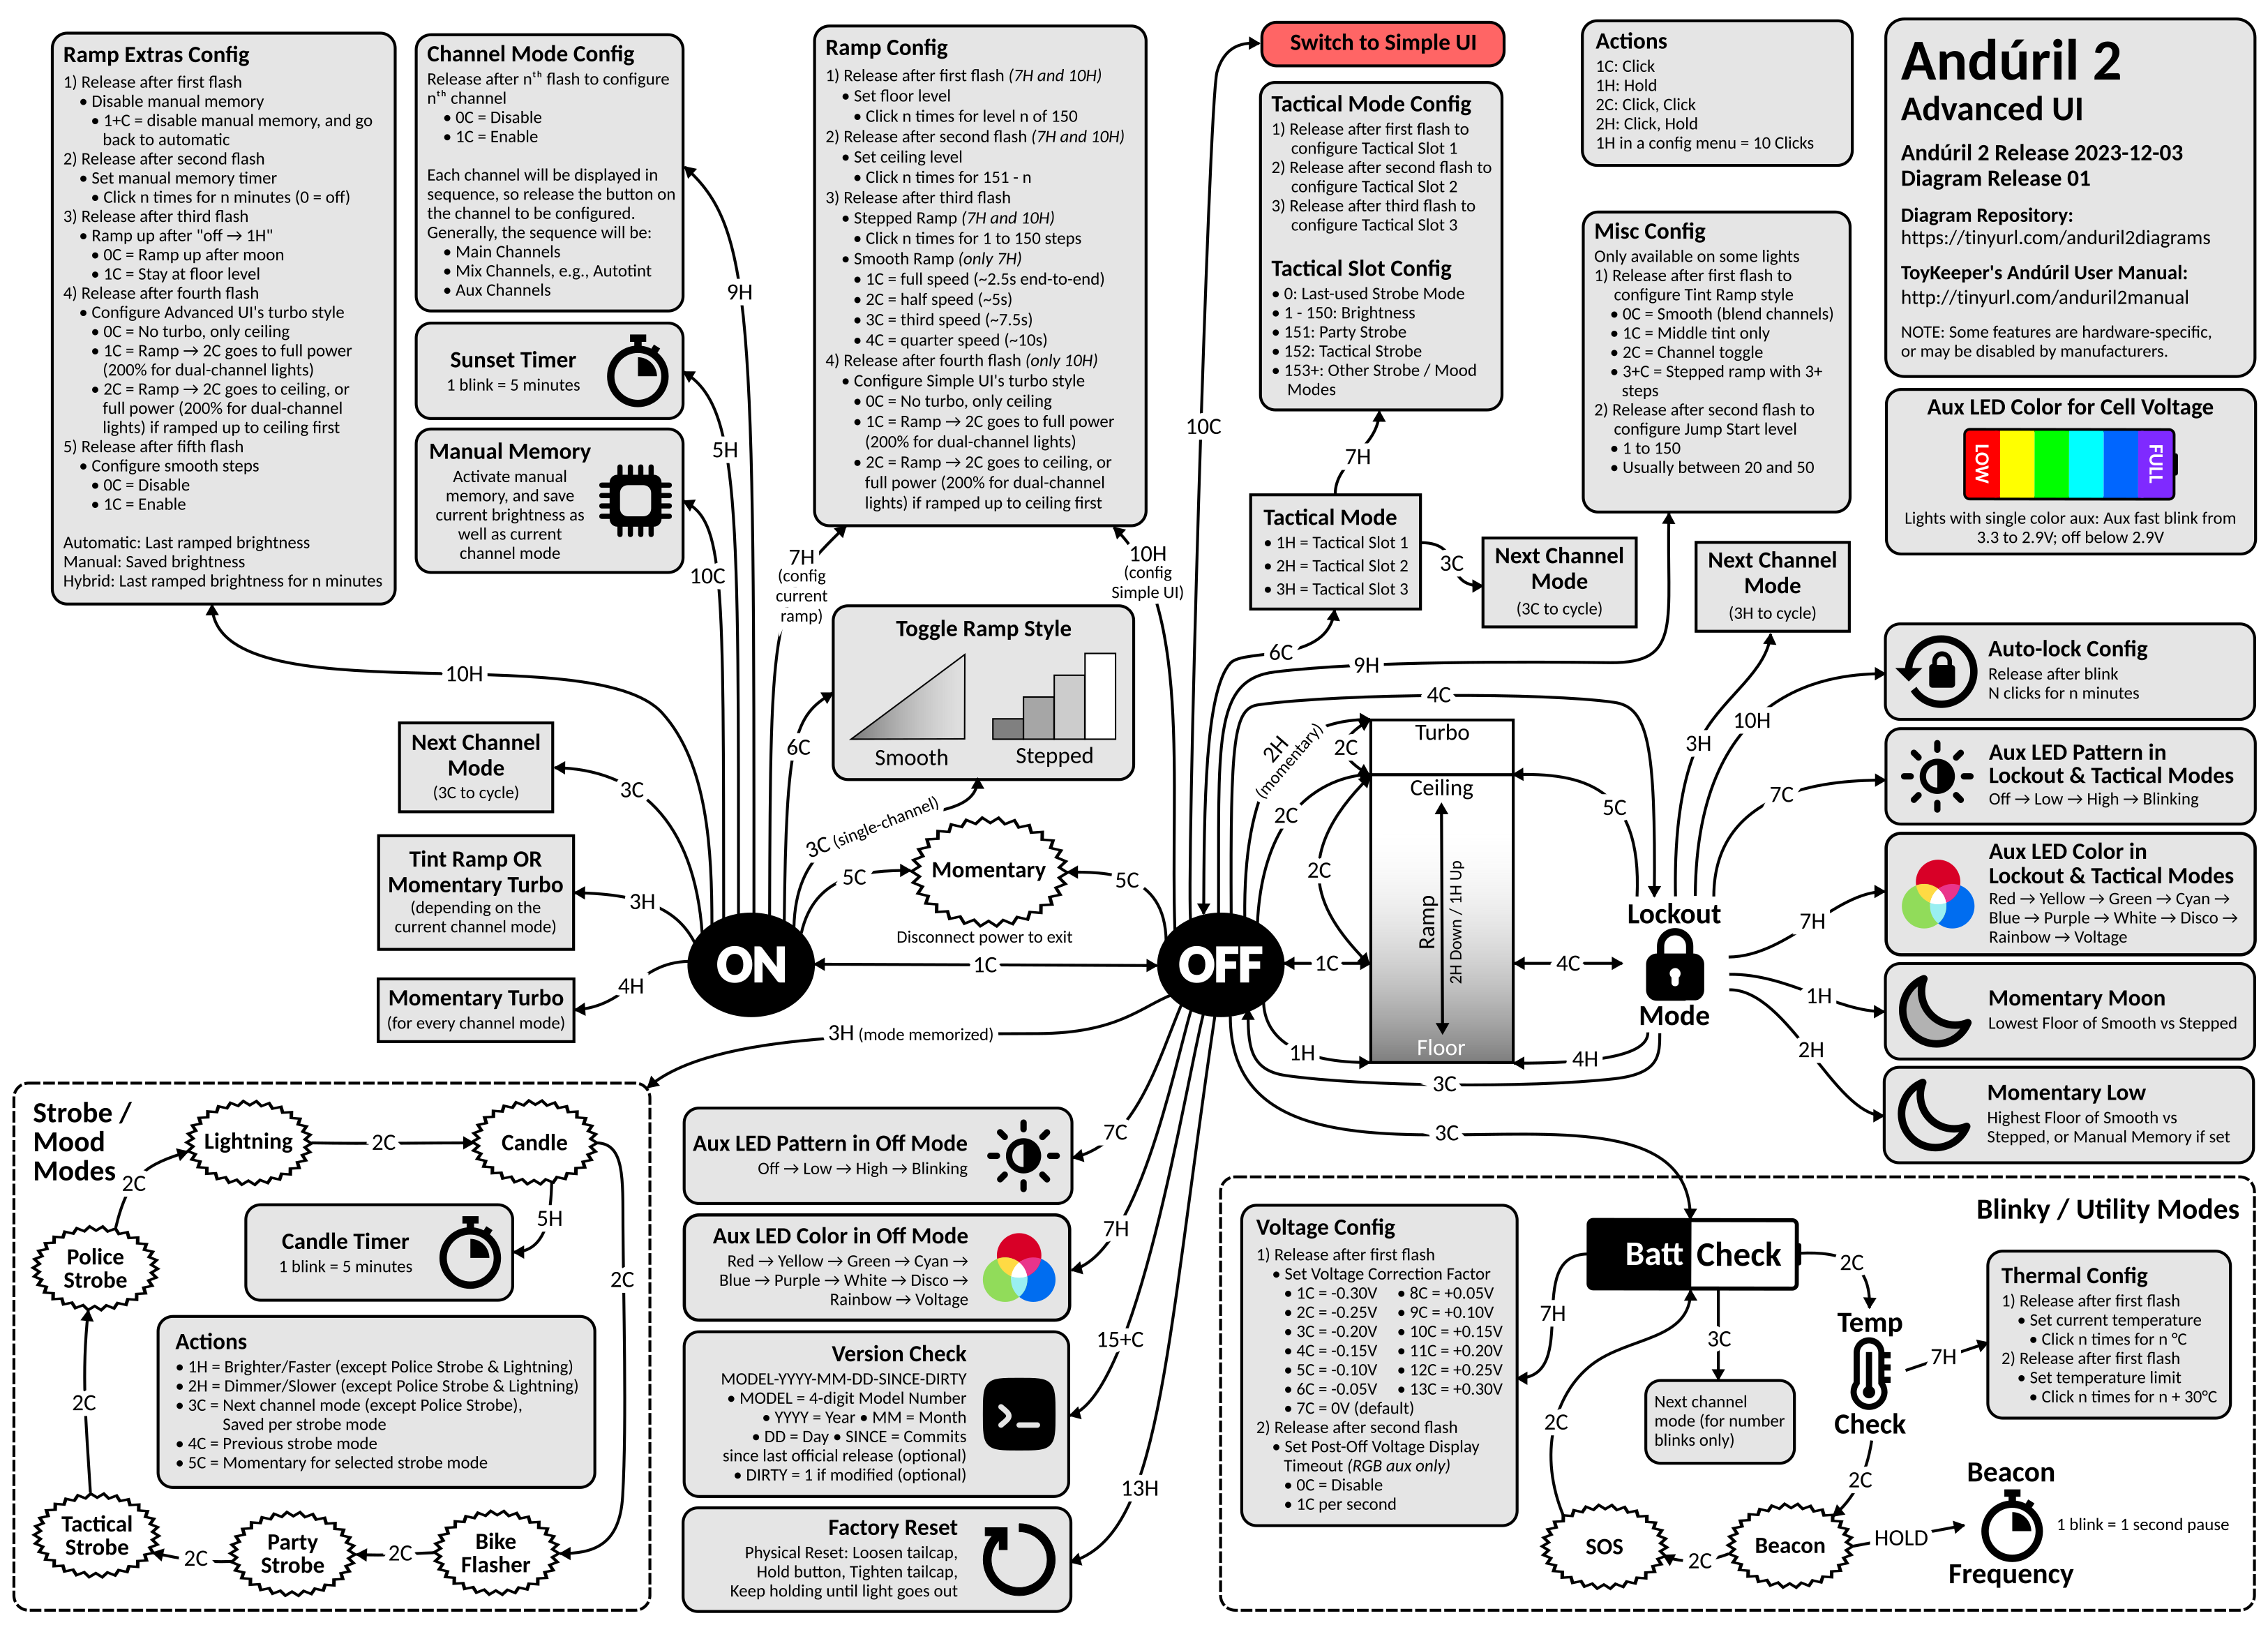
Advanced UI
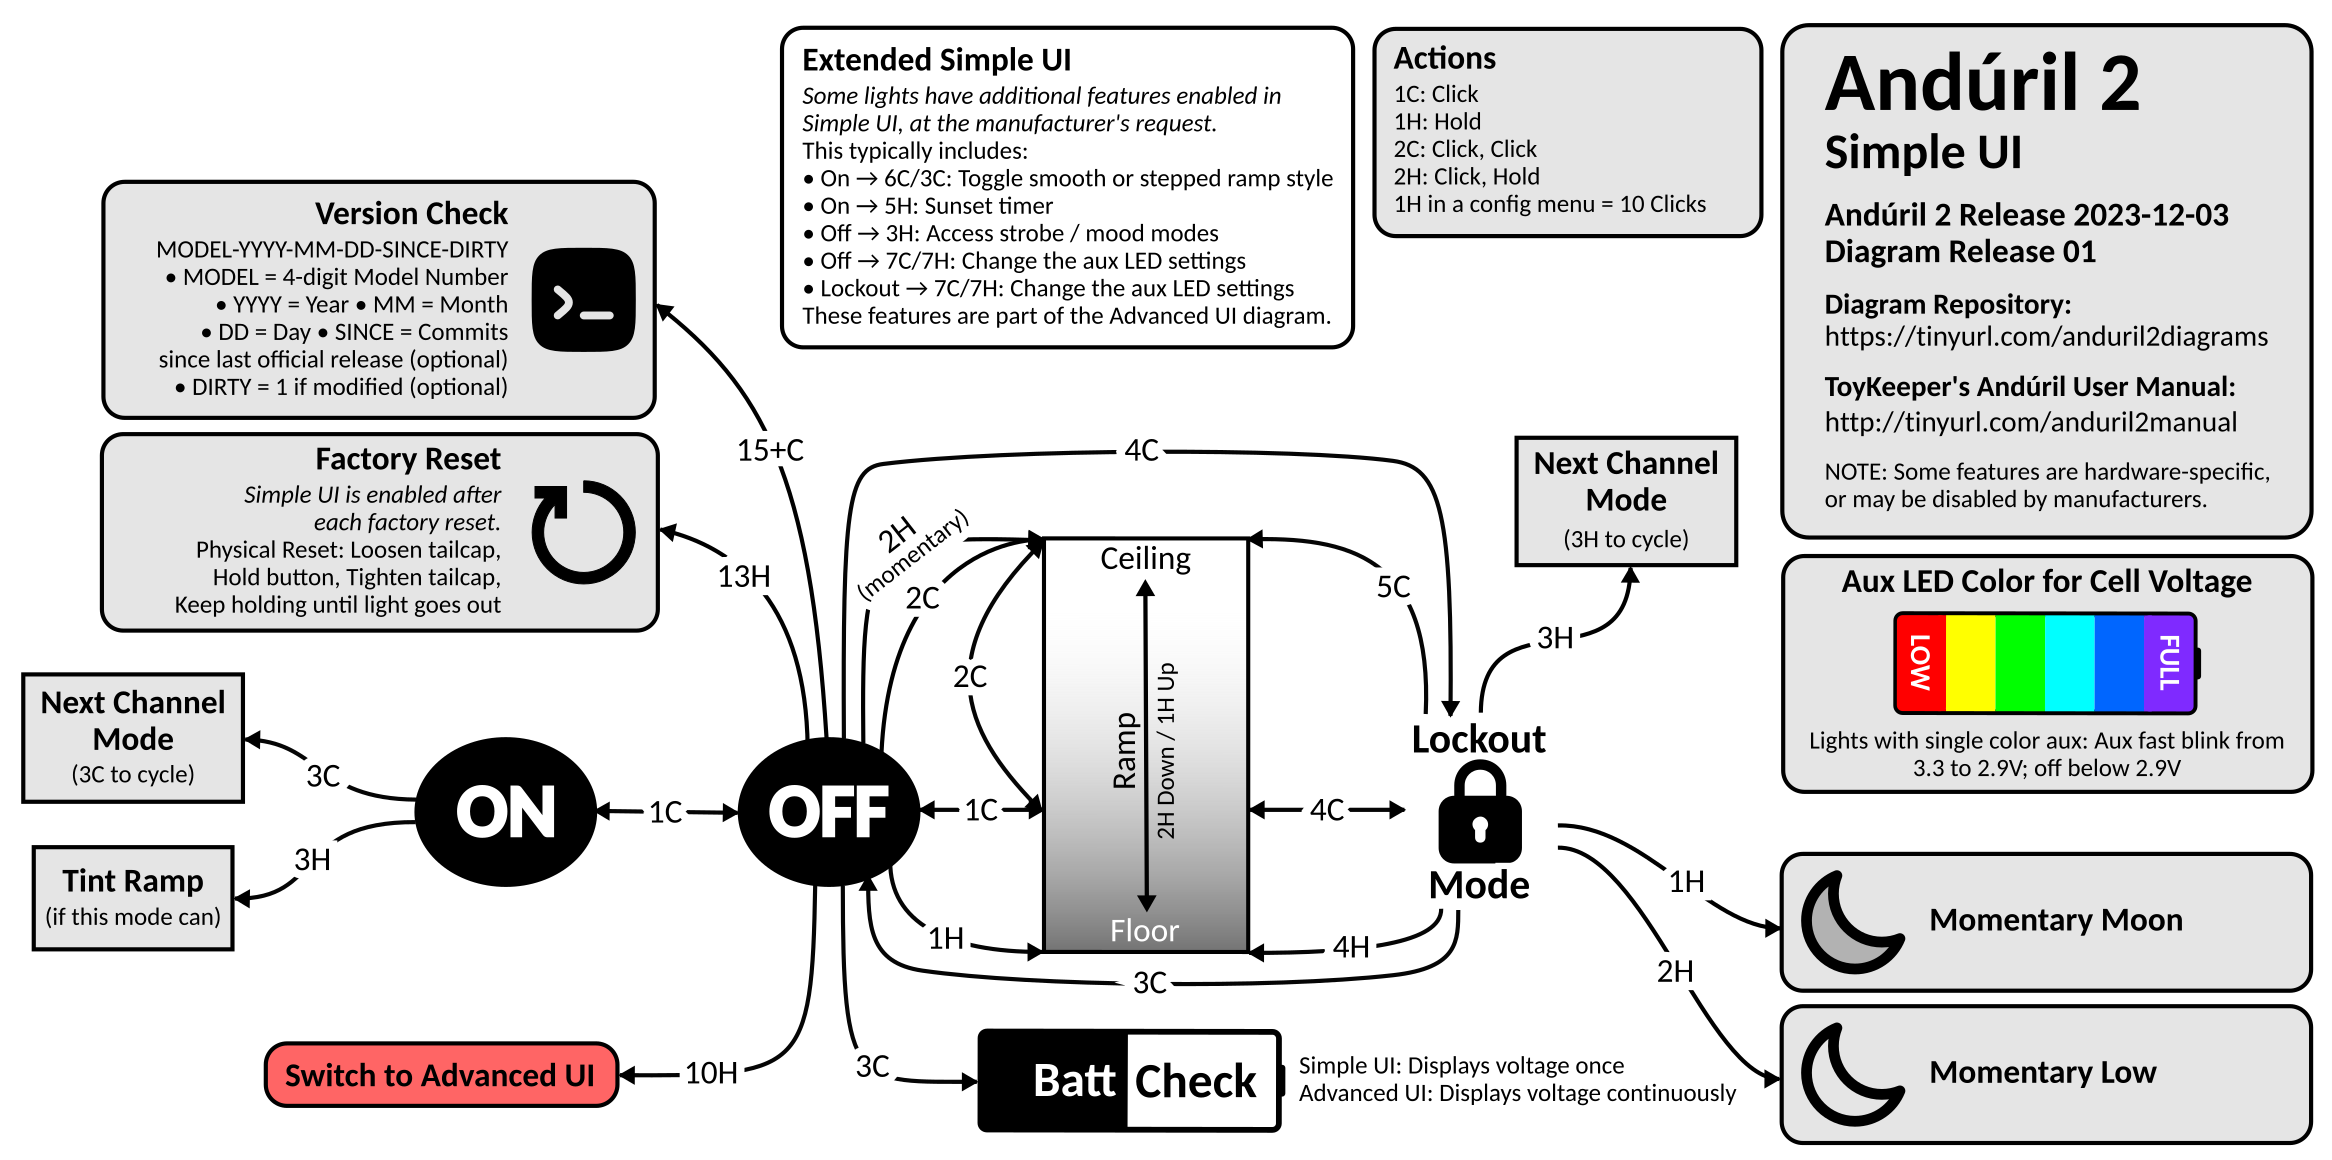
Simple UI
Background: This was 100% inspired by Lux-Perpetua's Andúril 2 UI diagram on BLF. In fact, Lux's diagram is so good, that I would have been happy to just use it except for one thing: the source isn't published, so you can't modify it. I also wanted to be able to keep it up to date with u/ToyKeeper's code. So I created my own...
This is where I intend to store all of my Anduril 2 UI diagrams, and any updates to them. Since ToyKeeper split off the multi-channel version of Anduril 2, I have created two new diagrams for it:
Anduril 2 Multi-Channel Advanced UI (PNG)Anduril 2 Multi-Channel Simple UI (PNG)
Diagrams now hosted on GitHub.
Yeah, it got complicated enough that I could no longer fit the Advanced and Simple UI diagrams on a single page, so I had to split them.
As always, you are free to do whatever you want with these diagrams. I make these for myself, and I'm happy to share them with the community. You can find the source MS Visio file here. Feel free to make your own copy and modify it to your heart's content. The Visio file contains several pages:
Single-Channel - Advanced/Simple UI diagram for the single-channel version of Anduril 2. I still need to update and post it.Multi-Simple - Simple UI diagram for the multi-channel version of Anduril 2.Multi-Advanced - Advanced UI diagram for the multi-channel version of Anduril 2.Diagram Parts - Various bits and pieces that I use in the various UI diagrams.
If you find any errors, please post a comment here. I try to keep the diagrams as accurate and up-to-date as possible, but you know, life happens. Enjoy!
Updates:
- 2023-07-06: Fixed several issues pointed out here. Thanks @lowprofile!
- 2023-07-09: Fixed a few more issues pointed out here. Thanks again @lowprofile! Also trying to get the wording in a few places more inline with the text manual.
- 2023-07-15: Updated for r728 which added channels for red, yellow, green, cyan, blue, purple, and white. Added 4H from ON to Momentary Turbo. Added 3C from Tactical Mode to Next Channel Mode. Several other minor fixes. Huge thanks to @lowprofile for continuing to provide valuable feedback. This multi-channel diagram has been a journey!
- 2023-07-17: Multiple visual enhancements/fixes thanks to @lowprofile. Incremented the version to r732 even though there were no material impacts to the diagram.
- 2023-07-20: Modified the ramp part of the diagram to reflect the default Anduril 2 configuration (2C to Ceiling). Thanks again to @lowprofile for feedback. I also switch from revisions to build dates as suggested by ToyKeeper.
- 2023-07-22: Made several corrections to the Simple UI diagram that I had been neglecting. Also made a slight wording change to the ramp config boxed on the Advanced UI diagram. Thanks to @lowprofile for all corrections. Finally, I incremented the build date to 2023-07-21, although there were no material impacts to the diagrams.
- 2023-08-06: Several cosmetic fixes to the Simple and Advanced UI diagrams thanks to feed back from @lowprofile. Also incremented the build date to 2023-08-04, although there were no material impacts to the diagrams.
- 2023-08-07: Several clarifications thanks to feedback from @lowprofile. Also incremented the build date to 2023-08-07, although there were no material impacts to the diagrams.
- 2023-08-10: Several cosmetic fixes to the Simple and Advanced UI diagrams thanks to feed back from @lowprofile.
- 2023-10-03: I'm embarrassed to admit that I missed an update from the 2023-08-27 release in which "smooth steps" were added (see the Ramp Extras Config). Other than that, there have been no material changes to the diagrams.
- 2023-11-07: I finally got around to making a couple of updates suggested by @lowprofile. In the Strobe Modes on the Advanced UI diagram, you'll notice that 3C allows you to save the channel mode per strobe mode. Very cool!
- 2024-01-01: Last update here on Lemmy. Lemmy is great, but it makes more sense to host the diagrams on GitHub when I can issue diagram releases corresponding with ToyKeeper's Anduril 2 releases. From now on, please access the diagrams there. It's a fairly significant update, so please be sure to read the README.